• Steel Soldiers now has a few new forums, read more about it at: New Munitions Forums!

  • Microsoft MSN, Live, Hotmail, Outlook email users may not be receiving emails. We are working to resolve this issue. Please add support@steelsoldiers.com to your trusted contacts.

M105A2 Recovery

silverstate55

Unemployable
Steel Soldiers Supporter
2,070
868
113
Location
UT
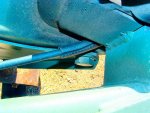
OK, I'm a total idiot....as far as the 3/4-inch round LED marker lights go, when I mentioned that I couldn't figure out how to fit the rectangular connector plug through the 3/4-inch diameter hole drilled for the light to fit through, I just had a Homer Simpson :doh: realization: the rubber grommet around the marker light can be slid down the wiring, so you can install both the marker light and the grommet through the mounting hole separately, then installed from the front with the wiring already through the hole. Good grief....

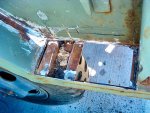
So if you wanted to keep the connector plug for easy light removal/replacement later, you could.

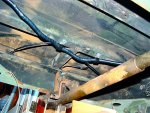
Here's how I wired them and where I ran the wires (in parallel, just soldered the positive [black] lead to the brown wire of the trailer's 4-wire harness and the ground [white] lead to the white wire of the trailer harness):
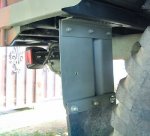
 

Attachments

silverstate55

Unemployable
Steel Soldiers Supporter
2,070
868
113
Location
UT
You can get more info on the these red 3/4-inch LED marker clearance lights from the vendor I bought them from:

R&P Carriages

They have them in many different colors too: amber, green, blue, etc...with lots of chrome trim mounting rings and whatnot. Hope this helps.
 

silverstate55

Unemployable
Steel Soldiers Supporter
2,070
868
113
Location
UT
OK, got a chance to snap some pics and post them here. These are of the first trailer I've completed and registered...this shows the hydraulic brake line around the landing gear, and close-ups of the tongue mounting. I wrapped 3/8-inch fuel line around the brake line to prevent chafing/wear, but I need to secure these pieces with some zip ties to keep them in place.

Each bolt hole (7 total on square tubing) is enlarged so I could fit a piece of steel tubing within, and weld it in place. So that way each bolt hole is reinforced and should help distribute the loads & shocks when in use.
 

Attachments

silverstate55

Unemployable
Steel Soldiers Supporter
2,070
868
113
Location
UT
Did some rust removal today on the second M105A2; got to cut out a panel and remove some other rusty bits. And made a surprising discovery when I removed the rusty panel: the body reinforcement gussets are LOADED with dirt and debris! No wonder this thing is a rustbucket. Now I'm contemplating drilling 3/4-inch holes in the ends of each gusset, flush with the bottom of each gusset, to allow dirt & debris (as well as moisture) to be blown or washed out completely.
 

Attachments

doskiez

New member
42
0
0
Location
Coupland, TX
Those are some nice looking trailers. I just bought one and will soon go a similar route converting it to civi use. Those are actually the lights I was planning on using as well. Thanks for the good ideas.
 

silverstate55

Unemployable
Steel Soldiers Supporter
2,070
868
113
Location
UT
Those are some nice looking trailers. I just bought one and will soon go a similar route converting it to civi use. Those are actually the lights I was planning on using as well. Thanks for the good ideas.
My pleasure, best of luck on your conversion! Be sure to post pics when you do, there's always something that could benefit others (and me!).

Thanks!
 

silverstate55

Unemployable
Steel Soldiers Supporter
2,070
868
113
Location
UT
HOLY MACKEREL, the rust damage is more extensive than I thought!

Just cut out an entire corner this morning before work. I'll replace everything with fresh clean sheet steel and some steel angles for corner reinforcements. I'll weld up everything nice and tight afterwards, taking my time so the sheet metal doesn't overheat and warp.
 

Attachments

silverstate55

Unemployable
Steel Soldiers Supporter
2,070
868
113
Location
UT
Got the rust-cancer area all cleaned out, and about 2 pounds of dirt & debris blown out of the underbody supports. Cut to size repair pieces of 3/16-inch steel sheet and got them welded into place. Now to clean up the vertical side supports and reweld them in place, along with some steel angle on all the 90-degree joints to seal this baby up good.
 

Attachments

silverstate55

Unemployable
Steel Soldiers Supporter
2,070
868
113
Location
UT
Work on these has been stalled due to electrical problems with my Dodge truck...I finally finished up on my truck, so I hope to load these 2 trailers up on my big equipment-hauling trailer so I can take them to the DMV to get titled. That way, by the time I finish these 2 trailers, the titles should be in (4-6 weeks).
 

silverstate55

Unemployable
Steel Soldiers Supporter
2,070
868
113
Location
UT
Finally got to get the first M105 conversion near completion. M16TY was kind enough to sell me some used splash shields off of a truck he was scrapping, and boxed them up nicely to ship to me. I took one of the splash shields, did some measuring, and found that I could quarter it and create smaller splash shields & mud flap mounts for 2 trailers. It was pretty banged up but it hammered flat in no time.

The photos show the process and the finished results. I initially had some shorter mud flaps but when I mounted everything on the trailer, I realized that I needed longer mud flaps. Since the width is a fairly custom 10.25" on each splash shield, I took a full-size truck mud flap I purchased from another SS member and cut two custom flaps from it, each measuring 10" x 14". Looks much better now, and is DOT-compliant. I used 1-1/2" angle steel for the mounting brackets, which were drilled & welded to the trailer body.
 

Attachments

m16ty

Moderator
Moderator
Steel Soldiers Supporter
9,576
210
63
Location
Dickson,TN
Looks great. I never knew them old slash shields I sent you could look so good. :)
 

silverstate55

Unemployable
Steel Soldiers Supporter
2,070
868
113
Location
UT
Looks great. I never knew them old slash shields I sent you could look so good. :)
I know it was a pain in the rear & in your back to package those up & ship them; my UPS driver tries to avoid my house now! :shock:

I just wanted you to know that it was all worth it! Thanks again!
 

Amram

New member
245
0
0
Location
Bremerton, Washington
So I have run into brake issues with my trailer as well. I bled off the air bank on the trailer and left the valve open. Backed the pads off as far as they will go. The thing still feels like a boat anchor behind my deuce. and only one of the drums still gets hot. I have taken the hub and drum off and everything looks intact from what I can tell by reading the TM. Do you guys have any idea?
 

doskiez

New member
42
0
0
Location
Coupland, TX
So I have run into brake issues with my trailer as well. I bled off the air bank on the trailer and left the valve open. Backed the pads off as far as they will go. The thing still feels like a boat anchor behind my deuce. and only one of the drums still gets hot. I have taken the hub and drum off and everything looks intact from what I can tell by reading the TM. Do you guys have any idea?
I would guess bearings since you have backed the break shoes off. You can always pull the shoes off that side and wire the brake pistons up so they don't fall out then reassemble the hub and tow the trailer with the brakes disconnected to see if the hub still gets hot. Do this with an unloaded trailer in a safe area.
 
Top