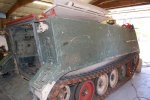
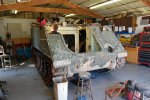
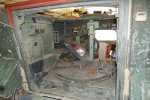
Update 2. Serviced the filters, a little gunk in the bottom of the suction, pleats a bit wavy, indicating water, pressure side was clean, very little debris in the can, mostly this waxy crap. Got it primed, took a bit, but fired it off, let it run and took it for a test drive. Pulled out of the shop, out the gate, left turn on the front road, then, in the same spot, it starts missing and loosing power

. Got it back to the shop, it still ran, but like poop. Installed test gauges and found only 5, maybe, PSI fuel pressure, no restriction showing on the gauge installed in the suction filter inlet. Driptroits use a positive displacement gear pump driven off of the geartrain, simple design, the only thing I can think of is the regulator in the pump. The cap faced down toward the gear housing, so the pump comes off. Get it off, pull the plunger and sho nuff, there is a chunk of something on the plunger where it seats. Clean everything out, put it back together, fire it, fuel pressure comes up, kinda slow, to 40 or so at idle and hangs there. Give it some throttle, 50 psi,
![Thumbs Up [thumbzup] [thumbzup]](https://www.steelsoldiers.com/images/smilies/icon_smile_thumzup.gif)
, got this licked! Done deal, done for the day.
Yesterday, Friday,

I get to work on it, putting it back together and taking care of some loose hardware on the gear case that were the cause of a leak. Gauges are still on it fir it to get it warmed up, pressures look good, back it out of the shop, out the gate, down the road, SAME SPOT the freekin thing starts missing and losing power! look over at the gauges, 5 psi, maybe 6 inches restriction. Get it back to the shop and start thinking. The ONLY thing it can be is the pump. Maybe the regulator spring is weak from no use for all the years of sitting and watered down fuel in it? I make a few calls to friends that have fuel shops, bounce my issues off of them, and all of us agree, restriction or a failed regulator. 6 inches on the gauge, so, I go for the regulator spring. Pull the pump and check the regulator for debris, looks good. Start calling around for a spring, nope, nobody has one. On line, complete kits are 75 bucks. They come with the gears, seals gaskets....one for the regulator port and one for the pump body halves....and the regulator stuff. I want to fix it, not be a parts changer. I know the gear pump works fine, it is a regulated pressure deal, so, there is a power pack out of one of the M551s out back. I went out to it, pulled the pump, it is locked up. Pulled the regulator out of it, a little rust in there, but cleaned up the spring. compare the two springs, and found that the one in the 106 has had 3/8 to 1/2 inch cut off of it

. Put the un cut spring in the pump, put it back together, I am thankful that these are easy pumps to remove! Fire it, pressure climbs to 50 psi and pegs a 60 pound gauge when throttled up! BAM fixed it! Back it out of the shop, out the gate, down the road, it starts missing and loosing power AGAIN! At least this time not in the same spot, it started right when I gave it a foot full of throttle. Look at the gauges, pressure bouncing around between 15 and 20 but the restriction is now at 25 inches. Reverse it back to the shop and start looking at things. Decide to install a pick up line into the second inlet port on the suction filter head and drop it into a jerry can full of fuel. Get that all set up, fire it, no restriction, about peg my 60 pound gauge at idle. Time to find out if it is plumbing or tank issue. Take the line off at the tank shut off valve and connect a clear line to the carrier line, pinch off the test line installed in the filter head. Get things all set up, crank it over, it fires but won't pull fuel into the line, it is sucking the test line empty! Plumbing issue. Trace the lines, they are soft lines out of the tank, plumbed to hard lines along the hull, to some soft line...this is starting to look like a job to find things....to some 45s to turn down into the hull and across the I guess "B" pillar under the engine compartment and into a hard pipe 90 into the engine compartment. Guess what that hard line goes into? A quick disconnect, there's the issue. Pull the line from the disconnect to the suction filter and the short hard line with the female end of the disconnect. Both of the nipples in the fitting had "hair" growing around them. Cleaned the fittings/line out and got about 1/2 teaspoon, maybe a bit more of this orange silicone feeling waxy goop out of them and a chunk of aluminum. Drained some fuel out of the shut off, it came out ok, only a little of the silicone looking stuff at first, then clear. Blew out the carrier line, a mess of stuff came out of that. Looked in the tank, there is small blobs of the orange stuff in there, the drain plug on the rear of the hull is stuck in the bung, I think the same guy that installed the plugs in the suction filter housing installed this one, I couldn't get the plugs out with the correct square plug socket, they just rounded off, ended up replacing the filter head.
Went ahead and re assembled the carrier, fired it, pressures are great, moved it but as soon as there was a demand for fuel, pressure dropped and restriction came up. We need to find a way to clean the tank. I will need to take the quick disconnect out again and clean the fitting and line. Before I left yesterday, We looked for some type of filter we could use to pull the fuel out of the tank, thru the filter and into storage cans. Found a suitable filter and I plumbed it up so we can suck from the bottom hopefully pulling some of the goop out with the fuel. The tank is part of the carrier, unlike the 901 that is removable. I'll also work on removing the bung at the rear of the hull to drain/clean, but it does not sit at the bottom of the tank, it is an inch higher than the bottom of the tank. I also found one of these,
https://www.mcmaster.com/43935k22
I will install this on the outlet of the fuel tank shut off. There is a 20 mesh screen filter in the Y. The screen filters down to around 800 microns, .0300 of an inch. It will be the sacrificial lamb for the fuel system. Easily cleanable and hopefully stop the issue we are having.
This carrier was acquired thru either State Surplus or another Museum 20 plus years ago, nobody remembers. There is a tag stating it was overhauled in 1981 and only 1000 miles or so showing on the ODO. I can't believe all the different issues this is having, from 9 years ago, the fan, wing bearings to all the fuel system issues. I know, sitting is bad for things, but I have seen 30 year old fuel be fine. Why would someone cut a pressure regulator spring? Seems that for everything I find, it causes yet another issue. Oh well, keeps my mind working! Hopefully, next week this track will be better.
No pics, but I will take some next week.


 . Got it back to the shop, it still ran, but like poop. Installed test gauges and found only 5, maybe, PSI fuel pressure, no restriction showing on the gauge installed in the suction filter inlet. Driptroits use a positive displacement gear pump driven off of the geartrain, simple design, the only thing I can think of is the regulator in the pump. The cap faced down toward the gear housing, so the pump comes off. Get it off, pull the plunger and sho nuff, there is a chunk of something on the plunger where it seats. Clean everything out, put it back together, fire it, fuel pressure comes up, kinda slow, to 40 or so at idle and hangs there. Give it some throttle, 50 psi,
  I get to work on it, putting it back together and taking care of some loose hardware on the gear case that were the cause of a leak. Gauges are still on it fir it to get it warmed up, pressures look good, back it out of the shop, out the gate, down the road, SAME SPOT the freekin thing starts missing and losing power! look over at the gauges, 5 psi, maybe 6 inches restriction. Get it back to the shop and start thinking. The ONLY thing it can be is the pump. Maybe the regulator spring is weak from no use for all the years of sitting and watered down fuel in it? I make a few calls to friends that have fuel shops, bounce my issues off of them, and all of us agree, restriction or a failed regulator. 6 inches on the gauge, so, I go for the regulator spring. Pull the pump and check the regulator for debris, looks good. Start calling around for a spring, nope, nobody has one. On line, complete kits are 75 bucks. They come with the gears, seals gaskets....one for the regulator port and one for the pump body halves....and the regulator stuff. I want to fix it, not be a parts changer. I know the gear pump works fine, it is a regulated pressure deal, so, there is a power pack out of one of the M551s out back. I went out to it, pulled the pump, it is locked up. Pulled the regulator out of it, a little rust in there, but cleaned up the spring. compare the two springs, and found that the one in the 106 has had 3/8 to 1/2 inch cut off of it