• Steel Soldiers now has a few new forums, read more about it at: New Munitions Forums!

  • Microsoft MSN, Live, Hotmail, Outlook email users may not be receiving emails. We are working to resolve this issue. Please add support@steelsoldiers.com to your trusted contacts.


M1078A1 cab and chassis electrical upgrades including AC

hike

—realizing each day
Steel Soldiers Supporter
345
499
63
Location
Texas Hill Country
Flux capacitors! Also, if you go over 88mph in your 1078 you will time travel, or at least feel
Like you are! 😳

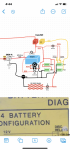
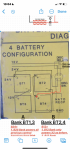
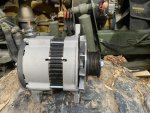
I like the idea of the victron doing all the 12v Power tasks in your diagram. If I ultimately drop the dual voltage alt, then I'll do this too, and just have a 12v battery bank (2) to back up the victrons. Pretty easy alteration. There not much 12v load in my 1078 truck.

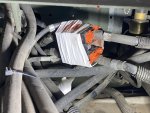
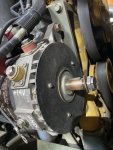
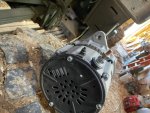
I've deleted the lbcd entirely and pulled the control cable from the disconnect. Aside from my continuous 14v leg high volt issue, which is looking like a ground connections issue more and more, I've not had a shutdown obviously since the dang thing isn't in there. I drove 400 miles without it and felt relief. Odd concept, that lbcd, since the batteries are also "capacitors" from an electrical sense, and very large ones. Why "save" and alt from overload and then risk blowing the trans computer in the process? When I had the 14v ovco on the alt and it shut down, the electrical system just went back to 25v and 12.5v off the batts and stayed there. I wonder how far I could drive with the 12v stuff all off on just 4 full batteries?

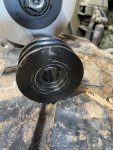
I suppose adding the lbcd back in there passively , just to have the caps back, is an added layer of "transient" (per neihoff) protection but idk where a transient would come from if there's no disconnection from load. Seems like it's just horse feathers. But Mine is still sitting on the bench and It rings out 100% per the neihoff static testing guide so if someone wants a free, used, homeless lbcd, they're welcomed to it😊. I have a box and packing paper all ready to go.
We received a 24v 200a alternator and if I wasn't so busy working the dual voltage one would be out and bracket mods begun. I am wondering if the alternator shaft sizes will match, though am expecting I'll need another serpentine belt pulley for the new alternator before we can complete the swap. Soon I am hoping to have a used working homeless 12v/24v alternator, LBCD, and barely used auto disconnect—
 

MatthewWBailey

Father, Husband and Barn Hermit
Steel Soldiers Supporter
358
859
93
Location
Mesa, Colorado
We received a 24v 200a alternator and if I wasn't so busy working the dual voltage one would be out and bracket mods begun. I am wondering if the alternator shaft sizes will match, though am expecting I'll need another serpentine belt pulley for the new alternator before we can complete the swap. Soon I am hoping to have a used working homeless 12v/24v alternator, LBCD, and barely used auto disconnect—
That's my question as well (pulley).
 

hike

—realizing each day
Steel Soldiers Supporter
345
499
63
Location
Texas Hill Country
Pulley arrived yesterday. Today we modified the mount and made an upper bracket.

IMG_3995.jpeg

IMG_4001.jpeg

[edit: added a 1-1/8" spacer to fill the gap behind the forward eye. You can see it painted yellow below in post 27]

IMG_4003.jpeg

IMG_4002.jpeg

Tomorrow we'll reinstall the modified mount and new bracket, pull the LBCD and remote battery disconnect relays, essentially the first battery bank wiring in post 19.

No more Niehoff dual alternator.

IMG_4007.jpeg

Hopefully, we are on the right path—
 
Last edited:

MatthewWBailey

Father, Husband and Barn Hermit
Steel Soldiers Supporter
358
859
93
Location
Mesa, Colorado
Pulley arrived yesterday. Today we modified the mount and made an upper bracket.

View attachment 916827

View attachment 916828

View attachment 916830

View attachment 916829

Tomorrow we'll reinstall the modified mount and new bracket, pull the LBCD and remote battery disconnect relays, essentially the first battery bank wiring in post 19.

No more Niehoff dual alternator.

View attachment 916831

Hopefully, we are on the right path—
What's the pulley part#? I'll probably need that for my cots Cat alt.
 

hike

—realizing each day
Steel Soldiers Supporter
345
499
63
Location
Texas Hill Country
What's the pulley part#? I'll probably need that for my cots Cat alt.
The particular pulley depends upon the size of the alternator shaft and retention method: key, locking bolt, friction; matching the belt size and outer diameter, (assuming the new alternator requires the same rpm range to operate).

We have a serpentine 8 groove belt, with a ~3" od pulley. Our new alternator has a smooth 7/8" shaft, If I recall the tables say the Niehoff has a 5/8" shaft with a keyway. I didn't remove the pulley off our Niehoff, assuming that if I keep as a spare or find it a new home having the pulley still on would be best.

Lots of internet shops have pulleys of many flavors. We found one with our characteristics at https://alternatorparts.com/, though for no other reason than they had what I needed in stock for reasonable price.

The harder part is making sure the modded bracket aligns the pulley correctly with the serpentine belt. Hopefully we'll have that right when we go to mount it up later today. Fingers crossed—
 
Last edited:

MatthewWBailey

Father, Husband and Barn Hermit
Steel Soldiers Supporter
358
859
93
Location
Mesa, Colorado
The particular pulley depends upon the size of the alternator shaft and retention method: key, locking bolt, friction; matching the belt size and outer diameter, (assuming the new alternator requires the same rpm range to operate).

We have a serpentine 8 groove belt, with a ~3" od pulley. Our new alternator has a smooth 7/8" shaft, If I recall the tables say the Niehoff has a 5/8" shaft with a keyway. I didn't remove the pulley off our Niehoff, assuming that if I keep as a spare or find it a new home having the pulley still on would be best.

Lots of internet shops have pulleys of many flavors. We found one with our characteristics at https://alternatorparts.com/, though for no other reason than they had what I needed in stock for reasonable price.

The harder part is making sure the modded bracket aligns the pulley correctly with the serpentine belt. Hopefully we'll have that right when we go to mount it up later today. Fingers crossed—
That site is nice. I should be able to match up a pulley to my cat alt.
 

hike

—realizing each day
Steel Soldiers Supporter
345
499
63
Location
Texas Hill Country
We were able finish up installing the new 24v 200a alternator; removed the 3-12v lines: from batteries to manual disconnect, remote battery disconnect relays to LBCD, LBCD to alternator; reattached the 24v lines at the LBCD all to 24v bat, nothing attached to the other three leads, though left the cannon plug; left the excite and ac wires disconnected, though in place, though will pull them off the truck another day.

IMG_4009.jpeg

IMG_4014.jpeg

IMG_4015.jpeg

IMG_4016.jpeg

Plenty of room without modding the shock towers in the A1.

[Edit: I realized this evening that wiring this way keeps the manual disconnect next to the battery box between the batteries and the alternator, and allows an undisconnected path between the alternator and PDP. Not good, nor my intention. I'll have to create the new full length wire runs: manual disconnect to PDP; batteries to alternator sooner than later. Then we can pull the LBCD out of the middle. I supose in the meantime I could reconnect the PDP feed to the LBCD 24v load terminal keeping the capacitors in the mix for a bit longer?]

Interestingly, the remote start in the engine bay still works, I was thinking that was a part of wire 1008 off the remote battery disconnect relays. Still learning and trying new things.

We haven't road tested her as yet, though she was holding 28.05v at the alternator steady. Looking forward to finishing the hydraulic kneeling delete tomorrow to button her up for drive about.

I couldn't have gotten here without all the constructive comments you all bring to the forum. Thank you for your help–
 
Last edited:

hike

—realizing each day
Steel Soldiers Supporter
345
499
63
Location
Texas Hill Country
That site is nice. I should be able to match up a pulley to my cat alt.
I saw your CAT alternator has a 7/8" shaft, like our Prestolite unit. We used the alternatorparts.com part #247750 - Pulley, 8-Groove Serpentine, For Delco Alternators.

That pulley does have a key way, though reading through their
help section and 8 groove serpentine page it appeared to be our best choice. You may need/find another; I'd be interested to know what works for your application, too–
 

MatthewWBailey

Father, Husband and Barn Hermit
Steel Soldiers Supporter
358
859
93
Location
Mesa, Colorado
I saw your CAT alternator has a 7/8" shaft, like our Prestolite unit. We used the alternatorparts.com part #247750 - Pulley, 8-Groove Serpentine, For Delco Alternators.

That pulley does have a key way, though reading through their
help section and 8 groove serpentine page it appeared to be our best choice. You may need/find another; I'd be interested to know what works for your application, too–
The new cat alt I have has a factory 2 shive pulley on it. I took it off and it's a smooth shaft but the pulley also has a Keyway. Probably just dual purpose?

that install looks real nice. I'm going to copy your photos lol!

on the disco, isn't that thing already between the alt and batts? I didn't think of it until now. I was going to keep a 12v only batt in the box and have it powered/charged off the 24/12v victrons from 24v ignition X3. (I'm going with 2 parallel 20a units). That way I still have lights on 12v battery if the trucks off without powering up the victrons. But now I'm wondering if I should run new cable runs to the disco from the alt like you're saying.

I think once there's an undisconnected path like @Ronmar said, then there's no need for capacitors to catch Surges since the batteries do it better.
 

hike

—realizing each day
Steel Soldiers Supporter
345
499
63
Location
Texas Hill Country
The new cat alt I have has a factory 2 shive pulley on it. I took it off and it's a smooth shaft but the pulley also has a Keyway. Probably just dual purpose?

that install looks real nice. I'm going to copy your photos lol!

on the disco, isn't that thing already between the alt and batts? I didn't think of it until now. I was going to keep a 12v only batt in the box and have it powered/charged off the 24/12v victrons from 24v ignition X3. (I'm going with 2 parallel 20a units). That way I still have lights on 12v battery if the trucks off without powering up the victrons. But now I'm wondering if I should run new cable runs to the disco from the alt like you're saying.

I think once there's an undisconnected path like @Ronmar said, then there's no need for capacitors to catch Surges since the batteries do it better.
Right, the battery disconnect relays on the A1 trucks is next to the manual disconnect. The wiring to the alternator runs from relays to LBCD to alternator. @Ronmar is who pointed out if removing the LBCD, then the battery disconnect relays needed to go as well. The batteries become the load sink.

I wanted to test everything before replacing all the wiring, but with the existing wiring between batteries, alternator and load (except starter) going through the LBCD I didn't have enough length separate everything as desired. As long as we don't turn off the manual disconnect while the alternator is under a big load we can finish testing the system for now and add the needed lengths soon to finish everything up.

I have a bunch of aught wire left from running power to our garage, though I think the big wires on the truck are 4/0. Looking at wire sizing 25' @24v 200a would require 4/0 wire. The existing runs do look quite a bit bigger.

IMG_4017.jpeg

Question: if you have the Victron 24/12v what is the 12v battery for? And why run 12v all the way back from the PDP to it?

We have a Victron 24/12 70a mounted to the footkick under the PDP and have for some time. It runs everything well on the cab and chassis feeding 12v to x2 at the PDP—
 
Last edited:

MatthewWBailey

Father, Husband and Barn Hermit
Steel Soldiers Supporter
358
859
93
Location
Mesa, Colorado
Right, the battery disconnect relays on the A1 trucks is next to the manual disconnect. The wiring to the alternator runs from relays to LBCD to alternator. @Ronmar is who pointed out if removing the LBCD, then the battery disconnect relays needed to go as well. The batteries become the load sink.

I wanted to test everything before replacing all the wiring, but with the existing wiring between batteries, alternator and load (except starter) going through the LBCD I didn't have enough length separate everything as desired. As long as we don't turn off the manual disconnect while the alternator is under a big load we can finish testing the system for now and add the needed lengths soon to finish everything up.

I have a bunch of aught wire left from running power to our garage, though I think the big wires on the truck are 4/0. Looking at wire sizing 25' @24v 200a would require 4/0 wire. The existing runs do look quite a bit bigger.

View attachment 916998

Question: if you have the Victron 24/12v what is the 12v battery for? And why run 12v all the way back from the PDP to it?

We have a Victron 24/12 70a mounted to the footkick under the PDP and have for some time. It runs everything well on the cab and chassis feeding 12v to x2 at the PDP—
Answer: I wanted to have some extra redundancy while driving. So with 2 x 20a victrons in parallel, 1 failing won't drop my lights. Also, if I lose both, the battery will backup the lights. The victrons will power from 24v ignition so will only "charge" batteries if the ignition is on and the 2 wire permissive is on. (I could also use the Bluetooth feature for that but that's too much to remember for me). The wire is already there from the PDP thru the old lbcd location. Only the 12v lead from the alt needs to be removed.

I'll probably pull 1 of the 4 batteries and simply have 2 in series for 24v and a single 12v to run that side. See diagram. I'm on the fence on the manual disco. Nice to have that as a safety function and to defeat vampire loads when the truck sits for a month. I might just put one of my LOTO locks on it to lock it ON. My lbcd is already gone and the leads bolted together but I still have to pull the relay pack. Those are unnecessary connections just waiting to corrode on me.
 

Attachments

Last edited:

MatthewWBailey

Father, Husband and Barn Hermit
Steel Soldiers Supporter
358
859
93
Location
Mesa, Colorado
I saw your CAT alternator has a 7/8" shaft, like our Prestolite unit. We used the alternatorparts.com part #247750 - Pulley, 8-Groove Serpentine, For Delco Alternators.

That pulley does have a key way, though reading through their
help section and 8 groove serpentine page it appeared to be our best choice. You may need/find another; I'd be interested to know what works for your application, too–
I pulled the neihoff pulley and it fits fine on the cat alternator. The supplied pulley with the cat had a keyway but the alt shaft is smooth. Both cat and neihoff alts are 0.875 exactly on the calipers. Seems peachy. Now I have to copy your mounting pics! There's less tolerance for misalignment than yours since the pulley is right up against the fan disc. It's gotta be straight anyway so I just gotta make it right.
 

Attachments

hike

—realizing each day
Steel Soldiers Supporter
345
499
63
Location
Texas Hill Country
I pulled the neihoff pulley and it fits fine on the cat alternator. The supplied pulley with the cat had a keyway but the alt shaft is smooth. Both cat and neihoff alts are 0.875 exactly on the calipers. Seems peachy. Now I have to copy your mounting pics! There's less tolerance for misalignment than yours since the pulley is right up against the fan disc. It's gotta be straight anyway so I just gotta make it right.
You could add a 7/8" grade 8 split ring washer to add a small gap between fan plate and pulley?

Before we pulled the mount off we measured the distance from the front mount edge where the forward lower ear sits against it to the alignment of the serpentine belt. Then as a double check we aligned the new alternator with old alternator pulley to pulley then measured the difference between the forward ears. These measurements were consistent and that is the size of the spacer we made from a 1/2" id thick wall 2" spacer from Tractor Supply cut down to our measurements. It looks right, we'll see how long the belt lasts.

Good luck—
 
Last edited:

MatthewWBailey

Father, Husband and Barn Hermit
Steel Soldiers Supporter
358
859
93
Location
Mesa, Colorado
You could add a 7/8" grade 8 split ring washer to add a small gap between fan plate and pulley?

Before we pulled the mount off we measured the distance from the front mount edge where the forward lower ear sits against it to the alignment of the serpentine belt. Then as a double check we aligned the new alternator with old alternator pulley to pulley then measured the difference between the forward ears. These measurements were consistent and that is the size of the spacer we made from a 1/2" id thick wall 2" spacer from Tractor Supply cut down to our measurements. It looks right, we'll see how long the belt lasts.

Good luck—
I was wondering how to measure that. That's perfect. This'll be cool if it works. Off the shelf parts!

On the pulley, I'm going to check how close the belt is on the existing alt that's on my cat loader. Might be fine. The shaft engagement is 1-1/8" on the pulley so I guess I could have a spacer there.
 

hike

—realizing each day
Steel Soldiers Supporter
345
499
63
Location
Texas Hill Country
The other location we measured was the distance the pulley was off the mount, perpendicular, to keep the belt tension similar. That made the cutout for the rear ear angled more deeply into the mount than I expected—
 

hike

—realizing each day
Steel Soldiers Supporter
345
499
63
Location
Texas Hill Country
Removed the LBCD; removed the remote battery disconnect relays; reused the existing wires to directly connect batteries to the alternator and manual disconnect to X1 at PDP and starter. Used gel connections to replace the connections at the LBCD location,

IMG_4062.jpeg

IMG_4066.jpeg

IMG_4068.jpeg

Next step: install the 24v AC, separate the batteries into 2-banks of 2 in series, connected by the battery combiner (Cyrix 220a). One bank for the cab and chassis; the other for the AC and added accessories—
 
Last edited:

MatthewWBailey

Father, Husband and Barn Hermit
Steel Soldiers Supporter
358
859
93
Location
Mesa, Colorado
Removed the LBCD; removed the remote battery disconnect relays; reused the existing wires to directly connect batteries to the alternator and manual disconnect to X1 at PDP. Used gel connections to replace the connections at the LBCD location,

View attachment 918683

View attachment 918684

View attachment 918685

Next step: install the 24v AC, separate the batteries into 2-banks of 2 in series, connected by the battery combiner (Cyrix 220a). One bank for the cab and chassis; the other for the AC and added accessories—
Nice. What brand are those gel connections?
 

hike

—realizing each day
Steel Soldiers Supporter
345
499
63
Location
Texas Hill Country
Free shipping to our local home depot. Didn't use the bus connection in the odd chance we have to go back. Added the wire ties as insurance.

IMG_3365.jpeg

IMG_3364.jpeg

I think they were about $25 each, hopefully they will hold up well—
 

Ronmar

Well-known member
3,269
6,612
113
Location
Port angeles wa
Yep, have done the same type splice using the splice block wrapped in self-vulcanizing rubber tape(fuses into a single piece of rubber when it comes in contact with itself) and scotchkote. Makes a very durable connection. The gel pocket sealing the connection, protected by the plastic case should last a long time. The only concern might be the screw terminals loosening their hold on the wire over time with vibration applied…
 

MatthewWBailey

Father, Husband and Barn Hermit
Steel Soldiers Supporter
358
859
93
Location
Mesa, Colorado
Yep, have done the same type splice using the splice block wrapped in self-vulcanizing rubber tape(fuses into a single piece of rubber when it comes in contact with itself) and scotchkote. Makes a very durable connection. The gel pocket sealing the connection, protected by the plastic case should last a long time. The only concern might be the screw terminals loosening their hold on the wire over time with vibration applied…
I think the fact that they're floating in air will neutralize any vibration effects.
 
Top
AdBlock Detected

We get it, advertisements are annoying!

Sure, ad-blocking software does a great job at blocking ads, but it also blocks useful features of our website like our supporting vendors. Their ads help keep Steel Soldiers going. Please consider disabling your ad blockers for the site. Thanks!

I've Disabled AdBlock
No Thanks