• Steel Soldiers now has a few new forums, read more about it at: New Munitions Forums!

  • Microsoft MSN, Live, Hotmail, Outlook email users may not be receiving emails. We are working to resolve this issue. Please add support@steelsoldiers.com to your trusted contacts.


M1081 Injectors

NDT

Well-known member
Steel Soldiers Supporter
10,107
5,714
113
Location
Camp Wood/LC, TX
Army took care of that one as opposed to most 1081s. I would run some diesel conditioner though it before I messed with the cat. Mine smoke a little too when you get on them hard.
Does yours still have the turret ring installed?
 

Shbennett1985

Member
21
28
13
Location
Carthage nc
Army took care of that one as opposed to most 1081s. I would run some diesel conditioner though it before I messed with the cat. Mine smoke a little too when you get on them hard.
Does yours still have the turret ring installed?
Yes still has the turret ring. Thought it had a cap but it’s duct taped...

also all the fluids were drained...just a heads up.
 

Ronmar

Well-known member
3,188
6,480
113
Location
Port angeles wa
As mentioned, conditioner and some fresh fuel... the fuel in mine looked OK, but smelled weird(storage additive, biobor ect). Only ran it on that long enough to load it, and refilled with fresh diesel at first opportunity...
 

Shbennett1985

Member
21
28
13
Location
Carthage nc
As mentioned, conditioner and some fresh fuel... the fuel in mine looked OK, but smelled weird(storage additive, biobor ect). Only ran it on that long enough to load it, and refilled with fresh diesel at first opportunity...
Yeah mine was dead empty on fuel. Had to prime the fuel system. The fuel supply line from water separator to pump is dry rotted and leaking.
 

Ronmar

Well-known member
3,188
6,480
113
Location
Port angeles wa
Does the primer bulb get firm when you pump it? If not, you are still inducing air someplace, the flapper bypass check is clogged/stuck open, or your pressure regulator has issues.

Have you checked the primary fuel pressure? There is a T and a pipe plug on the forward side of the secondary fuel filter where you can test it.
should be about 20PSI at idle and ramp up to 60 PSI at RPM...

Do you have an IR thermometer? Measure the ex manifold temps as close to each exhaust port as you can shoot them to look for differences..
 

Ronmar

Well-known member
3,188
6,480
113
Location
Port angeles wa
1. The primer bulb does get firm
2. Fuel pressure is 20 idle 60psi when rev
3. Exhaust manifold temps:
1 197
2 265
3 371
4 355
5 297
6 217
Here is a pic of where I tested.
The problem with measuring where shown is you are seeing heat from 2 different cylinders at that point. You want to measure up near the edge of a flange like in this pic, right alongside the cylinder port so you are only mostly seeing the heat from just that one cylinder... start with the sensor reading the head then slide the sensor window up onto the flange To where the temp peaks.

On mine #1 and 2 were a little different than the rest. When I got in to check valve clearance I also checked injector timing(easy test) and found 1&2 were off at the edge of spec. When I reset them to match the others in spec, the 1&2 temps came back in line with the rest of the cylinders... I haven’t checked/set fuel or sync on the injectors/rack yet(way more involved procedure).


35CF53E6-A92D-4DA0-B6FC-19F9B2ED4874.jpeg
 

Shbennett1985

Member
21
28
13
Location
Carthage nc
Thank you very much for the help. Yes, I’ve watch some of the videos on injector sync and it looks a bit more in depth than I have time to work on it.
Did you have to get special tooling to check injector timing?
 

Ronmar

Well-known member
3,188
6,480
113
Location
Port angeles wa
Thank you very much for the help. Yes, I’ve watch some of the videos on injector sync and it looks a bit more in depth than I have time to work on it.
Did you have to get special tooling to check injector timing?
No, you don’t need any special tools for injector height/timing, just a vernier caliper with a depth probe like in this picture.

In fact, you don’t need any special tools to do the whole process if you remove the intake plenum to expose the top of the cylinder head. Then a simple dial indicator on a magnetic or clamped base can reach the end of each injector rack directly. They are not particularly precise measurements so even a low end dial indicator is plenty precise to do the job. With the deck exposed you could even hook up 2 or 3 dial indicators at a time... My house project is drawing to a close, so I will then have time to do a video on how to do this without the cat tools eventually...

If I did it every day, I would want the special tools, but for a very infrequent task a little extra work doesnt bother me compared to the cost of the cat tools.


D31FC8F9-D805-4A4F-810A-A0630E7D6D35.jpeg
 

Shbennett1985

Member
21
28
13
Location
Carthage nc
I dropped the truck of today at a local diesel mechanic just to get an opinion. If he thinks it needs timing, I may try to do it myself. Re shot exhaust temps at flange
1 152
2 228
3 255
4 225
5 181
6 131
I really would like to do it myself. The engine sounds like it has a fuel knock and is dumping unburnt fuel. It’s especially bad when going up an incline. Can only reach about 40 mph on flat ground. I’m wondering if during the front plate replacement something
could have gotten out of time and making it run bad.

Here is another pic of the truck. It’s clean and I love it, just anxious to get it running right.
 

Attachments

Last edited:

Ronmar

Well-known member
3,188
6,480
113
Location
Port angeles wa
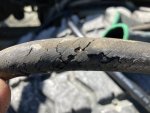
Im not sure now that you mention it. Does this photo help? View attachment 830684
That bare aluminum is the timing case, the cover is the thin yellow plate that is on the front...

I think you pull the cam, or at least the cam gear to change out that case, and to pull the cam you need to pull all the rockers and pushrods up top. Could be they got things mixed up, or didn’t set the valves and injector height/timing correctly. Have you ever adjusted valves on an engine? If so, this is a fairly simple task, wrench, feeler gauges and screwdriver... And you add the vernier caliper to set the injector height. The height spec is on a label on top of the valve cover.

You roll the crank by hand using a wrench on the alternator pulley bolt. You rotate it till it stops against a bolt/pin inserted into the flywheel case under the starter, then adjust half the valves and half the injectors, then you pull the pin out. Roll the engine over a little by hand and re-insert the pin and roll it the rest of 180 degrees till it again stops on the pin. Then you adjust the remaining valves and injectors, takes about an hour.

The procedures are in the tech manuals, have you downloaded them from this site?

Since they pulled the cam, I would pull that front cover and confirm the timing marks on crank and cam line up properly, and that the whole cam isn’t out of wack...

also you need to look in the area I circled in your pic. There should be a bracket that attaches from the lower power steering mount bolt back to the engine block. This helps support the compressor and power steering weight to help keep it from cracking that case that they replaced...

3963C6B0-A258-49E2-A00A-149F0976C89D.jpeg
 
Top
AdBlock Detected

We get it, advertisements are annoying!

Sure, ad-blocking software does a great job at blocking ads, but it also blocks useful features of our website like our supporting vendors. Their ads help keep Steel Soldiers going. Please consider disabling your ad blockers for the site. Thanks!

I've Disabled AdBlock
No Thanks