- 673
- 895
- 93
- Location
- SW Va, Roanoke County
Loving your work, subscribed
Steel Soldiers now has a few new forums, read more about it at: New Munitions Forums!


since your building your own camper box..... why not design in a trap door (and framing below) that allows for tranny access? Ton easier than removing camper box.....
Camper will be de-mountable, but definitely not convenient. If anything mechanically catastrophic happens, that is the plan.
....
Chris
Sounds like you have put a lot of thought into your design. Please feel that any comment by me is meant to be collaborative and adding perspectives from outside. Feel free to steal any idea or reject anything I say.I hunted for a while regarding where to place that fixed mount for exactly the reasons you mention, although I was more worried about inducing issues with the chassis than the cabin (I think I spec'd the cabin construction to be stout enough that it would ride out any issues). I have positioned the lower rail to chassis forward fixing plate right at the end of the chassis reinforcements and it will pick up the two forward holes used for the transmission mount. In this respect, the fixing plate will bridge the last chassis reinforcement bolts for the interior plate to just the frame element. The exterior OE reinforcement ends just aft of where I am planning to attach my plate. I think this is an acceptable solution but still open to suggestions.
Camper will be de-mountable, but definitely not convenient. If anything mechanically catastrophic happens, that is the plan.
I forget the exact numbers for displacement, but it was somewhere around 6 inches. With the spring rates chosen, the forces ramp up pretty quickly to match the neighborhood of the expected weight for the camper, so I figure that was a good place to start. If it's too stiff or too floppy, the springs are easily swappable.
And quite frankly, I love the idea of a panhard bar for lateral control. That seems so much more elegant and appropriate than the catch fence concept. I'm not above stealing that idea. Should be totally reasonable to incorporate (famous last words!).
Thanks for your thorough review of what I'm up to. I appreciate the extra eyes looking for pitfalls.
Chris
I have thought quite a bit about it but I still understand that I don't know everything. I genuinely appreciate the peer review feedback and will happily steal ideas where I see them!Sounds like you have put a lot of thought into your design. Please feel that any comment by me is meant to be collaborative and adding perspectives from outside. Feel free to steal any idea or reject anything I say.
It will be a mix of 2x3x.120 and 2x2 in both .120 and .080. The 2x3 stuff will be in the floor for the most part and the 2x2 for the remainder. I went with steel because it's something I am familiar with and can work with comfortably. And also for budgetary considerations....How is the cabin being constructed?
I'm planning on adhesive backed rubber, but I also know that may not be up to the task. I have other thoughts for plan B but am sticking with plan A until it fails.When I was looking at doing a rail on rail design, I planned to place PE or HDPE plates between the rails and then attaching them to the subframe with bolts into bracket on the side (that way I can never pinch a bolt head).
Based on a few discussions I had with a camper builder, he estimated our trucks need a lot more than 6” of travel. I was getting 16” from his estimates.
So am I. That has been part of a plan for a while, but need to work out logistics. Maybe not 10k but something... I want to see what the subframe does before I construct the box on it, but I hadn't thought about removing the springs. Would be an interesting exercise.I am really curious what you would see if you put 10,000 lbs on your frame and articulated your suspension. It may be worth loading it up with weight and no springs, and see what the free travel gives you.
Did you start a build thread? I am always interested in seeing others' work.I am months behind you on my build. I am scabbing on a few more feet of frame I stole off of a 1078A1R. Adding the whole rear clip to mine so I get the extendable hitch.


Looking at what I wrote earlier, it may be misleading. I plan on doing exactly that. The "remove the box" option was for something truly catastrophic.since your building your own camper box..... why not design in a trap door (and framing below) that allows for tranny access? Ton easier than removing camper box.
Am hoping to put my former ambulance box down as close to truck chassis as possible.... thus I'll be cutting out floor and re-framing that area. adding raised floor to go over tranny there. Im hoping roof structure is in good place above to actually add a point to hook a chain hoist too. So can not only access tranny.... but also unbolt and lower it down from there too.


Looks great!
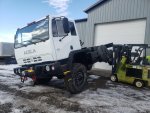
Is that the upper frame rail of a 1083?
Reason I ask, is it is mounted upside down from what is on the stock 1083. I don’t think that matters in your case, but it is just something I noticed.
With the steel camper frame, you should have no problems with torsion.
Sent from my iPhone using Tapatalk


Your water and waste tanks going to be internal?
Have you thought about putting all your tanks pumps batteries inverter and such under your bed and put hinge top lids over them out of 3/4 for the mattress to lay on with a grill facing into living area for room temp air to flow thru and around in the winter ? You could bury the black water tank down in the frame rails if you pour some antifreze in each tank full but place the dump valve where you can reach it when time to hook up hose and dump you can put a manual or a 12 volt dump valve they are not very expensive both will require a small amount of maintenance o-rings seals and such so give your self room.That's the plan. Hope to get them in the sub-floor space over the axles. Would like to locate the batteries in the same neighborhood as well but will see where we end up for space.
Are you going Lithium or AGM batteries?That's the plan. Hope to get them in the sub-floor space over the axles. Would like to locate the batteries in the same neighborhood as well but will see where we end up for space.
