Are you going to seal that plywood with a sealer like polureathane to seal it forever or it will be a spoungeI am floored with my progress!!


Thinking about a side hustle renting it out as a mobile dance hall. It's HUGE!
The punchlist before we can "use" it:
- panel in the back
- seal up stairwell
- install accordion seal or at least the camper side cover plate over the passthrough
- make a motor/trans hatch cover
That should actually get us into the woods. With a little more time, should be able to pull that off before the end of the year.
-
Steel Soldiers now has a few new forums, read more about it at: New Munitions Forums!

M1088 camper conversion
- Thread starter ckouba
- Start date

More options
Who Replied?Yes.Are you going to seal that plywood with a sealer like polureathane...
Truth be told, the floor is only in temporarily. It's got a dozen screws holding it in presently. I have plumbing and wiring to run, for which I've done zero planning and I know I will need to get it stuck under there. During that process, the plywood will be removed and sealed.
I've been so focused on getting a box built and paneled that I haven't thought about any of the systems layouts and such. My primary objective has been to get a box in which to validate the configuration we have chosen, so next steps will also involve mocking in the interior and giving it a try. Definitely need to start thinking about systems though, and start figuring out what components will be used and where they are going.
The floor covering the opening for the trans is now built and the only remaining section to build is the first ~6" up front. Over the past week I got the plywood sealed with urethane and started working on the mechanism to open the rear doors so I can panel them up. This did not go well- I think one of the latches was actually broken, so I basically wasted a day and change chasing a problem which wouldn't be solved with the parts on hand. Unfortunately I am beyond the opportunity to return them so have ordered replacement parts.
For positive progress, the door is installed! This was pretty painless and went well. It is starting to look and feel like a real camper.
As additional progress, I got the kayak loading opening built, including its closure panel, and glued and screwed in the last of the major pieces of paneling to enclose the habitat. The good news is that I can still get a 4x8 sheet of plywood through the door as well!
For you visual learners, the kayak door:

Let's see if they fit through the opening:

Looking good from the inside!

Next up is covering the corners and butt joints of the sheeting with the alu angle/flat to complete the sealing of the skin. I hope to get through this over the coming week, but that may be a bit ambitious. Once this is done, a trip will be made!
For positive progress, the door is installed! This was pretty painless and went well. It is starting to look and feel like a real camper.
As additional progress, I got the kayak loading opening built, including its closure panel, and glued and screwed in the last of the major pieces of paneling to enclose the habitat. The good news is that I can still get a 4x8 sheet of plywood through the door as well!
For you visual learners, the kayak door:
Let's see if they fit through the opening:
Looking good from the inside!
Next up is covering the corners and butt joints of the sheeting with the alu angle/flat to complete the sealing of the skin. I hope to get through this over the coming week, but that may be a bit ambitious. Once this is done, a trip will be made!
ramdough
Well-known member
- 1,554
- 1,731
- 113
- Location
- Austin, Texas
Campable is a major milestone! Keep up the good work.The floor covering the opening for the trans is now built and the only remaining section to build is the first ~6" up front. Over the past week I got the plywood sealed with urethane and started working on the mechanism to open the rear doors so I can panel them up. This did not go well- I think one of the latches was actually broken, so I basically wasted a day and change chasing a problem which wouldn't be solved with the parts on hand. Unfortunately I am beyond the opportunity to return them so have ordered replacement parts.
For positive progress, the door is installed! This was pretty painless and went well. It is starting to look and feel like a real camper.
As additional progress, I got the kayak loading opening built, including its closure panel, and glued and screwed in the last of the major pieces of paneling to enclose the habitat. The good news is that I can still get a 4x8 sheet of plywood through the door as well!
For you visual learners, the kayak door:
Let's see if they fit through the opening:
Looking good from the inside!
Next up is covering the corners and butt joints of the sheeting with the alu angle/flat to complete the sealing of the skin. I hope to get through this over the coming week, but that may be a bit ambitious. Once this is done, a trip will be made!
Sent from my iPhone using Tapatalk
Got my end pieces made:

Have the angle to cap all the seams off as well. Have started working on removing all the screws which will be covered by the angle and pulling off all the protective plastic film. It's starting to really come together!
Have the angle to cap all the seams off as well. Have started working on removing all the screws which will be covered by the angle and pulling off all the protective plastic film. It's starting to really come together!
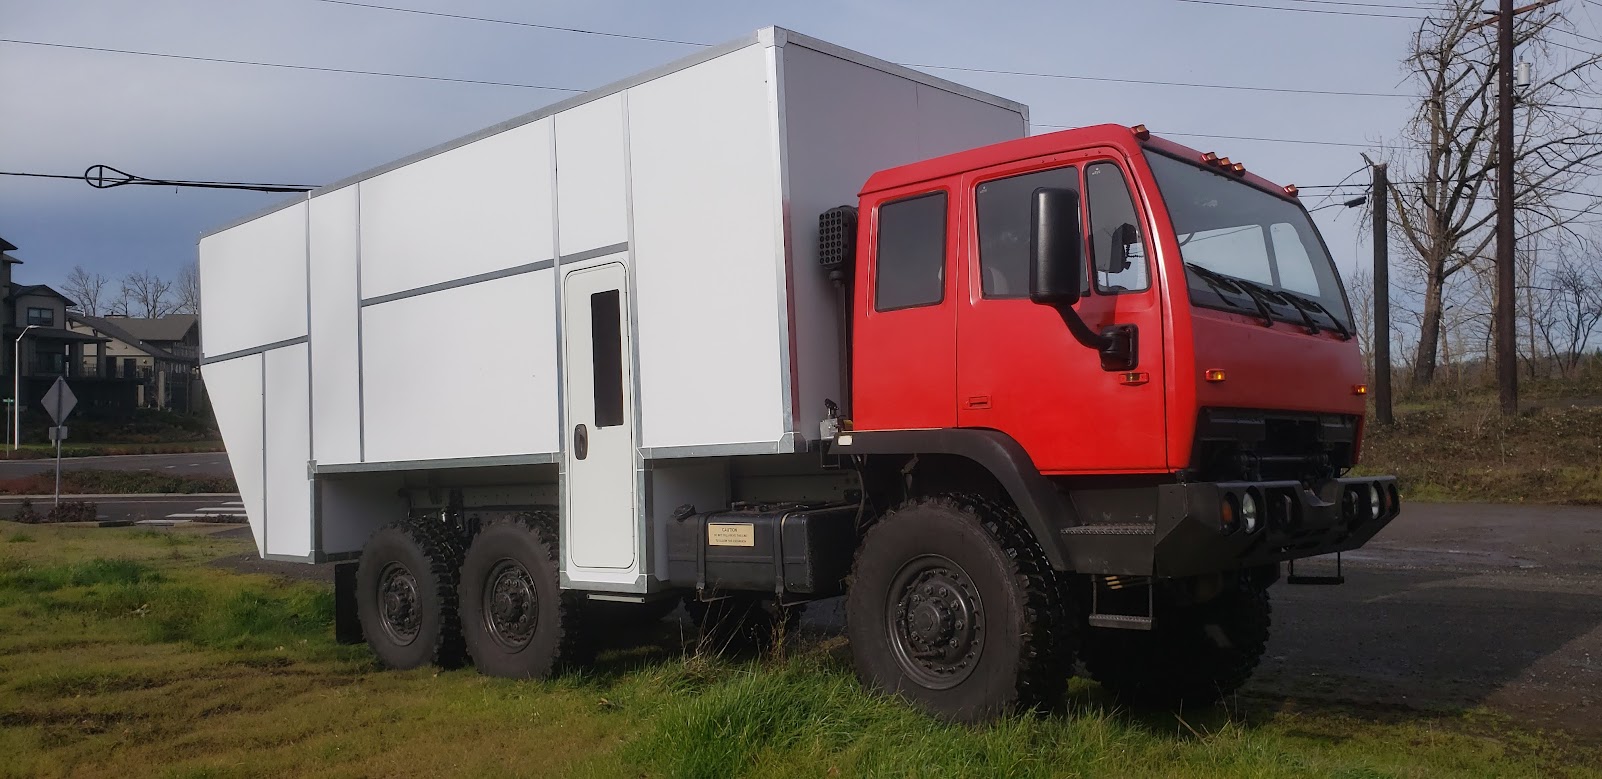
Weather's been too crappy to get the angle and flat on to seal the box, but other work has been completed. Box is fully skinned, stairwell is fully panelled, cargo bay doors open remotely...... it can almost be called a camper.
With the box complete, it was time to roll it out and get another round of glamour shots. Enjoy!


Need a few days of dry weather (carport roof leaks a bit) and the box will be fully sealed. Trying to think creatively about finding a big enough place to get the work done indoors too.
Regardless, it's always exciting (for me at least) to get it out of the carport. I am very pleased with how it's shaping up. It's been about a year since I got at it in earnest. It's not going quickly but it's making steady progress, and this week was a massive milestone. I'm not sure I'll get to camp in it before the year is up but it's only because I am being patient and exhibiting self control.
Chris
With the box complete, it was time to roll it out and get another round of glamour shots. Enjoy!
Need a few days of dry weather (carport roof leaks a bit) and the box will be fully sealed. Trying to think creatively about finding a big enough place to get the work done indoors too.
Regardless, it's always exciting (for me at least) to get it out of the carport. I am very pleased with how it's shaping up. It's been about a year since I got at it in earnest. It's not going quickly but it's making steady progress, and this week was a massive milestone. I'm not sure I'll get to camp in it before the year is up but it's only because I am being patient and exhibiting self control.
Chris


Hi Mark,
I saw a video of a 1083 going up over something and as the intermediate axle climbed up, the chassis only moved upwards half of what the wheel did, and it was climbing a large step. This let that axle get surprisingly high relative to the chassis, much higher than I ever expected it would. The top of the tire was about to the bed, if I am remembering correctly. I don't remember where I saw it but it made an impression on me.
The other benchmark I used, for better or worse, was the 2ifoverland spacing. The bottom of their hab was basically level with the bottom of the cab/front fender line. I figured if it was good enough for the vendor who built that, and knowing that they were full timing in it and actually using it, it made sense to me to duplicate and move on.
As I got into the build, I did some measurements which I can't now find but they went something like there was ~7-8" between the bump stop of the axles and the frame. If I got into the "worst case" situation of completely crossed axle, the ~8" at the bump stop multiplies out to ~10-11" at the tire.
All these indicators were pointing at about the same answer, and conveniently, the available steel sizes made the decision quite simple. The channels I scored from the 1083 were about 6" (or just over that actually, I think it's documented somewhere in those early posts) and the other rail I added is 3" x 6".
So the short answer to your question is yes, I believe it's just over a foot from the top of the tire to the bottom of the habitat.
As I type that though, I remember that the build has also started to compress the suspension. My overall height is actually just under 12' now, so I will need to re-check what that distance is.
The weather here hasn't been too favorable for getting the skin sealed up but I am hoping that by the end of the week, that task will be crossed off and the remaining seams will also get their Sikaflex. Once that happens, it's game on! I will get the trans fluid flushed and swap to ATF and then we will actually USE it!! Exciting times!
Chris
I love the idea of camping in the unfinished box, it may help you make design desiciions before you finalize it . Im curious on the spacing of the middle wheel to the box, maybe its just the picture angle, but those floating beam axles dont just travel up and down like a "normal" suspension, but pivot on the center connect and may get really close to the box where ive put the red paint.
The front high tire will move forward up to 3.5 to 4 inches as the beam drops the rear tire and raises the forward one. (prob just the pic angle)
(Edit with response to ckouba reply") Ok, so mine is unloaded and with all 5 springs still and sits higher, maybe 25 degrees down, so in my configuration rotation up will give a big movement of my wheels forward and backwards. Clearly i still need to delete a leaf, and load up the frame! )
Ok, so mine is unloaded and with all 5 springs still and sits higher, maybe 25 degrees down, so in my configuration rotation up will give a big movement of my wheels forward and backwards. Clearly i still need to delete a leaf, and load up the frame! )
The front high tire will move forward up to 3.5 to 4 inches as the beam drops the rear tire and raises the forward one. (prob just the pic angle)
(Edit with response to ckouba reply
Ok, so mine is unloaded and with all 5 springs still and sits higher, maybe 25 degrees down, so in my configuration rotation up will give a big movement of my wheels forward and backwards. Clearly i still need to delete a leaf, and load up the frame! )
Last edited:
Hi Mark,
I understand what you're saying but I think I am OK and it's just the photo angle.
The lower radius rods are just shy of horizontal as it sits, probably within 10° or so. The system will move it forward as the suspension compresses, but I don't think as much as the 4" figure. The converse is accurate though- when the suspension droops, the further from horizontal the radius rods get, and the more the geometry sucks the axle closer to the pivoting beam. When I put the springs back together after pulling a leaf, it was quite the exercise until I lifted the axles to take advantage of the effect.
Progress!!!
Alu for covering seams is on! It looks good enough, but the real news is that means it can leave the nest again.

Things are progressing... While waiting for the weather to shape up enough, I got the stair control wired up from the cab as well as the stairwell, so that's a bonus! Basically working hard to get it to the point of a usable box, then want it to rain so I can see if it's sealed up....
The last big thing before that is the fluid flush and swap for the trans which I am looking to get done this coming weekend.
Somebody had earlier asked about how the rear doors open. I meant to take a pic while out in the open, but failed. So here's a pic showing how the rear doors open:

Stay healthy my friends.
Alu for covering seams is on! It looks good enough, but the real news is that means it can leave the nest again.
Things are progressing... While waiting for the weather to shape up enough, I got the stair control wired up from the cab as well as the stairwell, so that's a bonus! Basically working hard to get it to the point of a usable box, then want it to rain so I can see if it's sealed up....
The last big thing before that is the fluid flush and swap for the trans which I am looking to get done this coming weekend.
Somebody had earlier asked about how the rear doors open. I meant to take a pic while out in the open, but failed. So here's a pic showing how the rear doors open:
Stay healthy my friends.
Recce01
Active member
- 129
- 50
- 28
- Location
- San Diego, Ca
Your project is looking fantastic! We are a little ways behind you, but working 7 days a week, 12 hours a day. I haven't had time to start a thread, mainly posting on Instagram because it is quick and easy lol. Keep up the great work!Progress!!!
Alu for covering seams is on! It looks good enough, but the real news is that means it can leave the nest again.
Things are progressing... While waiting for the weather to shape up enough, I got the stair control wired up from the cab as well as the stairwell, so that's a bonus! Basically working hard to get it to the point of a usable box, then want it to rain so I can see if it's sealed up....
The last big thing before that is the fluid flush and swap for the trans which I am looking to get done this coming weekend.
Somebody had earlier asked about how the rear doors open. I meant to take a pic while out in the open, but failed. So here's a pic showing how the rear doors open:
Stay healthy my friends.
Thanks Recce. More progress has been made lately.... No exciting pictures though.
Trans has been flushed and refilled with ATF. After draining it, I think it actually had ATF in it already. It shifted well and continues to shift well, so that's all good. Followed the guidance in this thread:
This included driving an up to temp city and hwy cycle between flushes (2). Found a Valvoline organic oil which met the Allison spec and used that ($130/5gal, used right at 5 gal per flush).
In addition, I took the liberty of cutting three massive holes in the roof for my roof hatches and bathroom vent/fan. Truck is now out from under the carport shelter and waiting to get rained on. Ironically, the forecast has cleared up for now....
Once the integrity of the box is validated, the buildout of the interior will begin.
I did run it across the scales as it currently sits. It's a bit heavier than I expected- although I never did hard math, just a bit of guesstimating. Front axle now tags in at 9,700# and the rear at 12,300#. So at a present total of 22k, I still have 4k to play with but it is a bit closer to my sub-26k objective than I would have chosen. I can't say I regret any of the decisions though, I am quite satisfied so far with how it's playing out.
I am starting to spec out wiring, plumbing, solar, and appliances- and drowning in the data...
Trans has been flushed and refilled with ATF. After draining it, I think it actually had ATF in it already. It shifted well and continues to shift well, so that's all good. Followed the guidance in this thread:
LMTV M1078 Transmission Fluid Change To ATF Write Up
Did the switch from the 15w40 engine oil in the transmission on my 1997 M1078 LMTV with WTEC II to ATF. Followed "8-9 Transmission Oil Filter Replacement" procedure found in TM 9-2320-365-20-3 page 8-32. However, I deviated from the procedure and did NOT remove the front driveshaft (WARNING...
www.steelsoldiers.com
This included driving an up to temp city and hwy cycle between flushes (2). Found a Valvoline organic oil which met the Allison spec and used that ($130/5gal, used right at 5 gal per flush).
In addition, I took the liberty of cutting three massive holes in the roof for my roof hatches and bathroom vent/fan. Truck is now out from under the carport shelter and waiting to get rained on. Ironically, the forecast has cleared up for now....
Once the integrity of the box is validated, the buildout of the interior will begin.
I did run it across the scales as it currently sits. It's a bit heavier than I expected- although I never did hard math, just a bit of guesstimating. Front axle now tags in at 9,700# and the rear at 12,300#. So at a present total of 22k, I still have 4k to play with but it is a bit closer to my sub-26k objective than I would have chosen. I can't say I regret any of the decisions though, I am quite satisfied so far with how it's playing out.
I am starting to spec out wiring, plumbing, solar, and appliances- and drowning in the data...
SCSG-G4
PSVB 3003
- 5,400
- 3,494
- 113
- Location
- Lexington, South Carolina
when you are totaling up the additional loads, compute your water/waste water as all FULL and the refrigerator full of water/frosty beverages and then give yourself about 500 pounds of leeway and you should be good. So long as you don't go over 25,999 you are 'golden'.Thanks Recce. More progress has been made lately.... No exciting pictures though.
Trans has been flushed and refilled with ATF. After draining it, I think it actually had ATF in it already. It shifted well and continues to shift well, so that's all good. Followed the guidance in this thread:
LMTV M1078 Transmission Fluid Change To ATF Write Up
Did the switch from the 15w40 engine oil in the transmission on my 1997 M1078 LMTV with WTEC II to ATF. Followed "8-9 Transmission Oil Filter Replacement" procedure found in TM 9-2320-365-20-3 page 8-32. However, I deviated from the procedure and did NOT remove the front driveshaft (WARNING...www.steelsoldiers.com
This included driving an up to temp city and hwy cycle between flushes (2). Found a Valvoline organic oil which met the Allison spec and used that ($130/5gal, used right at 5 gal per flush).
In addition, I took the liberty of cutting three massive holes in the roof for my roof hatches and bathroom vent/fan. Truck is now out from under the carport shelter and waiting to get rained on. Ironically, the forecast has cleared up for now....
Once the integrity of the box is validated, the buildout of the interior will begin.
I did run it across the scales as it currently sits. It's a bit heavier than I expected- although I never did hard math, just a bit of guesstimating. Front axle now tags in at 9,700# and the rear at 12,300#. So at a present total of 22k, I still have 4k to play with but it is a bit closer to my sub-26k objective than I would have chosen. I can't say I regret any of the decisions though, I am quite satisfied so far with how it's playing out.
I am starting to spec out wiring, plumbing, solar, and appliances- and drowning in the data...
After a few weeks of dry weather, we finally got a good dousing. I left the truck outside and happily, it remained dry inside. Yay!
I have worked through a number of other little things in the interim and now have the side cargo hatch set up (opening cut in the siding, door skinned and installed, locking handle installed). The tail lights are fully wired up and the habitat step can be raised and lowered from both the cab and the stairwell. The spare tire winch is reinstalled and the components for the straps to secure the tires have all been reinstalled. I took care of some wiring tasks in the cab, including wiring up all the switches in the switch box on top of the dash and running leads out of the cab to a relay bank on the chassis.
I have the components of the composting toilet and I think the first order of business is to get the bathroom built. It will be a wet bath, with the toilet having a cover and the bathroom becoming the shower stall.
I also need to get serious about systems and size up/layout the components so I can figure out cable and plumbing runs.
Time to gain a little momentum...
Momentum gained - side hatch installed:

Passthrough accordion gasket installed:


Took it around the block yesterday and it's fairly stable. The most deflection seems to be from the cab air ride with the box remaining pretty stable on the chassis (or at least appearing to be).
Next project is planning out and building the bathroom/shower layout next- unless something else comes up first.
Passthrough accordion gasket installed:
Took it around the block yesterday and it's fairly stable. The most deflection seems to be from the cab air ride with the box remaining pretty stable on the chassis (or at least appearing to be).
Next project is planning out and building the bathroom/shower layout next- unless something else comes up first.
Lostchain
Well-known member
- 285
- 591
- 93
- Location
- Portland, OR
What an awesome job on the pass-through, that's sweet!
Third From Texas
Well-known member
- 2,837
- 6,669
- 113
- Location
- Corpus Christi Texas
Looks awesome !!!
That's one of the reasons I decided to stick with the ridged A1R cab mount. I miss the "cool factor" of the air ride cab, but I really want to have a crawl thru if only for emergency and for the dog to access the cab for overwatch at night). Retrofitting to air ride was just one more project I really don't have the time for, but the added flex was a factor.
The most deflection seems to be from the cab air ride with the box remaining pretty stable on the chassis (or at least appearing to be).
That's one of the reasons I decided to stick with the ridged A1R cab mount. I miss the "cool factor" of the air ride cab, but I really want to have a crawl thru if only for emergency and for the dog to access the cab for overwatch at night). Retrofitting to air ride was just one more project I really don't have the time for, but the added flex was a factor.
- 114,235members
- 167,162threads
- 2,353,353posts
- 3,346online users