• Steel Soldiers now has a few new forums, read more about it at: New Munitions Forums!

  • Microsoft MSN, Live, Hotmail, Outlook email users may not be receiving emails. We are working to resolve this issue. Please add support@steelsoldiers.com to your trusted contacts.


M109A4 Sub-Zero Oil Field

JarheadMtn

New member
356
2
0
Location
Anaconda Montana
It was in the 40's and sunny here today again. Melts some of the snow and then freezes back into more black ice. we have had lots of avalanches and a few fatalities the past few days caused by this ice under the snow pack. Becareful on the road!

You may try Army Surplus Warehouse near Idaho Falls for your hard top. (208) 529-4753. I bought a 20,000 lb winch there for $400. Its about 100 miles into Idaho from Montana.
 

roady

New member
304
1
0
Location
Greensboro MD
Hope all is going well Jason. I have been checking the GPS page and havent seen any updates since real early this morning. You have made quite the trip when you look at it on the map from where you started....
 

rickf

Well-known member
3,019
1,312
113
Location
Pemberton, N.J.
I am confused, he said he was headed for the Bakken but that is mostly in North Dakota and the far eastern corner of Montana. He is way west in Montana. Maybe I missed something? No matter what it is one heck of a trip!

Rick
 

bill2444

New member
272
3
0
Location
cheboygan/mi
yea i was hoping that maybe i could run into him outhere in the bakken. I'm working out in west ND around Dickenson.
 
Last edited:

JarheadMtn

New member
356
2
0
Location
Anaconda Montana
I just checked his GPS and see that he drove past me and is up near simp5782. I thought he was going to eastern Montana too. He's a days drive from the eastern part of the state.
 

jmoneysmithmas

New member
72
0
0
Location
Montana
I'm home- Kalispell, MT. My odometer reads 3,135 miles more than when I started in Spring City, PA on December 26. I want to thank everyone that helped out along the way, and posted so much valuable advice. Everyone has been extremely helpful, and suggestions and input are welcome. This trip has been a major learning experience, and I've solidified my confidence and understanding of the truck's abilities. Thank you everyone!

Now that I'm home, I have a lot of work to do to prepare the truck for the extreme cold. Here in Kalispell, we don't get the howling wind or extended periods of sub-zero weather. After preparations and modifications, I can then drive 600 miles East to the oil fields with more confidence and have a better sense of survivability.

Ironically, the day I got home (today) I received a few job offers in the central and western part of the state. This is great news- I won't have to rush out to the oil fields... and, I really need to put some more $$$ in the bank to get the M109 ready for action. North Dakota oil field work may be delayed until next winter, but it's not going to stop me from modifying the truck.

I haven't added up my fuel costs yet, but I know it's probably around $1500. Diesel prices in the mid-west were the best... I think $3.33 for Diesel #2 was the lowest I paid. Only once I believe I paid over $4.00/gal. Here in Montana, Diesel #2 is around $3.79, and Diesel #1 is around $4.15. Bottom line: I'm glad I went for the road trip vs. having the truck shipped.

As far as I'm concerned the trip was a great success. Although I only averaged 1 shower per 48 hours, I really can't complain at all. The only other hangup was a 24 hour delay in Missouri to locate a mysterious oil leak- but it was remedied with an hour of tightening every possible oil-related bolt and fitting. Additionally- I feel like I just completed a covert night run across the country slipping through PERFECT weather. I did most of my traveling in the dark. I've always liked and preferred night travel over daytime for a couple reasons:

1. you can see headlights approaching, therefore, I feel I have a better sense of who is on the road.

2. Less traffic = less stress, and less chance of collision. I really appreciated driving through larger cities (eg: Indianapolis, St. Louis, Kansas City) in the late night hours, and avoiding all 'rush hour' or daytime traffic.

3. Run the truck during the cold hours, sleep during the warm hours... easier on the humans who are camped out in the back. The only down side to this is trying to take your wake-up leak at 2pm in a walmart parking lot that now has a bustling customer force surrounding you. Here's the trick: just crack the back door about 5" and let her rip- about 6 feet down to the ground.

A few other things that came in handy:

1. anti-bacterial facial wipes. Basically, baby wipes. On days where a shower wasn't readily available, I gave myself a redneck field shower with these. No, it doesn't compare to a real shower, but it gets the big chunks off, and it will make the truck smell clean for a few minutes.

2. Headlamp. I'm glad I brought one. I used this a lot more than my flashlights. This keeps your hands free, and magically always seems to be pointing right where you are looking.

3. SPOT GPS. Although I wish I had it from the start of the trip, I was glad my buddy shipped it to me in time to receive it in Denver. Wyoming and Montana have a LOT of dead-zones for cell service. For example- on my last 200 mile stretch of my trip, I did not pass a single vehicle, and there was cell reception only about 10% of the time.

4. Cots and sleeping bags. The $200 investment (per person) saved us a lot of hotel costs, and... I was really quite comfortable in the back of the M109. Plus- no housekeeping knocks at 8am. In total, I think I slept 7 nights in the back of the truck, and never disturbed once.

5. MP3 player. I picked up a $40 MP3 player and some ihome $20 speakers from Costco before Christmas. The 2 speakers together are about the size of a coke can, and split in half. They fit (and stayed) on the small flat part in the center of the 'dash' near the windows. They held up pretty good, and battery life was better than expected. Although the cab noise makes it tough to clearly hear music, it was worth the investment for some faint background tunes.

6. Power inverter. This was installed prior to receiving the truck. Priceless investment. Kept the music going, the gps on, and cell phones charged. We also used it to power and charge a laptop. It's a 400 Watt inverter, and i think I only paid about $50 for it.

7. Gorilla tape. I've never tried this stuff before the journey, but it's basically duct tape on steroids. It came in handy to close some gaps in the cab/window area and, to help secure the trailer wiring harness to the truck (it would loosen up and slip out occasionally). I need to make a wallet out of this stuff. It seemed to hold its strength better than duct tape in colder weather too.

This trip gave me the opportunity to test the truck out in a small variety of weather conditions- although, not very extreme. We had a little rain at the beginning of the trip in PA, so I was able to locate a few areas in the cab that have small leaks (expected with a vinyl top, i'm sure). I now know where to focus when I begin to start sealing this truck into a cold-weather sarcophagus.

Between Bozeman, MT and Billings MT, there was a high cross-wind. Digital signs, wind socks, and plenty of DOT warnings and signage prepared me for what I was heading into. "extreme high winds ahead", "light trailers not advised", etc. These high winds also brought warm temperatures (relatively speaking), but the wind is a real buzz-kill and much more dangerous with high-profile vehicles. I have driven through most portions of Montana, and have seen some bad accidents- especially along the Rocky Mountain Front (east of Rockies). I was thoroughly impressed with the stability of the M109 in 50+ mph winds. I felt much safer in this truck than I ever would in my Chev Tahoe pulling my 22' travel trailer. For a 70 mile stretch, i was wrestling the wheel, but I didn't cross a lane line once. Note: my truck was virtually empty... only about 400 lbs of cargo, including myself. From this experience, I feel like I can push through much higher winds with a loaded truck... as long as the roads aren't icy. Anyone have input or experience to share with driving in high cross-winds with a M109? Montana has a LOT of wind, all-year round, so if no one responds, I'm sure I'll find out myself this year; weather I like it or not, I'll be testing the limits of the capabilities of this truck.


I've taken some more photos, and I'll be uploading those soon. Modification and winter preparation photos soon as well...
 
Last edited:

jmoneysmithmas

New member
72
0
0
Location
Montana
Above photo descriptions (left-right)
1. Myself and Gladys - home in Montana
2. The traffic was awful in Montana
3. Relocation of air tank blow-off valves the morning before we hit the road
4. Sleep-over at Cabela's, Billings, MT
5. Interior
6. Vinyl roof cover... need to seal it up better for cold weather
7. zip-tie and bungee holding steps in place. The spring latch (left) didn't seem to fit the loop on the steps
8. Rear view (before I added some stick-on reflectors)
9. M101 trailer connection
 

jmoneysmithmas

New member
72
0
0
Location
Montana
Time for an update!

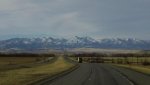
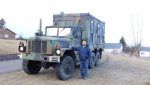
I went to Western North Dakota back in February to do some oil field surveying. Instead of hauling Gladys (my M109) over there, i went to work for another surveyor where i could use his trucks. This gave me the opportunity to make some money and check things out. Last week, I got a call to come to work out in BFM (BFMontana) so I departed from North Dakota, and have been working on getting Gladys ready for some remote survey work. This winter was the opposite of last winter: last year was extremely cold and tons of snow, whereas this winter turned out to be more like 5 months of October weather.

In my short stay in North Dakota, i found that the oil companies will often call a 'safety stand-down' when temps get below -15 and/or the wind-chill factor makes it feel below that appx. temp. So- if I go back to North Dakota next winter (likely), I won't necessarily have to prep Gladys for function at those extreme temps (-40), although it couldn't hurt.

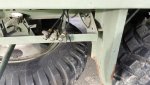
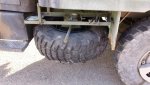
Now that our mild winter is just about over, I'm focusing more on the 'normal' weather functions of the M109. A couple weeks ago, I purchased and received 2 spare wheels from SS member USarmymedic07... pleasure doing business with you! I now have a spare tire for my M105 trailer (using the one my M109 came with), and a correct wheel/tire in-place on the M109. I just need to do some research on how to put a valve stem on it can be used in an emergency.

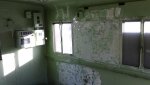
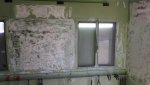
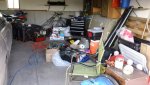
Being back in Montana, and having some free-time between jobs, I'm spending the week preparing Gladys for work. My main goal was to try to get the interior lights in the M109 to work (still no luck), and build some storage shelves out of 2x4 and 2x6 lumber. Well, as soon as i cleared out all the supplies and junk i was storing in the shop van, I was reminded of the paint situation. There were paint chips everywhere- like green and white confetti. It was a mess. So, i decided to backtrack: FIRST address the paint issue, THEN build shelving.

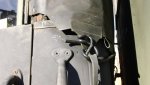
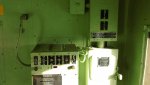
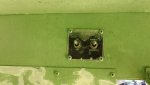
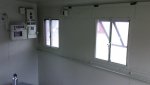
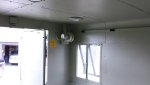
Starting with the electrical issue, I still can't seem to get the interior lights to come on, after all the possible switch combinations. They, and the exhaust fan worked when i bought the truck in December, but not since then. Having power is crucial to me... I'll be getting a generator soon, but I need to fix this problem first. Anyone have thoughts? I've seen other members replace the Military electrical components (junction box and main switch) with commercial/residential electrical boxes and power strips. I may have to do this too. I am a dummy when it comes to electrical, and I feel even dumber trying to trouble-shoot this M109 setup. There is a small box to the left of the fuse box that is unmarked, and seems to have 3 positions. I don't know what this is... but it's a bit sticky, and doesn't seem to 'click' into position well.

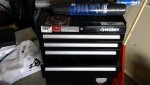
I hit Home Depot and Lowe's hard this week. I bought a rolling tool cabinet (got the manager to make me a really good deal on the floor model), a $30 grinder with some paint-stripping wheels, an air hammer (for working on the wheels mainly), a gallon of light green paint (for touching-up the interior of the box), and some lumber and hardware to construct a desk, some shelving and a work desk.

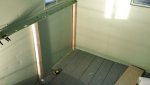
I spent a couple hours with a putty knife peeling off some of the flaking paint chips, then a couple more hours smoothing out some trouble areas with the grinder. All this close-work allowed me to inspect every screw in the hull. I noticed quite a few were loose, so I got my screw gun out, and started tightening... well, I'd say 50% of them weren't holding much, and were able to free-spin.

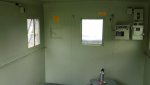
I also decided to inspect and open the pop-out windows (just before i started grinding... as i didn't want to be in a cloud of paint dust). It appears I'm going to need to do a lot of window work too. 1/2 of the screens were obviously in need of repair, so I had bought a roll of replacement screen this week at Lowe's, but it seems that the screens are the least of my worries. The wood frames are warped, rotten, and water-damaged. I'll be looking for some good info on how to replace/fix windows too... I've seen a couple threads about window replacement/fixes, but i'll have to dig em up again. Anyone have any good tips or pointers? One of the side windows has moisture in it, and the front window (above the cab) also has moisture. The front window is also missing the metal shield, and I'd like to find/make one later this summer. I like the windows in there, and I think I'll do my best to keep them all functioning. Other members suggested closing a couple up, but I like air-circulation. Not only in summer heat, but any time after a double chili-dog binge. :grin: A small AC unit may be on the shopping list by July... there's no shade trees where I'm going to be working.

Last night I spent a few hours reading SS threads and other outside forums regarding CB radios. I need CB radio comm. this summer on this particular job. There's no cell reception, and I work closely with a lot of heavy equipment moving around. I've never known much about radios, except what I learned in College Physics... and in those days, women and 40oz malt liquors were on my mind more than sine waves. Needless to say, I tried to educate myself so I could purchase and install a CB system in both my SUV and the M109. At first, I was leaning towards an 'authentic' mil-style antenna conversion to a CB system, but after some research, and realizing the extra hassle in converting a military antenna to work as a CB antenna in the 27mhz range, I decided to go 'modern'... although, definitely not as cool aesthetically. I ended up buying 4, 5-ft Firestik II antennas, 3 cobra cb radios, various mounting brackets, mount springs, quick disconnect fittings, and 3 coaxial cables. I had to triple-check my amazon.com order to make sure i had the right parts and cables to work in 3 locations in the 2 vehicles... i think i got it all.

Here's the CB configuration, and I'm hoping to get some advice/feedback on my proposed antenna mounting locations, and powering the 2 separate CB units in the M109. Radio guys, i know you're out there... love to hear from you (pun intended)! thanks!

1. My SUV. Cobra CB radio, 9' coaxial connected to 5' firestik antenna mounted on steel roof rack/cage near center of roof-top. ...pretty straight-forward.

2. M109 cab. Cobra CB Radio, DUAL 9' coax connected to 2, 5' firestik antennas mounted on outside mirror frame. This is a 12v CB system, however my truck is 24 volts. I have a 12V inverter (300W) mounted on the back of the cab between the 2 captains chairs. Can i connect to this somehow, or should i connect the CB directly to ONE of the batteries? If i connect to one of the batteries (for 12v power), what is the best way to do this?

3. M109 box. Cobra CB Radio, 18' coax connected to a single, 5' firestik antenna mounted in the center of the M109 box (with a dome-mount and quick release, so it can be easily removed for highway travel... well, if you consider climbing up on the roof "easy". I've read somewhere that the M109 box is 12V. What do you guys recommend I do for powering my 'base station' CB radio, and... where and how should i connect it? I'm building a work desk for my laptop under the control/power boxes sometime in the next couple days.

The in-cabin CB will probably get very little use, as Gladys will be stationary for the next 4 months on a construction site. The rear van area will serve as a job trailer and my command center for communicating with equipment operators, the state inspectors, and the contractor superintendent. I may have shore power there this season, but I plan to get a generator this season as well. I have the 50' 4-pin GIANT cable that attaches to the M109 box. Anyone use this cable? If so- what do you have fitted on the power supply end? I've been trying to decide what to put there: 50-amp RV male end, a 30-amp RV male end, or a generator-type end? There are dozens of converters out there (in fact- i have quite a few of them with my RV), but I'm not sure how that monstrous cable will work with these configurations. Any thoughts? suggestions?

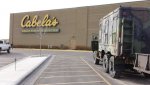
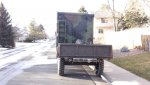
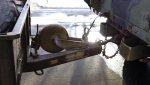
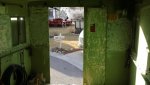
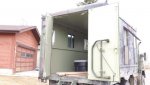
I've attached a few photos showing nothing much more than proof that i'm working on my truck, and... perhaps for reference if someone has any thoughts on my dome light power issues. Oh, and one photo of a pretty neat store in Circle, MT.

...More photos and updates to come in the next couple days.
 

Attachments

Last edited:

jmoneysmithmas

New member
72
0
0
Location
Montana
^photo explanations above, Left to Right:
1. The new tool box
2. This is just 1/2 of my survey gear for Gladys
3. Tire on rim, just need to figure out how to make a valve stem and put air in it.
4. Switches left of rear door (opposite evac fan)
5. What is that switch in its own junction box (top center of photo)?
6-8. Removing flaking paint
9. Interesting store in Circle, MT
 

SCSG-G4

PSVB 3003
Steel Soldiers Supporter
5,311
3,201
113
Location
Lexington, South Carolina
M109 windows - use some #8 screws 1.75 inches long. Drill holes from the inside on the window frame about three inches up from the bottom all the way out. Insert the #8 and out a nut/lockwasher on the inside, tighten. You may need to put several on each side, if so space them three or four inches apart. The wood rots and the window was built with the inside and outside metal pieces clamping into the wood. To repair to 'factory' you will have to completely disassemble, replace the wood, then press the metal back into the wood so it clamps. Machine screws are much faster! You can purchase the front window blackout cover from White Owl Parts > White Owl - Home Page

Lights and Wiring - overhead lights are all wired from the strip in the top middle, so you can get at most everything by removing those two strips. The controls are in the back. but you also have both regular and blackout lights to consider. One overhead bulb is supposed to be the blackout (usually has a blue dome on it) which stays on when the door is opened while the others go out so no bright light escapes giving your position away (in wartime). The TM covers the shop van and all of it's lighting - you just have to go to the shop van section to find it.

Big power cable - since you have the four pin, you may have the capability of 220 v power feeding into the box. You may have to check the connectors inside to see if you actually have two hots, a neutral and a ground, or whether they actually only used two of the wires. Take the connector off the generator end (and depending on what you find) get a mating plug that will match the generator's largest outlet. BTW, the box is all 24V, not 12, unless someone has changed things after it left Uncle Sam's hands. 110/220 power always came in through the cable. HTH
 

jmoneysmithmas

New member
72
0
0
Location
Montana
Thanks for the helpful info Mike! I emailed White Owl... we'll see what they say. Your advice on repairing the windows sounds great.

I got the interior painted with some Latex paint from Home Depot yesterday. Using some paint chips, I had them match the color. I told them it didn't have to be perfect, and I ended up with a color I like even more; more of an olive drab that doesn't feel as 'hospital-like'. They also added a mold-resistor additive for a few extra bucks there at the store... I figured it wouldn't hurt. Anyway- I was pleased with how it turned out, and i still have about 1/4 gallon left which will come in handy after I work on the window frames.

After the painting was done, I pulled out my tape measure and started thinking about how I want to configure my shelving and desk area. After 20 minutes of scratching my head, and doing a mental inventory of all the gear I have, I decided to get on my computer and draft up a layout plan in AutoCAD. Once the 'plan' was established, i went to work. Only 4 boards were cut when my roommate arrived and mentioned $3 pints at the new brewery in town. Needless to say, I'll be back at it tomorrow, with more photos of my shelf construction.
:beer:

After some more thought on the electrical situation, I think I'm going to start over and rebuild from scratch: new wiring, breaker box, light switches, master switch, etc. I'll be using electricity back there on a daily basis for a lot of sensitive equipment: survey and GPS instruments, CB radio, handheld radios, laptop, etc. Since I do a lot of road construction, it's required to have orange flashing light beacon(s) on all on-site vehicles, so I've got to hook up a switch for these too. I've looked into military convoy lighting, but I'll probably go with a strip LED on the rear... maybe one in the front of the box as well. I may even upgrade the dome lighting to LED. Even later in my plans, I would like to get some rear and side flood lights for winter use (sunset can be early as 4:30pm). I may look into some flush-mount flood lights, like the ones used on fire-fighting rigs... less chance of ripping something off via tree branch.

thanks again guys, and keep the ideas and input coming! ...more updates real soon.
 

Attachments

rickf

Well-known member
3,019
1,312
113
Location
Pemberton, N.J.
I think your ideas about going with the the updated modern electrical and lighting are a very good idea. You are depending on this vehicle for your livelihood and safety and the safety of others, do not scrimp on the necessities. The one thing I have not seen you talk about, or maybe I missed it, was insulation for the box. I know you were talking about a big heater but if the walls are cold you are going to have a wet miserable existence! Very cold walls and warm bodies and breathing create a LOT of condensation. Even in my camper, which has a lot more insulation than a 109, I can get water dripping from the roof vents at times.

Rick
 

jmoneysmithmas

New member
72
0
0
Location
Montana
I think your ideas about going with the the updated modern electrical and lighting are a very good idea. You are depending on this vehicle for your livelihood and safety and the safety of others, do not scrimp on the necessities. The one thing I have not seen you talk about, or maybe I missed it, was insulation for the box. I know you were talking about a big heater but if the walls are cold you are going to have a wet miserable existence! Very cold walls and warm bodies and breathing create a LOT of condensation. Even in my camper, which has a lot more insulation than a 109, I can get water dripping from the roof vents at times.

Rick
Thanks for the concern Rick. I thought about removing all the interior wall panels and replacing the insulation with R3 foam board and expanding foam/gap-filler. This would be the ideal place to start, but since I need to get this truck out in the field by next week, I didn't have the time (or available funds) to do that step first. Between the paint and materials to build my shelving and desk, I'm only a couple hundred bucks in, and I'm being very conscious of how i put these shelves in; I want them to be easily removed later. I may re-insulate this fall, when my work hours drop off...

Depending on how/when i replace the electrical components, I may do some insulating at that time too. Again... finding the time to strip my daily work truck down to the shell is tough part.
 
Top
AdBlock Detected

We get it, advertisements are annoying!

Sure, ad-blocking software does a great job at blocking ads, but it also blocks useful features of our website like our supporting vendors. Their ads help keep Steel Soldiers going. Please consider disabling your ad blockers for the site. Thanks!

I've Disabled AdBlock
No Thanks