• Steel Soldiers now has a few new forums, read more about it at: New Munitions Forums!

  • Microsoft MSN, Live, Hotmail, Outlook email users may not be receiving emails. We are working to resolve this issue. Please add support@steelsoldiers.com to your trusted contacts.

M35A2 expedition mini home

montaillou

Well-known member
Steel Soldiers Supporter
807
832
93
Location
W.WA
I'm gearing up to start the actual camper part of the build so thought I'd start a master thread here. I call it a mini home because it's much more independent than a camper. I'll post links to all that I've done if you really got a lot of time to waste at work.

So...I started my process around 2019, I hope to be done in 18-24 months. My eventual goal is world travel so I first started by modifying the truck. Skip to the first picture if you want to see my progress on the camper itself.

First up, make the cab a little roomier and stronger so that I can store stuff on the roof. You can find the thread here. Part of the rebuild I had an opening, off center in the wall behind the seats so I could push the seat forward and move to the cargo bed and back without leaving the truck. I later put a sliding door to cover the opening.
Next I put sound insulation in the cab & under the hood.
Air lockers install.
I put super singles on the deuce when I got in 2016, but some tire places won't touch military wheels. This really wasn't an issue when I'm driving near home, but if I'm out on the road I could rupture a sidewall. Not only would might I have trouble finding a place to do the work, I would have to replace my spare which would be difficult as these aren't sold everywhere. My solution, custom wheels & commercial tires.
Secondary and tertiary fuel tanks.
And while I hadn't planned on one, an engine swap kinda fell into my lap. There are some minuses, but I felt the positives outweighed the negatives.

I have done some other minor modifications here and there, most I'm not going to list. I removed the bench seat in the cab and replaced it with a jump seat my only planned passengers are my dog and cat.

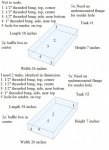
Camper build: The plan involves building a box in the bed of the truck (the cargo sides stay) that would act as a 9 inch high sub-floor. Into this space I will have a 14,400 watt, 24v battery (the yellow rectangles), a white (in blue) & grey water tank, tankless water heater, water filtration and because I have lots of room, 2 more fuel tanks. The purple bar at the top of the drawing represents the back wall of the cab. There will be a space behind the cab to step into. This space will be 16" deep and the width of the bed. The sub-floor occupies the entire depth of the bed, the camper will be short the 16".
The box at the bottom of the drawing will be a tool box accessible from the outside (behind the drop gate). This box will contain 2 tire chains, a spade, pick, axe, cordless grinder, cordless chainsaw and other implements of destruction.

Each square = 2 inches.

Layout no 8_sub.jpg

This is a general concept drawing. I plan on ordering the fuel tanks this coming week. I will use a high-flow transfer pump with a check valve from one of the outside tanks to fill these tanks. These tanks will also be wrapped in 1/2" ballistic fiberglass just because. Each fuel tank will feed directly to the engine using a custom 10 way valve and selector.
Fuel tanks.jpg

I will not be installing a black water tank because I plan on using an incinerator toilet.
I bought a pneumatic rivet gun and a 48" finger brake. The subfloor box (there will be no top) will be made with 20 gauge aluminum. The interior walls will be covered with custom made cabinets out of aluminum between 6" and 8" deep. The structure frame will be rectangular steel tube. The outer skin will be Phoenix Panels - these are 5' x 16' panels consisting of half a mm of aluminum, front and back, with about 5 mm of plywood between.
 
Last edited:

montaillou

Well-known member
Steel Soldiers Supporter
807
832
93
Location
W.WA
Put 50% down, finalized the dimensions and ordered the fuel tanks. Should take 1-2 months. Each tank works out to be about 45 gallons. Though, I'll be lucky to get 40 gallons of use considering the surface area & how shallow they are.

20210329_124022.jpg

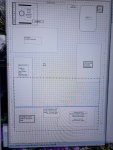
This is one of my latter floor layouts, though I've since changed it to swap the shower & sink to the opposite wall. Also, the wood stove (upper left) should be rotated 90 degrees clockwise. There will be an entry door on the driver side. There will be 2 doors, one behind the cab that is off the landing between the camper and cab. I originally conceived of an emergency hatch above the bed probably with a roll out ladder. However, I've revised this. I want a larger door and steps so that my dog can climb them.

The issue with this is 2 fold. 1) I'm cognizant of raising my truck center of gravity so I'm trying to keep the camper portion comfortable but cozy. The sub floor is 9 inches (this height was determined by the batteries which are 7 inches), it will be laying on an inch of insulated foam. I'm 5'10". At the moment the only thing I plan on putting on the ceiling is the track for the shower curtain. The plan is to make the interior cabin around 6'1" or maybe 6'3". The walls and ceiling will be 2" thick - this mostly to accommodate some EPS insulation and some other stuff that will be stuffed into the walls, pipes, electrical, ballistic fiberglass (again).
2) because the wall isn't very tall I need a door that is well below standard height. Right now I'm considering 30" x 60" and I've been looking at access vent doors. These doors typically are steel with some foam insulation sandwiched between. They come pre hung which is handy. Locks can be added.

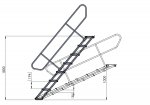
I will also have some steps (dog can't climb a ladder) that will swing and fold out. RV steps typically are for applications below 3 feet, and my steps will start at about 5 feet off the ground. I haven't found anyone that makes exactly what I need but I have found platform or dock stairs that are the right length that I plan on cutting and hinging. A company out there makes attachable legs that vary in length depending on the terrain for the bottom step.

adjustable_stairs_4.jpg

I don't know that I'll use these, if I do I'll cut the railings off as they take up too much room. I may rig up some sort of post that collapses with a rope railing. Amazon has been a great resource for these steps. From other sellers these steps may come with up to a $1,000 shipping fee. On Amazon the shipping is free and the price isn't much higher than those other retailers.
 

Attachments

VPed

Well-known member
Steel Soldiers Supporter
1,109
307
83
Location
Clint, TX
I have a ladder on my rig that is similar to your drawing. It was an old warehouse roll-around ladder that I cut to suit my needs. The handle rail is removable and stows flat. I adjust for varying campsite heights at the attachment point to the truck. The attachment points consist of two pieces of angle iron with a series of holes drilled to vary the height.

I found the warehouse ladder in a junk pile at a business. It was being thrown out due to damaged casters and a bend in the support pipes, neither of which I needed. I asked the business owner about it and he let me have it for a 30-pack of Bud light. Not as adjustable as yours but the price was right.

The ladder can be seen in the last photo of my build thread link below.


montaillou

Well-known member
Steel Soldiers Supporter
807
832
93
Location
W.WA
Unfortunately, the stairs in the drawing are out - they're made for concert stages and are just too wide. Right now I'm mulling over 2 options: Aluminum stairs, would remove the railing to save some weight, or stringers. Found the stringers on Amazon, they go to 60.5" height and are available in aluminum (not listed in the ad, but found on manufacturer's website). The stringers are much cheaper, but once I attach steps they'll probably be close to comparable price. But I think the stringer option might be around 100 lbs lighter. Even using 3 stringers for extra support and structure just won't add much weight (little over 16 lbs each - and aluminum might be lighter, though if it's a lot more expensive I'll stick with steel).

I need to take into consideration the balance between the two sides. Some things just can't be evenly distributed. For instance, because of how the venting works, my wood stove has to be where it's at. The stove alone is 75 lbs + heat shielding, an iron stand so it's not right on the floor and the hearth + surround, far heavier than the incinerator toilet opposite it. In the sub-floor the water tanks are more towards the passenger side so they should help balance things.

And my outside fuel tanks. The 70 gallon is on the driver's side and the 50 is on the passenger.
 
Last edited:

therealquaid

Active member
72
102
33
Location
California
Unfortunately, the stairs in the drawing are out - they're made for concert stages and are just too wide. Right now I'm mulling over 2 options: Aluminum stairs, would remove the railing to save some weight, or stringers. Found the stringers on Amazon, they go to 60.5" height and are available in aluminum (not listed in the ad, but found on manufacturer's website). The stringers are much cheaper, but once I attach steps they'll probably be close to comparable price. But I think the stringer option might be around 100 lbs lighter. Even using 3 stringers for extra support and structure just won't add much weight (little over 16 lbs each - and aluminum might be lighter, though if it's a lot more expensive I'll stick with steel).

I need to take into consideration the balance between the two sides. Some things just can't be evenly distributed. For instance, because of how the venting works, my wood stove has to be where it's at. The stove alone is 75 lbs + heat shielding, an iron stand so it's not right on the floor and the hearth + surround, far heavier than the incinerator toilet opposite it. In the sub-floor the water tanks are more towards the passenger side so they should help balance things.

And my outside fuel tanks. The 70 gallon is on the driver's side and the 50 is on the passenger.
Just a thought, these stairs work for 58” entrance height, could you maybe use something like this https://www.etrailer.com/RV-and-Camper-Steps/TorkLift/TLA7846.html and engineer some final step just below your access door in case it ends up too low?
I do realize however that this stair sticks out quite a bit.
 

montaillou

Well-known member
Steel Soldiers Supporter
807
832
93
Location
W.WA
maybe use something like this
It seems like anything I get will require modification. These will be mounted on the side of the truck and I would have to rig something up to put the steps inside then hang them when in use. They are light. I remember looking at these when I first started looking, maybe I should add these for reconsideration.

I was planning on using Torklift's landing gear for the bottom step of whatever I get.

Edit: Thinking today, the reason I probably passed on the Torklift stairs was because I couldn't deploy them from the inside.

A friend suggested to have a door that hinged on the bottom and the stairs would be built on the inside panel. They wouldn't be long enough so a portion would have to hinge over. Thinking about it, I'm reminded of how attic stairs work.
 
Last edited:

montaillou

Well-known member
Steel Soldiers Supporter
807
832
93
Location
W.WA
Found a good video on a sliding bed frame that a guy made for his Sprinter van. My bed frame area is that dash/dot line at the bottom of the pic in post #2. The blue line is the halfway point and where I will collapse the bed to. This bed is almost the size of a queen, and collapsed will free up about 24" of space.

I'll have to modify the design a little, mostly just the dimensions. My plan is to sleep across the back end of the truck and slide the long half. Fold over a futon-style mattress to create a little more room (during non-sleeping hours) and also get at stuff (my fridge/freezer will be here) stored underneath the bed more easily.

This COLLAPSIBLE Bed System Is Perfect For MAXIMIZING SPACE In Your Van!!! #vanlife - YouTube

The downside is this stuff isn't cheap and as I'll be using a futon I'll need more slats to fill the space. Still, it's light and strong and will easily shave probably 100 lbs off of other designs I've been considering.

Edit: Looking at prices, the 1" x 1" is about half the price of the 1.5" x 1.5", which is what the Youtuber used. As I need to use more pieces, to close the gaps for my soft mattress, the 1" x 1" is probably the way I'll go.
 
Last edited:

TechnoWeenie

Well-known member
Steel Soldiers Supporter
1,657
1,676
113
Location
Nova Laboratories, WA
As far as the ladder goes....

I don't know your physical fitness level, but when I lived in my M934, I used the factory ladder, and had some 550 cord wrapped in a loop on the top step, so at night, I could just lift it up/in.

If you want to DIY steps and keep them light but rugged, Interwest Metals in Fife has both aluminum step tread, and if weight isn't an issue but you want it to fold, expanded steel.

I would also look at the M1010 for inspiration. Their steps fold out....
 

ToddJK

Well-known member
1,321
4,518
113
Location
Sparta, MI
Subbed. I'm looking forward to seeing how this project pans out. It's very interesting, there was an overlanding YT'er who did his M109 and it was pretty cool. Had a three part video series on his and the build process. It was quite cool to say the least.
 

montaillou

Well-known member
Steel Soldiers Supporter
807
832
93
Location
W.WA
a grey water tank?
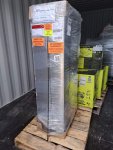
The picture in post #10 shows two fuel tanks standing up - they will be mounted flat. Believe me, water tanks don't cost anywhere near what these did.
Post #1 has one of my sub-floor drawings. The fuel tanks are shaded orange in the drawing. The two tanks at the top of the drawing are for water and will be plastic, the blue tank is for clean water and the grey one will be for the grey water - the shower will be directly above it and the sink will be next to the shower. Will lay out many of the pieces in a 1:1 scale to make sure nothing is interfering with the structure of the truck. For instance, if a strap for a fuel tank won't work, we'll just move the strap, etc. When I made the drawing of the sub-floor I included wide spaces around objects so there would be room to jockey things. There was meant to be some empty space so I could store items. The floor will be made up of a series of hatches to get at the stuff in the sub floor for maintenance or replacement.
 

ramdough

Well-known member
1,554
1,729
113
Location
Austin, Texas
Just a thought, these stairs work for 58” entrance height, could you maybe use something like this https://www.etrailer.com/RV-and-Camper-Steps/TorkLift/TLA7846.html and engineer some final step just below your access door in case it ends up too low?
I do realize however that this stair sticks out quite a bit.
Just FYSA, I bought a set of these and there are two things I found out…..

1. You can buy direct from the manufacturer and they gave me a discount and also give vets, etc discounts (not a vet, but close enough). Just ask….

2. The top step did not line up right for my application. If you count the distance of the bracket to the first step, it wants to be 4” out into traffic when stowed to get that first full step exposed when deployed. Gonna have to McGyver it to get mine to not stick out and also have the first full step.

It is a really nice product, so I am still happy so far. Hope it turns out.

Sent from my iPhone using Tapatalk
 

therealquaid

Active member
72
102
33
Location
California
Just FYSA, I bought a set of these and there are two things I found out…..

1. You can buy direct from the manufacturer and they gave me a discount and also give vets, etc discounts (not a vet, but close enough). Just ask….

2. The top step did not line up right for my application. If you count the distance of the bracket to the first step, it wants to be 4” out into traffic when stowed to get that first full step exposed when deployed. Gonna have to McGyver it to get mine to not stick out and also have the first full step.

It is a really nice product, so I am still happy so far. Hope it turns out.

Sent from my iPhone using Tapatalk
Is the ladder designed in a way to be easily removed in case you want to store it elsewhere?
 

therealquaid

Active member
72
102
33
Location
California
I
Yes, you can pull out two pins and the stairs comes off. Almost too easily, makes me concerned about theft.


Sent from my iPhone using Tapatalk
That’s a real concern. I’m thinking of building somewhere to store it while I drive and just put it up everytime I set up on site.
 

therealquaid

Active member
72
102
33
Location
California
It seems like anything I get will require modification. These will be mounted on the side of the truck and I would have to rig something up to put the steps inside then hang them when in use. They are light. I remember looking at these when I first started looking, maybe I should add these for reconsideration.

I was planning on using Torklift's landing gear for the bottom step of whatever I get.

Edit: Thinking today, the reason I probably passed on the Torklift stairs was because I couldn't deploy them from the inside.

A friend suggested to have a door that hinged on the bottom and the stairs would be built on the inside panel. They wouldn't be long enough so a portion would have to hinge over. Thinking about it, I'm reminded of how attic stairs work.
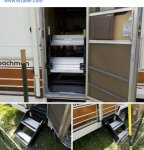
Not sure if you already figured out the design for your entry, but I saw this in an RV facebook group and thought I’d share since they bolted the stairs inside. I wonder if such a setup would make space for long stairs.
1EF85519-E217-4333-8E66-526B24EEC76A.jpeg
 

coachgeo

Well-known member
5,150
3,466
113
Location
North of Cincy OH
Top