- 131
- 309
- 63
- Location
- Charlottesville, VA
Well, here's kind of a nasty problem on a newly-rebuilt engine. The account below points up a number of issues--among them the crimes of assumptions and impersonations.
After installing the engine and all of the related plumbing (this is an original equipment restoration), I thought it'd be a good idea to start and run the engine in frame before installing the cab and other body parts. Rather than just a test of the engine on a stand, this test would check all of the components from the fuel tank forward.
Upon a successful start and run, the engine ran great. We discovered a number of minor leaks; most of them were related to loose fittings or clamps which we easily rectified. There was a fuel leak at the left frame rail coupling. One of the oil hoses to the filter leaked at the crimped fitting--no apparent way to repair, so the vendor is sending a replacement. Radiator hoses were not clamped tight enough--I'm using the original-like two wire clamps that need to be really cranked down. Fuel supply line at carburetor seeped fuel which resolved with tightening. All in all, this was an effective way to check and fix the entire engine assembly before fenders and cab made it difficult to identify and repair problems.
Most of the problems manifested right away as oil and coolant began circulating. But we didn't discover a particular oil leak until the engine had been running a while. This leak was a constant drip below the timing chain cover. It was not a stream of oil, but just a steady drip--about one per second.
Was the main bearing seal leaking? Unlikely, because the seal was new, and I assisted (maybe that was it ) a qualified and experience machinist with the assembly. We were quite diligent with this aspect.
How about the oil pan itself? The oil pan bolts were not loose, but I tightened them all about a turn. Oil did not appear to be running forward to the leak area.
Was the timing cover properly fastened? Inspection revealed that I had missed installation of three cap screws and nuts. There are 8 screws which fasten to the block. The other threw are approximately at the 10 o'clock position and are screws and nuts. While timing cover did not appear to be leaking from this area, I installed the missing fasteners, and restarted the engine. The oil leak reappeared with no improvement.
After studying the exploded view in the Ord 9, I began to suspect that we missed the installation of a paper gasket which fits in front of the timing cover seal though which the hub passes. We couldn't recall installing this little gasket, but my machinist friend was very careful to use sealant at every potential leak area. Still....
Something else? It was impossible to tell.
So, the only option left was a partial tear down to examine the front of the engine including the timing cover seal. This required draining and removal of the radiator, fan, and belts (this is a 100 amp system with 4 belts) cranking jaw and hub. After removing the front support bolts and loosening the rear support bolts, I used an engine hoist and the engine lifting shackle to raise the engine enough to clear the studs at the front rubber cushion which in turn allowed removal of the front engine support. This exposed the front of the engine.
There did not appear to be any oil leaking from the timing cover seal itself. I couldn't see the edges of a paper gasket, but the seal itself was dry.
Same with the timing cover itself-no apparent leak. The screws on the timing cover were not loose, though I did tighten all of them about a turn.
Still, there had been a leak while the engine was running, albeit fairly small. There was no active leak with the engine static.
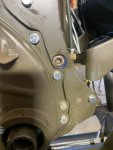
Then I saw a small plug in an oil journal on the left side of the engine (to the right of the timing cover as you look at it in the photo).
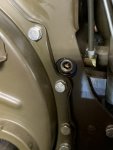
Note that the plug is at the return line (the vertical dark green metal line at the right side of the plug) to the oil (filter.
The plug was recessed and at first glance did not appear to be a problem. A closer look with the shop light revealed that a very small trickle of oil had been running from the plug along the timing cover down to the bottom.
Was this the problem? I could not find anything in the Ord 9 or other manuals which referenced this plug.
I removed the plug, and it appeared to be OK. So I wrapped it in teflon tape and reinstalled. While tightening, the teflon tape pushed out the front. That was strange and unexpected. What is going on?
Fortunately, I had an old engine block that I could examine. A plug was present, but it was different in that about three threads were exposed. For many reasons, I was confident that this plug had never been disturbed since the engine was built. Before I took a torch to remove this rusty plug, I found an identical one in my leftover plugs and fittings box.
I again removed the suspect plug and placed it beside the other plug.
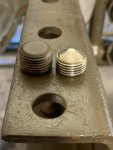
Well, this is interesting. I am not familiar with this style plug with the cone shape, but since my ignorance of things mechanical expands at the same rate of my experience, I am not surprised.
I screwed the replacement plug into the hole, and it appeared to fit like it should.
So, what's up now? Time to unholster the caliper. Here's what I found:
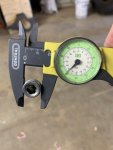
Installed plug: 39/64 in diameter.
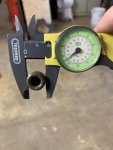
Replacement plug: 42/64 in diameter.
That cone-shaped plug which was under indictment was now faced with overwhelming evidence of its crime: Guilty of impersonating an original. It was too small to do the job.
I installed the larger replacement plug using oil-resistant teflon tape (probably not necessary, but I felt the "belt and suspenders" approach might minimize the likelihood of having to go through this again.
After rechecking all of the exposed fasteners, I reassembled the front of the engine including radiator and other components (like the alternator) that I had to move.
With bated breath, I started the engine and ran it for several minutes.
No leak!
While I didn't much like the set back of having to take the front of the engine apart, I'm glad that I was able to identify the problem.
Lessons learned:
--All fittings should be referenced against the manuals. In this case, I couldn't find a reference, but that doesn't mean there isn't one.
--Test fit all fasteners by hand before final installation. In this case, the plug seemed to fit just right, but in fact went in a little too easily and ended up too deep in the hole. That should have been a clue. With more than one plug in the box, it would have taken only seconds to compare measurements.
--The bright, shiny part isn't necessarily a better one than the original take-out.
--Don't assume anything--especially with a part that will be hidden behind something that will be time-consuming to remove. The installed plug was only 3/64 less in diameter than the correct one, but that was more than enough to allow oil to seep past the threads when the engine was under pressure.
--Test all components before final assembly. Because I "knew" I had a good engine and was careful with all aspects of the build, I was tempted to begin installing cab and body parts before running and testing the engine. Had I done so in this case, I would either have had to live with a steady leak or spend additional hours and hours troubleshooting.
--Take a deep breath, and analyze your proposed course of action while accounting for unknowns. In this case, I probably did not have to remove the hub and pulley, but I thought that I was going after the timing chain cover seal. While I did tighten the cover fasteners, I could have done so without the additional work of removing he hub and pulley. I could have gotten to the fasteners anyway. They existence of an incorrect plug was not immediately apparent.
The crime of assumptions? The guilty party (me) was sentenced to time served with probation conditioned upon good behavior.
And the incorrect plug? After conviction beyond a reasonable doubt, the plug was spared execution. The plug's role in this account is a mitigating factor. The victim impact statement to the contrary, the plug was given a life sentence in a dreary, lightless cardboard box with its fellow miscreants. Can it be rehabilitated? Probably not, but there's always a chance.
After installing the engine and all of the related plumbing (this is an original equipment restoration), I thought it'd be a good idea to start and run the engine in frame before installing the cab and other body parts. Rather than just a test of the engine on a stand, this test would check all of the components from the fuel tank forward.
Upon a successful start and run, the engine ran great. We discovered a number of minor leaks; most of them were related to loose fittings or clamps which we easily rectified. There was a fuel leak at the left frame rail coupling. One of the oil hoses to the filter leaked at the crimped fitting--no apparent way to repair, so the vendor is sending a replacement. Radiator hoses were not clamped tight enough--I'm using the original-like two wire clamps that need to be really cranked down. Fuel supply line at carburetor seeped fuel which resolved with tightening. All in all, this was an effective way to check and fix the entire engine assembly before fenders and cab made it difficult to identify and repair problems.
Most of the problems manifested right away as oil and coolant began circulating. But we didn't discover a particular oil leak until the engine had been running a while. This leak was a constant drip below the timing chain cover. It was not a stream of oil, but just a steady drip--about one per second.
Was the main bearing seal leaking? Unlikely, because the seal was new, and I assisted (maybe that was it
How about the oil pan itself? The oil pan bolts were not loose, but I tightened them all about a turn. Oil did not appear to be running forward to the leak area.
Was the timing cover properly fastened? Inspection revealed that I had missed installation of three cap screws and nuts. There are 8 screws which fasten to the block. The other threw are approximately at the 10 o'clock position and are screws and nuts. While timing cover did not appear to be leaking from this area, I installed the missing fasteners, and restarted the engine. The oil leak reappeared with no improvement.
After studying the exploded view in the Ord 9, I began to suspect that we missed the installation of a paper gasket which fits in front of the timing cover seal though which the hub passes. We couldn't recall installing this little gasket, but my machinist friend was very careful to use sealant at every potential leak area. Still....
Something else? It was impossible to tell.
So, the only option left was a partial tear down to examine the front of the engine including the timing cover seal. This required draining and removal of the radiator, fan, and belts (this is a 100 amp system with 4 belts) cranking jaw and hub. After removing the front support bolts and loosening the rear support bolts, I used an engine hoist and the engine lifting shackle to raise the engine enough to clear the studs at the front rubber cushion which in turn allowed removal of the front engine support. This exposed the front of the engine.
There did not appear to be any oil leaking from the timing cover seal itself. I couldn't see the edges of a paper gasket, but the seal itself was dry.
Same with the timing cover itself-no apparent leak. The screws on the timing cover were not loose, though I did tighten all of them about a turn.
Still, there had been a leak while the engine was running, albeit fairly small. There was no active leak with the engine static.
Then I saw a small plug in an oil journal on the left side of the engine (to the right of the timing cover as you look at it in the photo).

Note that the plug is at the return line (the vertical dark green metal line at the right side of the plug) to the oil (filter.
The plug was recessed and at first glance did not appear to be a problem. A closer look with the shop light revealed that a very small trickle of oil had been running from the plug along the timing cover down to the bottom.
Was this the problem? I could not find anything in the Ord 9 or other manuals which referenced this plug.
I removed the plug, and it appeared to be OK. So I wrapped it in teflon tape and reinstalled. While tightening, the teflon tape pushed out the front. That was strange and unexpected. What is going on?
Fortunately, I had an old engine block that I could examine. A plug was present, but it was different in that about three threads were exposed. For many reasons, I was confident that this plug had never been disturbed since the engine was built. Before I took a torch to remove this rusty plug, I found an identical one in my leftover plugs and fittings box.
I again removed the suspect plug and placed it beside the other plug.

Well, this is interesting. I am not familiar with this style plug with the cone shape, but since my ignorance of things mechanical expands at the same rate of my experience, I am not surprised.
I screwed the replacement plug into the hole, and it appeared to fit like it should.
So, what's up now? Time to unholster the caliper. Here's what I found:

Installed plug: 39/64 in diameter.

Replacement plug: 42/64 in diameter.
That cone-shaped plug which was under indictment was now faced with overwhelming evidence of its crime: Guilty of impersonating an original. It was too small to do the job.
I installed the larger replacement plug using oil-resistant teflon tape (probably not necessary, but I felt the "belt and suspenders" approach might minimize the likelihood of having to go through this again.

After rechecking all of the exposed fasteners, I reassembled the front of the engine including radiator and other components (like the alternator) that I had to move.
With bated breath, I started the engine and ran it for several minutes.
No leak!
While I didn't much like the set back of having to take the front of the engine apart, I'm glad that I was able to identify the problem.
Lessons learned:
--All fittings should be referenced against the manuals. In this case, I couldn't find a reference, but that doesn't mean there isn't one.
--Test fit all fasteners by hand before final installation. In this case, the plug seemed to fit just right, but in fact went in a little too easily and ended up too deep in the hole. That should have been a clue. With more than one plug in the box, it would have taken only seconds to compare measurements.
--The bright, shiny part isn't necessarily a better one than the original take-out.
--Don't assume anything--especially with a part that will be hidden behind something that will be time-consuming to remove. The installed plug was only 3/64 less in diameter than the correct one, but that was more than enough to allow oil to seep past the threads when the engine was under pressure.
--Test all components before final assembly. Because I "knew" I had a good engine and was careful with all aspects of the build, I was tempted to begin installing cab and body parts before running and testing the engine. Had I done so in this case, I would either have had to live with a steady leak or spend additional hours and hours troubleshooting.
--Take a deep breath, and analyze your proposed course of action while accounting for unknowns. In this case, I probably did not have to remove the hub and pulley, but I thought that I was going after the timing chain cover seal. While I did tighten the cover fasteners, I could have done so without the additional work of removing he hub and pulley. I could have gotten to the fasteners anyway. They existence of an incorrect plug was not immediately apparent.
The crime of assumptions? The guilty party (me) was sentenced to time served with probation conditioned upon good behavior.
And the incorrect plug? After conviction beyond a reasonable doubt, the plug was spared execution. The plug's role in this account is a mitigating factor. The victim impact statement to the contrary, the plug was given a life sentence in a dreary, lightless cardboard box with its fellow miscreants. Can it be rehabilitated? Probably not, but there's always a chance.


