• Steel Soldiers now has a few new forums, read more about it at: New Munitions Forums!

  • Microsoft MSN, Live, Hotmail, Outlook email users may not be receiving emails. We are working to resolve this issue. Please add support@steelsoldiers.com to your trusted contacts.

M37 fuel tank

ODAddict

Active member
Steel Soldiers Supporter
116
234
43
Location
Charlottesville, VA
Hello all,

Today, I dropped the fuel tank for my M37, The tank has at least two baffles dividing the tank into approximately 1/4--1/2--1/4 sections. It appears that there is no direct access for maintenance or cleaning for the two outside baffled areas.

After removing the fuel sending unit and the fuel filter assemblies, I discovered a large amount of loose rust in the tank.

So, now, I'm at a bit of a standstill. While I have the usual tank cleaning, etching and sealing kits ready to use, I'm concerned about their effectiveness for the baffled areas which do not appear to be directly accessible. Has anyone encountered this situation? I appreciate your suggestions and advice.

Thank you,
 

Mullaney

Well-known member
Steel Soldiers Supporter
Supporting Vendor
7,769
19,877
113
Location
Charlotte NC
Hello all,

Today, I dropped the fuel tank for my M37, The tank has at least two baffles dividing the tank into approximately 1/4--1/2--1/4 sections. It appears that there is no direct access for maintenance or cleaning for the two outside baffled areas.

After removing the fuel sending unit and the fuel filter assemblies, I discovered a large amount of loose rust in the tank.

So, now, I'm at a bit of a standstill. While I have the usual tank cleaning, etching and sealing kits ready to use, I'm concerned about their effectiveness for the baffled areas which do not appear to be directly accessible. Has anyone encountered this situation? I appreciate your suggestions and advice.

Thank you,
.
Heated water and a pressure washer... And lots of time. I am sure there are better ways, but like on a shampoo bottle - Rinse, Lather, Repeat. Doing whatever you can to bend a piece of pipe on the pressure washer to hit every possible angle to attack and eventually flush the rust. Maybe a cheap camera to look where your eyes can't see. They are fairly cheap and attach to your cell phone. Search for "USB Camera Borescope Endoscope".

Then when you finally flush whatever rust you can extract, the etching sealing kit should do the rest.

HOT water to keep from flash rust happening inside the tank.
Hot enough to make you wear gloves handling the tank...
 

TomTime

Well-known member
Steel Soldiers Supporter
676
1,664
93
Location
MD.
I remember reading somewhere, maybe here that a person/member dropped the tank, plugged/capped off all openings. He put in a tank cleaner agent with rust/scale remover into the tank. He only filled up the tank two thirds to three quarters of the way full. He strapped it into the rear of his truck (I assume he put it into a pickup truck before he put in the cleaning agent in) he let it soak for awhile and then drove the truck around for awhile. He let the action of the truck to agitate the cleaning agent within the tank. He then left it sit again for awhile to let the tank soak. Then he rotated the tank, top to bottom 180 degrees, so now what was the top is now the bottom. Then repeated the same process, soak, drive and soak again.
After soaking he drained the cleaning agent from the tank.
He rinsed the tank and then added a detergent and repeated the same process, of soak, drive and soak.
He then rinsed it out thoroughly and left it dry out.
I can't remember but I think he then used a tank sealer after the tank was completely dry.

Note: I would make sure the drain hole is at the bottom after the rotation for draining the tank.

I know that sounds like a lot of work but if you take the time and do a good job you won't have to do it again.

Make sure ALL the fuel lines are purged and cleaned so nothing gets back to the tank once reinstalled.

I've also read about people using vinegar as a cleaning agent.

Good luck!

Tom.
 

ODAddict

Active member
Steel Soldiers Supporter
116
234
43
Location
Charlottesville, VA
Thank you for the comments and advice. Seems that there is more than "one way to skin the cat." I like the idea of putting the tank in the back of a truck to (painlessly?) slosh whatever "witches' brew" is inside. As an aside, I just completed a 67 Chev C10 with rebuilt 283 engine and 2 speed Powerglide trans. I was with my Dad when he picked up the truck from the dealer in 1966. I think that's the perfect "mule" for the M37 tank.

First task will be to run a magnet around the inside to capture the big chunks. Then, on to chemicals! I'll report on the results.
 

Mullaney

Well-known member
Steel Soldiers Supporter
Supporting Vendor
7,769
19,877
113
Location
Charlotte NC
Thank you for the comments and advice. Seems that there is more than "one way to skin the cat." I like the idea of putting the tank in the back of a truck to (painlessly?) slosh whatever "witches' brew" is inside. As an aside, I just completed a 67 Chev C10 with rebuilt 283 engine and 2 speed Powerglide trans. I was with my Dad when he picked up the truck from the dealer in 1966. I think that's the perfect "mule" for the M37 tank.

First task will be to run a magnet around the inside to capture the big chunks. Then, on to chemicals! I'll report on the results.
.
Pretty cool mule. You aughta post a picture or two - just for history's sake.

I remember going with my dad to pick up a 1971 Oldsmobile Vista Cruiser down in the big city of Monroe. Seven miles on the odometer. Complete with a 455 Rocket to power it... And an 8-Track tape deck factory installed.
 
Last edited:

ODAddict

Active member
Steel Soldiers Supporter
116
234
43
Location
Charlottesville, VA
Tank update...but before I start, thanks to you all again.

After a local club member suggested it, I opted for the high school chemistry experiment method (I don't know if such things are taught any more). Basically it's electrolysis. Second Chance Garage has a good description: Gas Tank Cleaning using Electrolysis (secondchancegarage.com)

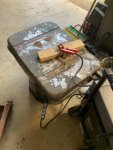
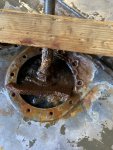
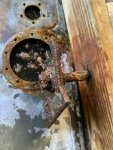
I used a small scrap steel plate fastened to a 3/4 bolt and nut (the anode) through a piece of 2x4 which acted as an insulator. The tank is the cathode. A couple of cups of Arm&Hammer Washing Soda available on line or at the grocery store (NOT banking soda!) mixed well with water in the tank (I made sure it was filled to the brim so as to achieve as much contact with the electrolye as possible) comprised the electrolyte. Insert your homemade anode through the fuel tank access port (in this case, the fuel filter access). Be careful not to allow any part of the anode to touch the inside of the tank because it will cause the circuit to ground out. You want to use the washing soda electrolyte as the transfer medium.

I used both a fleet battery charger and a small bench top charger. Attach the positive cable to the anode and the negative to the tank. Make sure that all connections are clean and tight. I found that I had to remove some finish from the bolt to get a decent connection. The larger charger seemed to work better probably because it was able to push more current. I used the amperage indicator setting to track progress. When the amperage declined to about half the initial current, it was time to clean the anode and restart.

The result was successful. It took two treatments over about 48 hours and a lot of flushing in between and after the second treatment. The tank interior looks good with a light sheen of "rust dust" after drying. I'll now use the KBS system to complete the job.

Attached are some photes.
 

Attachments

Top
AdBlock Detected

We get it, advertisements are annoying!

Sure, ad-blocking software does a great job at blocking ads, but it also blocks useful features of our website like our supporting vendors. Their ads help keep Steel Soldiers going. Please consider disabling your ad blockers for the site. Thanks!

I've Disabled AdBlock
No Thanks