• Steel Soldiers now has a few new forums, read more about it at: New Munitions Forums!

  • Microsoft MSN, Live, Hotmail, Outlook email users may not be receiving emails. We are working to resolve this issue. Please add support@steelsoldiers.com to your trusted contacts.

M818 Turbo Addition

Lonnie

Member
201
20
18
Location
Pittsburgh, PA
Yes, but unfortunately it is almost impossible to see with the turbo & exhaust in place.

The turbo outlet points straight down, then a 90 deg silicone coupler facing the rear,
a 3.5" tube to a 90 deg coupler between cab & belle housing,
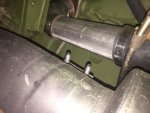
Turbo outlet.jpg

to a 45 deg coupler on top of belle housing, which I could not get a picture of,
then to a 90 deg coupler transitioning to a 4" at the dr. side.
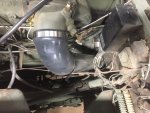
Intake.jpg
From there a 4" tube to a 90 deg transition at the 5" intake manifold.

All the couplers over the belle housing were connected with small pieces of tubing approx 4-5 " long.

It is a very tight fit back there but it clears nicely & allowed me to have room for Jakes on top of the engine.
 
Last edited:

US6x4

Well-known member
Steel Soldiers Supporter
1,238
2,272
113
Location
Wenatchee, WA
I like how simple the entry into the intake is with that routing. I too am eventually going to run a turbo with jakes so this routing is on my mind lately.
 

Lonnie

Member
201
20
18
Location
Pittsburgh, PA
It was a rather simple install.
I've built a lot of custom turbo/supercharger tubing for cars... this was easy compared to fitting 3.5" pressure tubing & a 4" intake in a Camaro.

Be sure to get aluminized steel or aluminum tubing so it doesn't rust on the inside.
 

US6x4

Well-known member
Steel Soldiers Supporter
1,238
2,272
113
Location
Wenatchee, WA
Do you have to roll a bead on the pipe ends or are the hoses just clamped over smooth pipe?
 
Last edited:

Lonnie

Member
201
20
18
Location
Pittsburgh, PA
On oval pipe, I always use a bead, but I have had good luck with regular t-bolt clamps on just smooth pipes.

You can carefully flare the end by using a small crescent wrench tweaking the last 1/4" of pipe out slightly. It does not take much & you don't want to see a lump in the hose... At the low boost we are running on these trucks, it isn't typically a problem.
 

Lonnie

Member
201
20
18
Location
Pittsburgh, PA
Started the Jake install today.

Before Paint...
Jake.jpg

Painted & Installed

IMG_3165 small.jpg

It went pretty well....

Here is a link to the Jake install manual:
https://parts.jacobsvehiclesystems....mmins-Models-400H-400-44B-44E-30E-and-25B.pdf
It tells you how to install, set clearances etc.

I swapped my parts without removing the rocker box. This kept me from breaking any gaskets etc.
It is rather easy:
1. Replace 1 rocker box bolt at a time with a stud & nut, then torque to specs & repeat 11 more times.
2. Line up the timing marks as you would to set the valves.
3. Remove the adjuster screw from the exhaust rocker & pivot the rocker out of the way in order to change the exhaust cross head.
4. Replace & adjust cross head for clearance.
5. Replace adjuster & adjust the exhaust valve clearance.
6. Unscrew the injector adjuster & replace it with the special hex adjuster provided with the Jake Brake.
7. Adjust the injector.
8. Finally check and adjust the intake valve clearance.
9. Move to the next cylinder...

My biggest issue was the injector adjustment. Having never done this before, I was paranoid & wanted to be sure my torque wrench was accurate. I carefully checked the existing preload to see where they were so I was sure I was doing it properly.
They were all fortunately within spec & returned to the specified torque.

I then installed the Jakes & torqued them down.
Loosen the Jake exhaust set screws & reset the clearance to .018" following the same cylinder rotation sequence as you used to set the valves.

Before putting the rocker covers on, I started the engine & bled the solenoids.
Once the got the air out, you could push a solenoid plunger & hear the engine sputter.

Now for the wiring...
 
Last edited:

US6x4

Well-known member
Steel Soldiers Supporter
1,238
2,272
113
Location
Wenatchee, WA
I put a filter housing on the right side to duplicate the factory left side. Used the 5" tubing throughout & tried to mirror image the left side.

Got the filter housing mounted & painted to look factory.

Lonnie, if you're thinking about fully duplicating the left side of the truck I think I still have my notes on making the front stiffener tube and triangular gusset from when I made mine symmetrical.
20180813_180438.jpg
 
  • Like
Reactions: 98G

US6x4

Well-known member
Steel Soldiers Supporter
1,238
2,272
113
Location
Wenatchee, WA
To make the front brace that ties the frame to the fender you need a piece of 1 1/4" O.D. x .109" wall x 31 1/4" long steel tubing. Mark two lines 1 1/2" in from each end, then flatten that 1 1/2" of one end in a press. Flip the tube around so that the freshly flattened end is on your end and the un-flattened end is in the press ready to get squished. Put an angle indicator on the flat end in the horizontal position then rotate the tube counterclockwise 12.5 degrees and then smash the 1 1/2" section of the end that is in the press all while maintaining that angle. The brace will form a 30-60-90 triangle with the frame and fender so the flat end that had the angle indicator on it gets bent up at the 1 1/2" mark to 60° and the other end gets bent up at the 1 1/2" mark to 30°. Pinching the flat end in a vice and bending it works well. Next I rounded the square corners to match the driver's side, drilled the holes for the 1/2" bolts and then TIG'd the seams closed (optional). Mount the 60° end to the frame bolt and then transfer punch a mark to drill through the brace that the fender is bolted to.
The triangular gusset is 1/4" steel at 6 1/2" x 14" with the 90° corner nipped off at 45° with that cut being 1 3/4" long.
The brace under the fender is a whole other monster...
20180726_165752.jpg20180727_153013.jpg
20180806_203009.jpg
 
Last edited:

Rescue101

Member
40
6
8
Location
Bridgton Maine
Started the 5" exhaust & soon realized there is hardly any straight sections of pipe before the stack.

I put in a small muffler under the hood & also a stack insert for noise control.

Here are a few pictures before everything was painted.

View attachment 778272View attachment 778273
Absolutely AWESOME!!…..Me being me,I would have put the stack BEHIND the cab,just my personal preference for noise reasons...…..But I bet you are going to LOVE the results !
 

US6x4

Well-known member
Steel Soldiers Supporter
1,238
2,272
113
Location
Wenatchee, WA
Started the 5" exhaust & soon realized there is hardly any straight sections of pipe before the stack.

I put in a small muffler under the hood & also a stack insert for noise control.

Here are a few pictures before everything was painted.

View attachment 778272View attachment 778273

Lonnie, do you recall what part number of muffler you went with and did it fit in the factory half-circle mount?
 
Top
AdBlock Detected

We get it, advertisements are annoying!

Sure, ad-blocking software does a great job at blocking ads, but it also blocks useful features of our website like our supporting vendors. Their ads help keep Steel Soldiers going. Please consider disabling your ad blockers for the site. Thanks!

I've Disabled AdBlock
No Thanks