General Mcgregor
Member
- 980
- 24
- 18
- Location
- Dover, New Hampshire
Hey fellas, hope you are enjoying the summer.
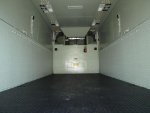
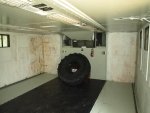
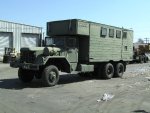
I had a few quick questions about the M820 Expansible Van Truck.
I took a tour of a salvage yard in PA a while back and while I was there I became very curious about the M820.
I was told that the M820 is 'an aquired taste' and only a select few seem interested in them as they are. This yard had a few for sale but I was also told that most people request to have the bodys removed before they purchase it, why? I understand that the longer wheel base could be used for a wide variety of applications but in my opinion the M820 is just so darn cool it seems like a sin to butcher it.
Is the body problematic i.e. does it leak or have insulation issues? I see so many threads about camper conversions and this seems like the perfect platform. I would like to hear from M820 owners or just guys who have knowledge about them as to why they are not widely represented in the MV community. I was also wondering what one of these (in surplus condition)typically cost. My family and I have been kicking around the idea of starting a food truck and I thought an M820 would make an excellent mobile Diner.
Any thoughts, experiences or pics would be very helpful.
Thank you and god bless!
-GM
Attachments
-
 90 KB Views: 122