• Steel Soldiers now has a few new forums, read more about it at: New Munitions Forums!

  • Microsoft MSN, Live, Hotmail, Outlook email users may not be receiving emails. We are working to resolve this issue. Please add support@steelsoldiers.com to your trusted contacts.


M871 Rebuild

Bighurt

New member
2,347
46
0
Location
Minot, ND
It's about time I did some PMCS on the fleet. Being that temps are above freezing and ice is off the roads its not a bad time to start.

I had some big personal events take place last year and in the wake the trucks and equipment have to find a new home. Not a new owner but a new home. So in preparedness for the trip and most likely long storage ahead and because some are in desperate need of MX. I decided to get my task underway.

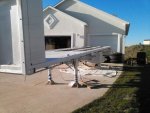
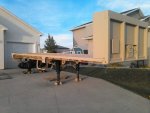
I decided to start with the M871, mainly because it's going to be loaded and lets face it aside from shear weight, its a pretty simple piece of equipment.

My goals before moving are;

-Tire service
-Brake Service
-Lubrication
-Electrical Inspection
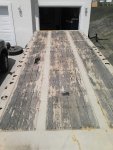
-Deck Replacement
-Custom Bows/Tarp
-Rust removal/paint

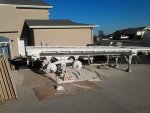
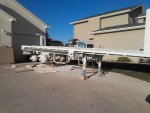
I started the ground work for the trailer deck repair with this thread;

http://www.steelsoldiers.com/showthread.php?123705-Re-decking-M871-what-material


In the mean time I decided to work on the rest. I'm fairly mechanical but often get squirreled, so this thread may bounce a bit.

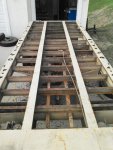
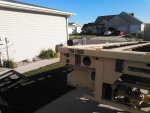
Yesterday I started deck removal, but I'm a horrible picture taker so you'll have to take my word for it. I certainly can't hear well today.

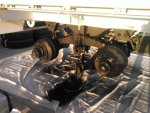
Tonight I finished the rear axle, well almost.

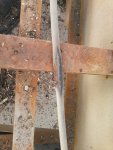
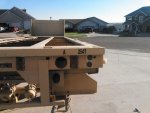
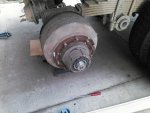
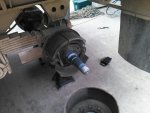
The TM doesn't specify tool sizes so I jumped into tire removal and brake drum removal to service the hubs. I started on Saturday but quickly discovered no place in town had the 3-3/4" octagon axle nut socket needed. So I ordered it and worked on the deck until it arrived today.

The second thing the TM doesn't describe is weight, the drum itself weighs a lot, if I were to guess it's close if not over 100 lbs. Now I actually own a wheel dolly and thought of using it however I wanted to inspect all the components, and both inner tires on the rear axle I suspected as having bad tubes. Knowing the weight I'll probably pull the front as an assembly.

For tonight's operation I used a cargo strap as a sling over my shoulder. Using my back in a twisting jerking fashion to hoist the drum and my hands to guide it on and off.

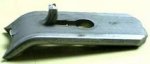
The third thing the TM doesn't mention is caging the brakes. It was kind of obvious to me and I'm not sure if the Army standard operating practice covers that but I expected to see brake caging as a prerequisite for the task, I mean caging the brakes is a procedure in the TM. Someone stole mine at GL or the army doesn't keep them on the trailer. I suspect the later as the USAF doesn't keep caging tools on the trailers either.

The forth thing I discovered the TM doesn't cover is volume of grease within the hub. I'd suspect over 3 lbs per axle and I used next to four packing it back up. I couldn't find anything that matched the mil spec so i just used NAPA's Extreme bearing and chassis grease, and will use it for other lube points as well.

All in all it went fairly easy and quick. The longest part was cleaning the grease from the bearings. The trailer had been recently serviced before I bought it in 2011 so the grease was really clean which makes the job faster. I don't own a bearing packer so I used the cupped hand method. These bearings are huge so it didn't work that well but not terrible. The TM says to remove and replace the gaskets but mine were good and I didn't want to try and find so. So if your following this you may want to find some before tearing apart your hubs. The inner seal is fairly durable but the outer seal under the cap is not.

So in addition to the TM requirements add;

1 Box of rags in a box
4 lbs of bearing grease
Hub sling or a friend
3 -1/4" Octagon Axle Nut Socket (outer nut)
3 -3/4" Octagon Axle Nut Socket (inner nut)
Brake caging bolt
Adequate lighting

I didn't find anything damaged or in need of adjustment within the hub or brake drum. The mileage I put on the trailer I think these will be lifetime brakes...

Cheers
 

Attachments

Bighurt

New member
2,347
46
0
Location
Minot, ND
Well I got released early today noonish, and decided to rip the deck off the trailer.

Between my two impacts, angle grinder, sawzall, various pry bars w/hammer's and most importantly by duck billed deck wrecker. I had it off in 6 hours and the fasteners ground flush. Tomorrow I'll cut off the ends of the screws that go through each frame member to make the deck claws a bit easier to install. If I can find it locally I plan to POR 15 the exposed area after wire wheeling the frame members.

I also have to fix the air system. Near as I can tell this trailer has been re-decked just once in it's life. I've owned it since 2011 and based on the decay and where the trailer was homesteaded at I'll guess it was re-decked over a decade before. I've always had issues with the trailer and the air system. It flat out doesn't pass the build-up air check and bleeds air rather steadily. It also takes a long time to release the spring brakes and to build up trailer pressure. I think I found the culprate...

Not only did they hit the line but it was between the cross members and the deck at 3 locations. Fairly pinched I'm surprised the brakes even worked, I didn't run the line to the trailer valve but I suspect this is the emergency which explains the length to build up PSI and release the brakes. As was suggested on another post, I'm glad they are rifleman first.

I decided to use claw style deck hold downs and carriage bolts to the typical deck screw. Not only does it save the swiss cheese cross members, but since I'm using Yellow Pine instead of White Oak or Apitong the claw, bolt ant nut combo is reusable so I don't have to spend another $500 on fasteners down the road. It's also easier to get a good hold since there are no weak spots when drilling through the cross members.

Aside from the issue with the air lines, I ran into an issue with my intended deck selection.

I settled on Southern Yellow Pine, I can actually get it from Menards locally. Their Microshades treated lumber in "CedarTone" is #1 Yellow Pine. Unfortunately it's 1-1/2" and the deck cavity is 2".

I have a few options;

- I have some clear cedar I can rip into shim's for each cross member.
- I can order 8/4ths Yellow Pine or White Oak.
- I can mill my own from yellow pine timbers.

The easiest is cedar shims, but I already have to mill the lumber into shiplap so the timber idea isn't bad either. I'll have to weight the options and figure it out.

Edit: I found 2.5" rough sawn Yellow Pine locally, might be another option.
 

Attachments

Last edited:

Artisan

Well-known member
2,762
227
63
Location
CDA Idaho
Big your a man after my own heart. You do it right...

I so enjoy watching guys do work who actually care about things, as I do.

In a perfect world I would jump on a plane and lend a hand.
 

Bighurt

New member
2,347
46
0
Location
Minot, ND
Thanks, as a contractor I've tried to build around the principle of "build it right", not to steal Mike Holmes's motto. I carry that into pretty much everything I do, just see my re-build thread.

In fact Thursday I was meeting with a client and they spoke those 3 little words, "do what's easiest". I stopped him right there, we don't do what's easiest we do what's right, they are typically not the same.

I'm trying to find a rust encapsulator today.

I ran the numbers last night, after everything will be said and done I'll have $2500 into a trailer I spent $1700 on. However I know some of it's brothers cam out of GL with a $5K price tag. I'm looking forward to being done, with one.
 

Bighurt

New member
2,347
46
0
Location
Minot, ND
Jeff, I found them in a few places.

AFT fasteners has them at $1.71 for 250+

Pioneer Heavy Duty Parts has them, but they never returned my email

Finally R and P Carriages has them on eBay at $1 with flat rate shipping.

We used them on the 7Q trailer in the USAF, basically a M270. Anyways the replacement deck according to the TO was to be Apitong with the claw style deck clip. The 7Q is nuclear certified so I imagine they didn't want swiss cheese cross members so all repairs or replacement listed the claw as the replacement. The TO paired that with a 3/8" carriage and a Hex nut.

As I'm still waiting on the claws, I'm waiting to decide on bolt combo. The claws are bare steel, I plan to treat them some how, probably paint but I could send them off to be galvanized. As I plan to use treated lumber, I need to use some sort of coated carriage bolt. Galvanized is easiest and Hex nuts are always available. So my plan budget wise was 3" carriage and -16 Hex nuts, but I may consider a lock washer. My experience is that the claw suffices as a washer.

Additionally unlike some of the trailers I saw re-decked the horn on the "claw" go into the wood, the tab holds the frame...bends the crab out of the bolt if you get that messed up.
 

Bighurt

New member
2,347
46
0
Location
Minot, ND
Been awhile since I posted but I've had a busy summer, between work and work if you know what I mean.

I finished striping the trailer and pressure washed it a few times. Still had to go pull webs and two big girls off the cross members. I don't know how they survived the onslaught of 4200 PSI...I was soaked, well only after I did the underside of the fore deck.

Primed 1/3 of the trailer with Rusty metal primer. I went over existing rust and the old CARC. I removed all the lights and then the loose material with a wire wheel and the pressure washer took care of the rest. It's not perfect but it's no a show piece. I don't have air at my current residence so I'm using an airless.

I wouldn't say it's the easiest but I'm trying to avoid over spray as well.

I was hoping to spray Behr Marquee on Wednesday but it's taking longer than expected to prime. And the ole adage goes the more effort you put into prep the better the results. So maybe Thursday will be paint, and Friday if I have time. I start a roof job Sat so I need Friday to get stuff together.

I ordered the Oak as well. 2" x 7" x 10' white oak out of MN. Supposed to come rough and dry so I have to wait a while, then I have to mill it for width and ship lap. Before I get to start decking the trailer. I ordered 26 boards and can't afford to be short the trailer gets a load as soon as she's ready.

I think I'll lay out the deck clips on a board and spray them tomorrow when I'm doing the trailer. They came raw but I have galvanized hardware, 3.5" bolts and hex nuts.

I'll try and get some pictures if I have time...maybe the GF will help tomorrow.
 

Bighurt

New member
2,347
46
0
Location
Minot, ND
Well I finished priming the trailer, well sorta, I ran out of primer. Since its oil based and I don't want to clean up again I'm not going to touch up undershot area's. Since it was overcoating CARC and not priming bare steel I can live with this. I'll post pics in a second but first a few things I learned;

-When you do the math and figure out how much paint you need, double it. Don't think 10% over spray is sufficient, CARC sucks up primer buy more.

-Oil based sucks to clean up, you need 1 hr for clean-up...and you don't want to do it twice. Plan accordingly.

-Do cracks and crevices first then fill the field. You can feather into but not out of a corner, crevice or seam.

-The flexible whip on your painter or hose on your airless is not flexible enough. Plan you movement then squeeze the trigger, if you have to do a dry run first.

-Vehicles suck to paint. Paint is like sand it sticks to the area's you don't want it, plan to do more than 3 coats. You may need 4 passes just to get 100% coverage.

-You can never have enough tarps.

-You'll get thirsty mid job, and if you don't you'll have to pee...one or the other, either way plan a break.

-Don't ever plan to wear what you are wearing in public again...actually I think most SS members have that problem day to day.

-If you think your doing a bad job stop, step back remember this is a Mil truck that can take battle damage, press on it's not winning a beauty contest.

-If you are painting a show truck stop, take out your wallet and pay a professional to do it...LOL

-If your only camera is your phone, don't leave it in your girlfriends car when she leaves...then expect to take pictures.

I can't think of anymore...
 
Last edited:

jasonjc

Well-known member
5,325
283
83
Location
Gravette Ar.
Sounds like you doing a great job. Please post up some pic's and how those clips work. I need to do my M129 one of these days. I need to stop looking at/following every one else threads and start doing my own:roll:.
 

Bighurt

New member
2,347
46
0
Location
Minot, ND
Alright I have a few pictures to upload.

These are after I stripped the lights reflectors and well anything I didn't want painted.

It also conveniently shows the only markings the trailer had, mental note to save that info.
 

Attachments

Bighurt

New member
2,347
46
0
Location
Minot, ND
Here is the trailer primed, it's a white primer which I didn't think would be fun but it's turning out to be really contrasty to the top coat.

Yes there are some missed spots but as previously mentioned they aren't a great concern.

The main objective was to get the rusty metal primer over the rusty area's. There was some bare sots but I painted those with the primer first. Actually all this effort was to protect teh cross members the boards bolt to...they were pretty pitted.
 

Attachments

Bighurt

New member
2,347
46
0
Location
Minot, ND
Last one for this evening before I ran out of sunlight.

The trailer is getting repainted "686" Desert Tan. Actually Home Depot was nice enough to explore un-used portions of the paint machine and pull the actual Federal Standard 595 chip code for the two colors. I provided the codes 33446 and 37030. It took her a bit but she found them pretty easy.

Rather than paint the trailer solid Tan, I kinda came up with a motif. The Rim's and running gear will be Black, along with the landing gear, feet and markings. I'm also having a custom tarp made which will also be black.

When the truck gets done I'll do a similar theme with undercarriage being black and the body being Tan. With Black exhaust I think the finally look will be pretty sharp and not to far off the mil color scheme.

The primer was Conco Rusty metal prep, oil based, and the top coat is Flat Behr Marquee. The Behr really sprays nice the black was fun to lay, I've never had success laying top coat with my airless I always back rolled it, this stuff is a joy to work with by comparison.

Enjoy!
 

Attachments

Bighurt

New member
2,347
46
0
Location
Minot, ND
Well I got the trailer painted. Yeah...

Fall in ND is a hard time to paint and I had other jobs on the books, so it took some time. Actually I still have the sides left, only got 4 done...of 16.

Kinda like the Black accents on the landing/running gear. I plan to paint the pads and the legs but I want to hook up first. Don't want to hook up with it on jack stands.

I have a few places to touch up black, and the wheels need to be painted as well.

All in all the Behr went on nice. I used about 9 gallons of Marquee, airless clean-up's waste a bit of material.

Hopefully I can finish all the paint and get the tires into the shop before week's end. Then I have airlines to repair and replace.

I'm planning to remove the 24 volt circuits as I will never use black-out's. Although I'm trying to find 12V composites just in case, but I'll re-wire them to 12 volt as just tail/brake and leave the black-outs disconnected. Anyone have a lead on LED composites let me know.

All the rest of the lights are being converted to HO LED's and I'm replacing the reflector's as well.

Now I'm stuck considering if I want to bring this up to DOT or not. Need reflective tape down the sides and across the back. Additionally I'd have to splice in mid ship turn lamps. Any thoughts on if I should go down that road?

I have my quote into tarpstop for the cover. Just going to go with a Black 30" rise fitted tarp. Now i just need my Oak!

Cheers
 

Attachments

Another Ahab

Well-known member
17,826
4,161
113
Location
Alexandria, VA
I ordered the Oak as well. 2" x 7" x 10' white oak out of MN. Supposed to come rough and dry so I have to wait a while, then I have to mill it for width and ship lap. Before I get to start decking the trailer. I ordered 26 boards and can't afford to be short the trailer gets a load as soon as she's ready.

.
You going to mill it all yourself (with a table saw)?

Or have you got a shop doing it for you?
 
Top
AdBlock Detected

We get it, advertisements are annoying!

Sure, ad-blocking software does a great job at blocking ads, but it also blocks useful features of our website like our supporting vendors. Their ads help keep Steel Soldiers going. Please consider disabling your ad blockers for the site. Thanks!

I've Disabled AdBlock
No Thanks