• Steel Soldiers now has a few new forums, read more about it at: New Munitions Forums!

  • Microsoft MSN, Live, Hotmail, Outlook email users may not be receiving emails. We are working to resolve this issue. Please add support@steelsoldiers.com to your trusted contacts.


M915 Battery Box on M809-series

Castle Bravo

Hundredaire Socialite
Steel Soldiers Supporter
1,956
199
63
Location
Arizona
Probably just a replacement part with improvements. The non-skid surfaces on the steps alone is much better than I've seen on the older boxes. Regardless, it's a very sturdy, well built box [thumbzup]
Somehow, I had not noticed the different steps. That does look to be an improvement.
 

MyothersanM1

19K M1 Armor Crewman
Steel Soldiers Supporter
1,954
401
68
Location
Culver City, CA
So, I finally got it all finished up this morning. I connected up the right side in-board secondary air tank to the existing air system. I also dressed up the the out-board right side primary air tank's drain valve pull cable. I mounted an eye-bolt to the front/top corner of the battery box lid which the pull cable can be passed through and removed when the box lid is removed.
IMG_0094.jpgIMG_0095.jpg

Using some paint masks from
http://www.militarystencils.com/default.aspx, I painted on the "CHECK BATTERIES DAILY" to the box lid and also redid the vinyl decaled "DRAIN AIR TANKS DAILY" on the under-cab driver's side tool box in the same fashion.
IMG_0097.jpgIMG_0096.jpgIMG_0099.jpgIMG_0101.jpgIMG_0102.jpg

With the air system once again complete, I was able to pull the truck out and get some good side shots of the new battery box and fuel tank install.
IMG_0105.jpgIMG_0108.jpg
 

MyothersanM1

19K M1 Armor Crewman
Steel Soldiers Supporter
1,954
401
68
Location
Culver City, CA
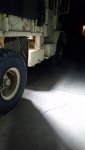
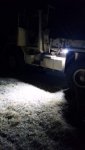
Installed a set of LED work lights in front of my front mudflaps pointing off to the side. Gives a very nice and bright side light for working and offroad driving when it's dark. I plan on getting a few more lights to install. I want to find the same lights and put a set behind the rear mudflaps and set on the front bumper as well.

View attachment 604034
View attachment 604035
View attachment 604036

I have them wired to an overhead console I got from Those Military Guys (originally for my M52). However I did not use the overhead console in the 12 volt configuration as it comes from TMG. I found the 24 to 12 volt converter is not strong enough to run the stereo they put on the console and any accessories plugged into the spare switches at the same time. I just disconnected the power wire from the converter to the circuit breaker and added a 24 volt hot wire from the battery to the breaker and then to the switch and then out to the lights. So in the end I have the stereo which is still 12 volts and 2 24 volt switches, all running through their own individual 15 amp circuit breakers, one of which is wired to the lights.

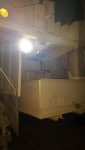
As always it's dark so the overhead console pictures didn't come out too well. I will get some pictures of the console tomorrow when there is decent light and post those later
Hey, Brother...Was this post meant for http://www.steelsoldiers.com/showth...-ton-this-week&p=1820504&posted=1#post1820504...??
Just making sure it gets to the right place :)
 

captacademy

New member
5
1
3
Location
NM
I installed the rubber coated plywood liner into the battery box. I bolted the liner down using the three existing pre-drilled hold down bolt holes; two on the left side and the right/rear. I laid in the outer most hold-down and placed a bolt through the hold-down bolt clip adjacent to the right/front bolt hole. I squared up the the outer hold-down to the box, then laid in the inner hold-down squared up and aligned with the outer hold-down. I installed all the bolt clips and marked the the holes by drilling the plywood with a 7/16" bit. The holes were then drilled completely through the box. Before installing the batteries, I test fit all the new bolt holes.
View attachment 601776View attachment 601777View attachment 601780View attachment 601779

The new batteries were set in the box with like posts opposite each other. The hold-downs were installed and tightened down. The pre-assembled "dog-bone" cross-over cable was also installed first. I had two cables one already marked red and one black that were near perfect length to connect the batteries to the bus bars. These cables were open ended left-overs from bus bar install phase, so I swedged on new terminals and installed new shrink tubing of the appropriate colors. I reused the same terminal clamps and rubber covers on all cables as they are all fairly new. All terminal clamps and bus bar nuts were tightened down. The 12VDC lead for the cold-start glow plug was shortened, a new terminal crimped on and attached to the clamp on the positive post of the rear battery.
View attachment 601781
View attachment 601783View attachment 601782

I flipped on the master battery disconnect and the in-cab battery switch. I immediately heard low-air buzzer and the battery gauge sprung to life. I gave the engine a crank and it started right up. The battery box project is now complete. I plumbed the newly installed air tank above the battery box into the brake air brake primary supply circuit. I just need to dress up the pull cable for the drain valve. I also installed a similar air tank for the secondary air brake circuit behind the box, but I am missing the one proper fitting to close up the air system. I should have that by late this coming week and I'll be up and running.
View attachment 601785View attachment 601786
Very nice work!
 
Top
AdBlock Detected

We get it, advertisements are annoying!

Sure, ad-blocking software does a great job at blocking ads, but it also blocks useful features of our website like our supporting vendors. Their ads help keep Steel Soldiers going. Please consider disabling your ad blockers for the site. Thanks!

I've Disabled AdBlock
No Thanks