• Steel Soldiers now has a few new forums, read more about it at: New Munitions Forums!

  • Microsoft MSN, Live, Hotmail, Outlook email users may not be receiving emails. We are working to resolve this issue. Please add support@steelsoldiers.com to your trusted contacts.

M923a2 Air Dryer rebuild

tstates

New member
21
0
1
Location
tega cay sc
Grab the end of bolt head with vise grips, and pull it out, it may take a few tugs. As per haldex insrtuctions. There was no bolt holding it in, just C clip.
 

gimpyrobb

dumpsterlandingfromorbit!
27,786
757
113
Location
Cincy Ohio
Whoops, sorry guys, I did just need to pull it out. Its been rebuilt since my last post(basically). I should have updated this thread.
 

silverstate55

Unemployable
2,075
873
113
Location
UT
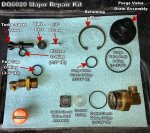
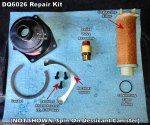
I recently rebuilt the air dryer on my M931A2; it underwent a total rebuild in 2005, but sat with little use until I picked her up in February, with 800 miles on the odometer. I used the upper (DQ6026) and lower (DQ6020) rebuild kits. The instructions included in the 6026 kit are pretty good, with decent drawings/diagrams. But the instructions in my 6020 kit were just text & a Kit Contents table...no drawings, no diagrams, etc... So instead of creating a whole new thread, I thought I'd share my photos & experiences here since there is already a good amount of info posted above.

If I'm wrong or missed something, please let me know.

Let's start with the kit contents (NOTE: Spin-on dessicant filter is NOT shown):

20140417_M931A2-Air-Dryer-Rebuild_02.jpg 20140417_M931A2-Air-Dryer-Rebuild_02a.jpg

I'll try not to repost the entire instructions, so if you have yours or download them above, you can follow along with the photos.

Hope this helps.
 

silverstate55

Unemployable
2,075
873
113
Location
UT
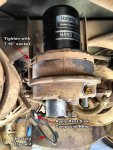
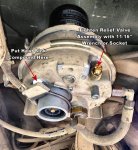
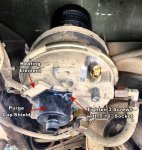
REMOVAL FROM TRUCK:

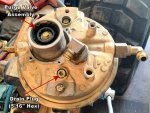
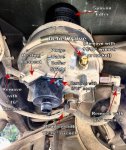
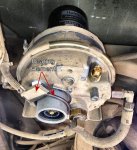
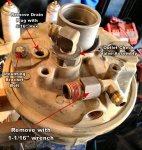
Please make sure ALL air drain valves are opened to completely evacuate all air pressure from the system. As Floridianson stated above, it helps to loosen the spin-on dessicant filter before removing the air dryer from its mounting bracket. I also removed the bottom drain plug (with a 5/16" hex-head Allen wrench), the relief valve assembly (with a deep-well 11/16" socket), and the purge valve shield cup assembly (3 screws, with a 5/16" socket). DO NOT pry the heating element before the purge valve cup shield is removed; doing so may damage the heating element (the loop around the purge valve housing). After removing the purge valve shield, you can safely remove the heating element. You will probably notice a white paste on the element & air dryer housing; this is heat sink compound that you can wipe off & remove.

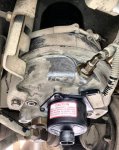
Remove the 3 air lines as shown with the following wrenches: 9/16", 13/16", 7/8". Loosen the 7/16" nut with a deep-well socket on the clamping band at the top of the air dryer body, then remove the bolt at the bottom-rear of the air dryer mounting bracket (not shown) with a 9/16" socket. Remove the air dryer from its mounting bracket.

20140417_M931A2-Air-Dryer-Rebuild_00.jpg 20140417_M931A2-Air-Dryer-Rebuild_00a.jpg 20140417_M931A2-Air-Dryer-Rebuild_00b.jpg

(NOTE: These photos were taken after rebuild was completed, but will work for clarity's sake)
 

silverstate55

Unemployable
2,075
873
113
Location
UT
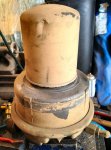
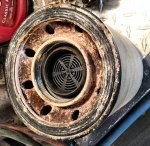
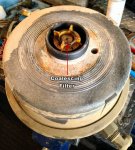
This is how my air dryer looked after removing it from the truck. The spin-on dessicant filter on the top of the air dryer body was loosened in place, and once off the truck I removed the spin-on cartridge. I was surprised by the amount of crud & corrosion present, so just because a vehicle has low miles doesn't mean that it's not needing maintenance!

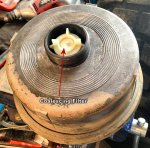
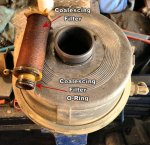
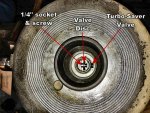
Once the spin-on filter is removed, you can pull out the coalescing filter (located below the spin-on filter). Just use a pair of pliers or channel-locks to lift the filter up & out. Looking down into the coalescing filter housing, you can see the parts for the Turbo-Saver Valve. Note the O-ring at the bottom of the coalescing filter (part N16000BF).

20140417_M931A2-Air-Dryer-Rebuild_01.jpg 20140417_M931A2-Air-Dryer-Rebuild_01a.jpg 20140417_M931A2-Air-Dryer-Rebuild_01b.jpg 20140417_M931A2-Air-Dryer-Rebuild_01c.jpg
 

silverstate55

Unemployable
2,075
873
113
Location
UT
Turn the air dryer housing over now. I mounted it in my vise, but used two soft 1x3 pine boards to protect the spin-on filter threads.

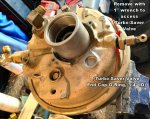
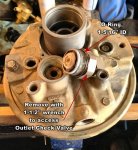
On the air fitting side with the smallest air fittings, remove this assembly with a 1" wrench; this will access the Turbo-Saver Valve. Note the O-Ring on the end cap air fitting (Turbo-Saver End Cap O-Ring, 3/4" ID). Remove the air fitting on the opposite end of the air dryer housing with a 1-1/16" wrench, and set it aside. If you haven't done so already, remove the drain plug with a 5/16" hex-head Allen-type wrench. We can now access the Turbo-Saver Valve assembly.

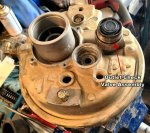
Next, remove the Outlet Check Valve assembly with a 1-1/2" wrench...you should have the Seal Assembly, Conical Spring, and O-Ring (1-5/16" ID) in/on this brass housing.

Remove the Purge Valve Retaining Ring with a strong set of snap-ring pliers, then use a pair of pliers or channel-locks to pull the Purge Valve assembly up & out. It might be a little snug, depending upon the condition of the old O-Rings...but pull it up & out.

20140417_M931A2-Air-Dryer-Rebuild_01d.jpg 20140417_M931A2-Air-Dryer-Rebuild_01e.jpg 20140417_M931A2-Air-Dryer-Rebuild_01f.jpg
 
Last edited:

silverstate55

Unemployable
2,075
873
113
Location
UT
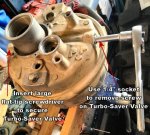
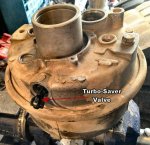
Now let's remove the Turbo-Saver Valve assembly. Using a 1/4" socket and a very long extension, insert this into the long end as shown below...then use a large flat-tip screwdriver to hold the Turbo-Saver Valve assembly in place while you remove the 1/4" threaded screw (Screw, Thread Form). I used a magnet to remove the screw all the way, then turned the air dryer housing over for the Valve Disc to fall out via the Coalescing Filter housing. You can use your long socket extensions or a long screwdriver to gently push out the Turbo-Saver Valve from the long end (it only goes one way!).

20140417_M931A2-Air-Dryer-Rebuild_01g.jpg 20140417_M931A2-Air-Dryer-Rebuild_01h.jpg 20140417_M931A2-Air-Dryer-Rebuild_01i.jpg

Now it's time to clean things up and prepare for reassembly. When cleaning, you might want to tip the air dryer housing so that any residual moisture/debris falls out of the drain plug hole. I didn't use compressed air due to the residual oil & grease, so I used long Q-tips, pipe cleaners, and lots of shop towels to clean it as best as I could inside & out.

The instructions for the 6026 kit state that NO aromatic solvents should be used to clean the air dryer housing, so I took that to mean no brake cleaner, etc...
 
Last edited:

silverstate55

Unemployable
2,075
873
113
Location
UT
USE THE SUPPLIED GREASE TO LUBRICATE ALL O-RINGS BEFORE INSTALLATION!

I started reassembly with the Outlet Check Valve. Make sure the rubber side of the Seal Assembly is facing down towards the air dryer housing. I found it easier to hold the Outlet Check Valve assembly with the Seal Assembly facing upwards, then lower the air dryer housing down to get the threads started...that way I didn't have to worry about the Seal Assembly falling out & getting pinched upon reassembly.

Install the new Purge Valve Body O-Ring (1-15/16" ID) on the new Purge Valve Body, install the new Purge Valve Piston O-Ring on the Purge Valve body (narrower end; 13/16" ID), and push the Purge Valve into its housing until you can install the Purge Valve Retaining Ring with snap-ring pliers.

Then I installed the Turbo-Saver Valve assembly. I applied the supplied grease to the Turbo-Saver Valve Piston, the Valve Disc, and the head of the 1/4" hex screw...the grease kept the screw locked into the socket, and I lowered the Valve Disc in through the Coalescing Filter housing, using grease to keep it in place. I inserted the Turbo-Saver Valve Piston while also inserting the screw with my socket extensions, sort of the reverse of the steps outlined above. Snug the screw into place, and replace the air fitting end caps on both ends but don't tighten them yet to ensure that they will line up with the air lines (remember to replace the O-Ring on the smaller air fitting end cap!).

Flip the air dryer housing over, install the new Coalescing Filter O-Ring onto the new Coalescing Filter, and gently push the Coalescing Filter into its housing...make sure that it seats fully, and does not extend above its housing lip.

Reinstall the drain valve with a 5/16" hex-head Allen-type wrench.
20140417_M931A2-Air-Dryer-Rebuild_02b.jpg 20140417_M931A2-Air-Dryer-Rebuild_02c.jpg 20140417_M931A2-Air-Dryer-Rebuild_02d.jpg
 
Last edited:

silverstate55

Unemployable
2,075
873
113
Location
UT
Spin on the top Spin-On Dessicant filter Cartridge finger-tight, then slide the air dryer housing into its mounting bracket on the truck. Snug up the 7/16" clamping nut/bolt with a deep-well socket, then insert & tighten the lower mounting bolt (use a 9/16" socket). Tighten the band clamp with the deep-well 7/16" socket.

Reinstall the 3 air lines & snug them up until no air leaks (pressure test later). Put a small dab of heat sink compound on the heating element & the recessed air dryer housing, then slide the heating element back into place over the Purge Valve housing. Remember that C-shaped fiber gasket from the 6026 kit? It should have a groove in one side, that groove will rest against the heating element to protect the Purge Valve Shield Cup from melting. I used a small dab of grease on the gasket to keep it attached to the heating element, then gently slid the Purge Valve Shield Cup up into place, making sure everything seated OK. Place the metal 3-hole Retainer Shield in place against the Purge Valve Shield Cup (it only fits one way), then insert the 3 screws & secure them snugly with a 5/16" socket.

Tighten everything that hasn't been done yet: the spin-on dessicant filter cartridge (per instructions, apply grease to cartridge gasket, and tighten by hand to 120-240 in.lbs. torque, or 1/2 to 1 full turn after gasket makes contact with air dryer housing...I also applied a small amount of anti-seize to the spin-on cartridge filter threads, just in case); the Relief Valve Assembly (use 11/16" deep-well socket or wrench), drain plug, any remaining air lines, etc...

20140417_M931A2-Air-Dryer-Rebuild_02e.jpg 20140417_M931A2-Air-Dryer-Rebuild_02f.jpg 20140417_M931A2-Air-Dryer-Rebuild_02g.jpg 20140417_M931A2-Air-Dryer-Rebuild_02h.jpg
 
Last edited:

Tow4

Well-known member
Steel Soldiers Supporter
2,097
647
113
Location
Orlando, FL
Excellent instructions and pictures silverstate55. Thanks for posting them.
 

Stein12501

Member
190
4
18
Location
Tebbetts, MO.
I hate to say it but I think I used carb cleaner after I removed the guts. Lubed the O-rings and replaced the canister. Worked for a while then it was back to the same old thing. I finally replaced it and haven't had any trouble for about a year or so. When the blow down valve sticks open and bleeds down the air, it never happens at a good time. Seems there were a lot for sale not to long ago. It was almost cheaper to replace the whole thing than buy the rebuild kits. Just my thought.
 

archmark

Member
267
20
18
Location
Woodway, TX
I think that it's better and probably cheaper to buy an entirely new unit off the interweb for +/-$120 instead of screwing around with replacing kits, filters, etc., but then that's me...

Mark
 

silverstate55

Unemployable
2,075
873
113
Location
UT
When I rebuilt mine I used electronics cleaner (in the spray can) and lots of long-reach Q-tips (as well as pipe cleaners), it's been working perfectly for well over a year now.
 

Stein12501

Member
190
4
18
Location
Tebbetts, MO.
I think on mine there was quite a bit of pitting on the body of the drier. It worked for a while then started acting up again. Living here in the Midwest we can get a lot of moisture. If yours holds up you saved yourself some money. Something I can always use more of.
 

Rickey

New member
1
0
0
Location
Manassas VA
I encountered an issue when starting the rebuild of my air dryer on my M936. It appears my heating element has fried and the fiber gasket disintegrated. I suspect the rust build up is what caused the vavle to stick open. The Haldex troubleshooting guide gives two heater kits, depending on the year. Anyone know where I can find the the manufacturing info?
20150821_183947.jpg20150821_183850.jpg20150821_184312.jpg
 
I completely tore my unit down and flushed out with a hose and got tons of grit out of it, there seemed to be a lot of corrosion in there from a year of mostly sitting, I operate the truck in a high alkali environment part of the year then near the coast, not so good. I found much playa dust in there it seems, the turbo saver was compromised, and now the question is, Would it be better to use silicone spray/grease on this thing? The grit seemed to clog up with grease supplied by Haldex. I've had good luck with silicone spray on pneumatic devices with o rings.
 
Top
AdBlock Detected

We get it, advertisements are annoying!

Sure, ad-blocking software does a great job at blocking ads, but it also blocks useful features of our website like our supporting vendors. Their ads help keep Steel Soldiers going. Please consider disabling your ad blockers for the site. Thanks!

I've Disabled AdBlock
No Thanks