• Steel Soldiers now has a few new forums, read more about it at: New Munitions Forums!

  • Microsoft MSN, Live, Hotmail, Outlook email users may not be receiving emails. We are working to resolve this issue. Please add support@steelsoldiers.com to your trusted contacts.

M923A2 Fan Clutch Repair - Any Clutch Gurus Out There?

Boi

New member
19
9
3
Location
Saint Charles, IL
Blade attachment bolts are loose. Reach in front and you can feel the washers will be loose, indicating the bolts loosened up. Common on these. Done mine twice so far, will add Loc-Tite next time, but I think it may be caused by the multi-layer composition of the fan blade hub actually.
20160731_190018.jpg

Just checked the nuts on the front and they're all tight. I had a better look at the whole assembly, and it seems like the fan clutch will be a bit of a pain to service. EDIT: Had to re-read the TM, it looks like just the fan and shroud need to be removed first, which means getting the clutch out shouldn't be too big of a chore.
 
Last edited:

74M35A2

Well-known member
4,145
334
83
Location
Livonia, MI
OK. That is slightly different than mine. My A2 is a Horton clutch and the fan blade is fastened with bolts, not studs/nuts. I'd like to convert it to studs/nuts to aleviate the looseness issue I am having.
 

74M35A2

Well-known member
4,145
334
83
Location
Livonia, MI
When I say mine are loose, it la is kind of strange but it means the bolts are snug like rusty snug, but loosened up. If I put a wrench on them, they are still tight, but need to be taken out, cleaned, maybe lubed, amd reinstalled tighter. I can slightly pull the fan away from the clutch hub, enough to slip maybe 2 pieces of paper in between.
 

Boi

New member
19
9
3
Location
Saint Charles, IL
When I say mine are loose, it la is kind of strange but it means the bolts are snug like rusty snug, but loosened up. If I put a wrench on them, they are still tight, but need to be taken out, cleaned, maybe lubed, amd reinstalled tighter. I can slightly pull the fan away from the clutch hub, enough to slip maybe 2 pieces of paper in between.
I found that the fan is tight to the clutch with no movement perpendicular to the axis; it spins freely by hand without binding or wobble. It is only when it comes on and the engine is under load at idle that it sounds like someone is clanking metal plates together.
 

ghitch75

Member
Steel Soldiers Supporter
91
1
8
Location
Greene County In
I found that the fan is tight to the clutch with no movement perpendicular to the axis; it spins freely by hand without binding or wobble. It is only when it comes on and the engine is under load at idle that it sounds like someone is clanking metal plates together.

mine sounds the same way.......i have grabbed the blades and shook a bunch of times and it seems tight......
 

Swamp Donkey

The Engineer
Steel Soldiers Supporter
1,450
121
63
Location
Gray, GA
View attachment 636549

Just checked the nuts on the front and they're all tight. I had a better look at the whole assembly, and it seems like the fan clutch will be a bit of a pain to service. EDIT: Had to re-read the TM, it looks like just the fan and shroud need to be removed first, which means getting the clutch out shouldn't be too big of a chore.
What brand and model number is that clutch?
 

gottaluvit

Well-known member
I found that the fan is tight to the clutch with no movement perpendicular to the axis; it spins freely by hand without binding or wobble. It is only when it comes on and the engine is under load at idle that it sounds like someone is clanking metal plates together.
Same here. No room for even a sheet of paper. Very tight. It sounds internal, like a gear or something won't fully engage at idle but does at higher RPMs.
 

74M35A2

Well-known member
4,145
334
83
Location
Livonia, MI
I thought I read it pulls 15hp at speed when engaged. I'd still loosen and retighten all fan attachment fasteners, just sayin'.
 

jerry v

New member
200
1
0
Location
michigan
That'll rob some power. I can feel my power reduce when going up hill (especially with a load) when the fan kicks in.
yes it does, my truck is not very fast,changed shutterstat no air leaks, going to have to fix fan clutch soon,just lazy right now. put cooling lines in with preheater, really humid out ,hot ,and im not in the mood start another project.:beer:
 

Boi

New member
19
9
3
Location
Saint Charles, IL
Swamp Donkey said:
What brand and model number is that clutch?
EDIT: Found it as an Evans FC200158, same one as Brasco (post 4) has in this thread.

20160801_185552.jpg20160801_174715-2.jpg

It is probably because the studs were rusty, but I was able to unscrew all but two studs instead of just removing the nuts. Looks like I'll have to get some red loctite on it when reinstalling.

I'll have to take this apart soon and see what is going on inside.
 
Last edited:

gottaluvit

Well-known member
Same here. No room for even a sheet of paper. Very tight. It sounds internal, like a gear or something won't fully engage at idle but does at higher RPMs.
I should add that my fan engages when I first start the truck below 20°F and will not disengage until it has warmed up some and I shut the truck off and drain the air. Then it works normal, I think. When it's that cold it wouldn't engage anyway. Does anyone else that has the rattle at idle have the cold lock-up too?
 

Boi

New member
19
9
3
Location
Saint Charles, IL
I should add that my fan engages when I first start the truck below 20°F and will not disengage until it has warmed up some and I shut the truck off and drain the air. Then it works normal, I think. When it's that cold it wouldn't engage anyway. Does anyone else that has the rattle at idle have the cold lock-up too?
I don't have that issue, but having just taken the clutch apart I think I have an answer for you. Short answer is that one clutch face is sealed by two o-rings. On the bell for the fan, there is a small opening through which air goes to provide pressure that counteracts a spring that keeps the clutch apart. I found on mine that grease made its way into this opening and behind that clutch face, becoming very hard and grimy. This made it incredibly difficult to move the clutch face. You may have this grime in your clutch, causing it to stick on (from the spring pressure) at startup until it heats up and frees the clutch face.

I will post an update with pictures and narrative in a day or two.
 

Boi

New member
19
9
3
Location
Saint Charles, IL
Alright, here is my progress so far. I have completely disassembled the clutch, keeping in mind its function as I examined the parts. I am not yet certain what would be causing the rattling. It may be some of the bushings/spacers that I found... they were a bit loose, but I can't imagine they would make a loud clanging noise. One of the very first things I found was RUST.

20160801_210154.jpg20160801_205827.jpg20160801_205808.jpg20160801_210143.jpg20160801_211049.jpg

It seems like moisture collected in the clutch, maybe from someone fording the vehicle, I'm not entirely sure. Some of the rust was on non-critical components, but there was rust on the thrust plate and cap. The faces on these, and the clutch disc, were also "too smooth".

Most of the work I had performed thus far was rust removal and using some scotch-brite on the thrust faces. When I was first taking the clutch apart, I noticed some grease under the seal plug, which housed a nut which kept the assembly together. At first I didn't think anything of it, until I removed the thrust plate and found hard, grimy grease caked underneath.

20160801_220142.jpg

This is problematic because there was a small channel that leads from the rear of the thrust plate to the seal plug. The center shaft is hollow, which feeds air into the are under the seal plug, which then presses on the back of the thrust plate. I found the rust and grease made it very difficult for the thrust plate to move so I used a strong degreaser to clean the housing (the part with the 3 studs). I also used degreaser and a swab in all the air channels, most of which were clogged with grease.

20160801_222125.jpg20160801_222259.jpg

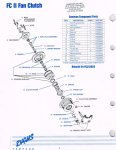
At this point, I need to get some Loctite for the thrust cap screws and then reassemble. While reading the PDF from Evans, the section on rebuilding says nothing about greasing any component while reassembling. My guess is someone mistakenly put grease into the clutch which caused issues with the thrust plate... and possibly the rattling noise. Only after reassembling will I know if simply cleaning it and etching the faces improved its performance.
clutch.jpg
 

Attachments

Boi

New member
19
9
3
Location
Saint Charles, IL
boi when you are ready to install , are you going with new belts. and any pictures of install?thanks jerryv[thumbzup]
Hi Jerryv,

I don't plan on using a new belt. The one that was installed still has a lot of life left on it, so I will replace it when it needs to be. :-D

As for the reassembly:
What I started off with was putting the piston/thrust plate in the housing for the fan. I lightly greased both o-rings and the entire plate and set it aside. I applied a fair amount of grease (but not gobs of it) to the housing where the o-rings on the plate slide, as well as the three guides. After putting the plate into the housing, I used brake cleaner to clean the face of the thrust plate, and set the assembly aside. Similarly to the thrust plate, I lightly greased the entire thrust cap and degreased the face. The hard part would have been mating the housing and the thrust cap with the clutch disc and spring. Fortunately I found it much easier to put a piece of threaded rod through the center of the assembly and use nuts to compress the whole apparatus; this way there was no fighting the spring and thrust cap in order to get the screws in. You cannot compress the spring all the way down using this method because you will eventually run into the spacer that sits in the center of the spring on top of the bearings. Once the holes are aligned it is easy to Loctite each screw and put it in. I used Loctite 271- the PDF from Evans says to use 272, but I couldn't source any locally. At first I mis-read the PDF and almost put 70 ft-lbs on a screw... it is 70 INCH-lbs! It didn't matter anyway, because I didn't have any torque-wrenches that could do 70 in-lbs so I just tightened them by hand with a screwdriver using star-pattern to ensure the thrust-cap is evenly torqued.

After that fiasco was complete, it was easy to drop the fan-side housing into the rest of the clutch (a bit tricky to align the clutch disc with the posts inside, but it can be done) and apply the remaining spacer, spring washer, and lock-nut. I then applied grease to the o-rings and threads on the cap and installed it. Since assembly was complete at this point, I then verified that I could spin the two halves freely. Hooking it up to an air source at ~10psi, I was able to lock the clutch up and verify it was functioning. There is a small hole on the outside of the fan-housing, near the base of the cap that releases air pressure to disengage the clutch. Be sure that it clear of any debris, otherwise the clutch will stay locked. This may be an issue for those who are encountering a stuck-on fan.

As for the studs that I removed when removing the nuts for the fan, I used the same Loctite 271 to lock them in place. For good measure when mounting the fan, I decided I will use some lock-washers in addition to the lock-nuts it already has.

20160802_221737.jpg20160802_222052.jpg20160802_222409.jpg20160802_232528.jpg
 
Top
AdBlock Detected

We get it, advertisements are annoying!

Sure, ad-blocking software does a great job at blocking ads, but it also blocks useful features of our website like our supporting vendors. Their ads help keep Steel Soldiers going. Please consider disabling your ad blockers for the site. Thanks!

I've Disabled AdBlock
No Thanks