• Steel Soldiers now has a few new forums, read more about it at: New Munitions Forums!

  • Microsoft MSN, Live, Hotmail, Outlook email users may not be receiving emails. We are working to resolve this issue. Please add support@steelsoldiers.com to your trusted contacts.

M939 Series Battery Cover/Seat Removal

nf6x

Feral Engineer
1,630
49
48
Location
Riverside, CA, USA
Please forgive me, but I feel the need to rant for a moment.

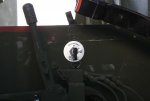
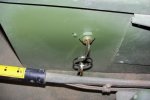
I'm installing a keyed battery disconnect switch in my M923, and I think that an ideal place for it is in the left wall of the battery box (which is also the passenger seat). It'll be reachable form the driver's seat, out of easy sight, and by putting a new hole in the floor under the switch and re-routing the existing ground cables through that hole, I should be able to leave the original cables intact and just add a short cable from the switch to the battery negative terminals. I'd probably leave the negative slave cable in place. I have all of the parts on hand now... heavy duty switch, three new MS35489-110 grommets, a hole plug to stuff in the one that I remove the ground cables from, lugs, terminal boots, and a brief surge of gumption. The batteries are disconnected, I have my safety goggles on, and I'm ready to go!

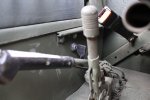
So, next step is to remove the battery box lid so I can get access to the area where the switch is going, which is right under the lid's hinge. That big lid/seat is in the way and needs to come out.

:rant:

So, why the ******* **** didn't they use captive nuts for the half dozen small screws holding it on the ******* battery box? I already unbolted the driver's seat and slid it out of the way to get more hand room around that area, but taking the cover off is still a job for two midgets with tentacles for arms! **** ****** ******* **** ******!

aua

Thanks for listening! I feel a little bit better now. Maybe I should just cut the dang screws off, then build a captive nut plate to affix in the battery box when I reinstall the cover.

Is there something silly and easy that I'm missing?

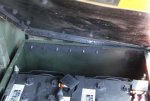
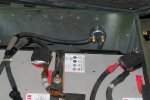
I'm attaching a picture showing the nuts holding the cover hinge on. The screws are phillips head machine screws.

I don't think that I want to install a battery relocation kit.
 

Attachments

NDT

Well-known member
Steel Soldiers Supporter
10,186
5,916
113
Location
Camp Wood/LC, TX
Ha! I'm sure the fasteners were easy to install at the battery box subassembly area at AM General.
 

nf6x

Feral Engineer
1,630
49
48
Location
Riverside, CA, USA
Ha! I'm sure the fasteners were easy to install at the battery box subassembly area at AM General.
That, and I have no doubt that AM General is an equal-opportunity employer. They probably had a pair of tentacle-armed midgets do the job. :mrgreen:

Ok, I had my nice long nap (an important part of my weekend fun!), and now I'll see if they come out with a combination wrench hanging off the nuts and a screw gun on the other side.

Then I'll see if I can find my rivnut kit.
 

nf6x

Feral Engineer
1,630
49
48
Location
Riverside, CA, USA
Thanks for the pictures! That is pretty close to what I plan to do.

An update:

I pressed the spare tire davit into service to help me lower the driver's seat out of the cab, and then tried using a small combination wrench as a porkchop to get the screws out. Nope, wrench keeps falling off. So, I'm going to just cut the danged screws out and replace them with rivnuts for next time. So this naturally led to an epic quest to find my big extension cord, since I naturally parked the truck at the farthest point from every outlet. After failing to find the cord, I pulled out my little 2k Honda genset. Then spent a while getting it to start and run on the skanky old gas that I should have drained from its tank a year ago. Time to fire up the Dremel now...

Some days, things just don't go easy. :)
 

nf6x

Feral Engineer
1,630
49
48
Location
Riverside, CA, USA
BTW, I'm using a Pollak 51-916 switch. The one pictured above looks like it may be the Caterpillar switch that many folks like? They both look similar in construction. I got my switch on eBay. PM me if you want the link; not posting it here since it is frowned upon to post short lived links.
 

nf6x

Feral Engineer
1,630
49
48
Location
Riverside, CA, USA
FINALLY! I got the cover cut out. I don't think I'll be finishing the whole project today, but at least I've made some progress: I got both seats out of the truck so that the local wildlife can nest in the cushions until next weekend. :-?

Ok, time to go make some new holes...
 

nf6x

Feral Engineer
1,630
49
48
Location
Riverside, CA, USA
Took a lot of pain to get to this point. It looks like I'll need to cut/grind a little clearance on either the switch marking plate or the seat hinge. I made the 3/4" main hole for the switch with a knockout punch (3/4" actual diameter, not pipe trade diameter), and I made the pilot hole with a Whitney hand punch. That was as far down as the hand punch would reach. Or maybe I'll just leave the marking plate off.

I'll do a blog post on the whole switch installation when it's all done. Next step will be to put a new hole in the cab floor, and I bet it'll be fun to get the (larger) knockout punch in place with my two normal-length non-tentacular arms! Gotta teach my dogs to use hand tools...
 

Attachments

nf6x

Feral Engineer
1,630
49
48
Location
Riverside, CA, USA
I probably could have worked around the lid, but I think it would have been just as difficult. Instead of working around the lid to get the lid off, I'd have been working around the lid to make the holes and install the switch and cables. Having the lid off already made it a lot easier to get the switch installed, and I still have more work to do over in that end of the battery box.

I'll install 1/4"-20 rivnuts into the seat box for the lid hinge, so next time I want to take the lid off it will be easy to unscrew it with a screw gun and regular-length arms.

Here's another pic, just for entertainment value. :beer:
 

Attachments

m16ty

Moderator
Moderator
Steel Soldiers Supporter
9,576
210
63
Location
Dickson,TN
I'm not a big fan of captured nut either though. The holder tends to break when the bolts are tough and then the only wrench you can get on it is a pair of vice grips.
 

nf6x

Feral Engineer
1,630
49
48
Location
Riverside, CA, USA
I don't have anything against the Cat or C&H switches, but I got the Pollak one on eBay for $28 with free shipping. The seller still has more. I can send a link by PM if searching doesn't turn it up. I bought a few, since I've been using these same switches for a long time.

Now, if you already have been using one of the other makes of switches, it wouldn't hurt to stick with the same brand so you only have one kind of key to lose.
 

spicergear

New member
2,307
26
0
Location
Millerstown, PA
Now that you guys are done with that...why don't you swing under the truck and pull the large washer off of the middle of the transfer case HI/LO linkage where it contacts the roller on the are of the air solenoid.

By doing that SIMPLE truck, you gain FULL CONTROL over your front axle engagement...no more of the automatic (and T-case breaking) engage in low range. Be about the best time spent vs dollar amount spent.
 

nf6x

Feral Engineer
1,630
49
48
Location
Riverside, CA, USA
Now that you guys are done with that...why don't you swing under the truck and pull the large washer off of the middle of the transfer case HI/LO linkage where it contacts the roller on the are of the air solenoid.

By doing that SIMPLE truck, you gain FULL CONTROL over your front axle engagement...no more of the automatic (and T-case breaking) engage in low range. Be about the best time spent vs dollar amount spent.
I have a new thread on just that topic. I found out that my front axle already isn't engaging in low range because the valve arm isn't adjusted right, and I was wondering if it's safe to keep it that way. I think I'll just adjust the valve arm to where the big washer never touches it, rather than removing the big washer. That should be easier, and it'll keep all of the parts attached to the truck.
 

spicergear

New member
2,307
26
0
Location
Millerstown, PA
I tried to take my valve are dealie off and for some reason it wouldn't come off. Maybe a plastic retainer or something...?!? It was easy enough to pull the pin from the clevis on the T-case side of the linkage, count the turns, pull the nut, pull the washer and slap it back together again. I would also consider cutting half the washer off. I would not however, EVER run one of the 939 series trucks with that washer and valve are in factory trim.

As an example of the torque this thing has in LOW range and reverse, I was on grass over the weekend backing up in reverse and applied the brakes and the engine would overpower the brakes unless they were really put on hard. Like one side or the other of the tandems would spin. That 6CTA and the Allison's deep reverse, plus the reduction in the T-case, PLUS the 6.44's equals a massive amount of torque at the wheels. I was actually impressed. :)

It is easy to see where the front drop of the T-case could be fractured by introducing a TON of traction by having the front axle automatically engage for LOW and Reverse. Pull that washer or clip that lever arm and you now have complete and total control of the front axle with the dash switch.

On another note, I was moving something this weekend that had my John Deere wheelie'ing to pull so I moved it enough that 'Bruiser' my M931A2 could be hooked up to it. It was about 6000lbs or so and had to go up a short steep wet grass hill. Low range, rear axles only and I REALLY, REALLY couldn't even tell it was hooked to anything. Idled up the hill and didn't spin a wheel. :mrgreen: I also had it down on the powerlines this weekend fooling around a little. Tried to go up a decent grade with a crappy short steep shale section at the beginning. Wouldn't go up at highway air pressure. Pressed the button for X-country, gave it minute of 'settling' as the tires fatten out...drove right up. :)
 

Rusty Nut

New member
87
0
0
Location
Chicagoish, Ill
Nice writeup on the disconnect switch. Next time you need to two-hand the nuts (yes, i actually typed that) use vicegrips instead of combo wrench.

/old threads never die....l
 
Top