- 2,137
- 1,095
- 113
- Location
- UT
Is your M939A2-series 5-ton truck refusing to start after sitting overnight or longer (losing its prime, lost prime, no start)? Will it start on one tank but not the other? Tired of having to manually prime your IP (Injection Pump) to get your truck started?
Well then I hope to put most of the common issues to rest with this thread, and that others can pitch in with suggestions & fixes for a "One-Stop Fix."
The A2-series trucks rely on an airtight fuel system to maintain its prime; it has a manual priming pump on the driver's side of the engine that also helps keep the IP primed during operation (there is a spring-loaded actuator on the inside of this manual pump, out of view inside engine block, that rides on a cam inside the block). If any air is allowed inside the fuel supply line, then the truck will lose its prime when shut off, allowing fuel to drain back into the tank(s). There is a bleeder screw, with lock nut, on the back side of the IP (between the IP and engine block, all the way forward near top of IP); the bleeder screw requires a 10mm open-end wrench and the lock nut requires a 3/4-inch open-end wrench. Crack both of these open while pumping furiously away on the manual priming pump, and eventually fuel will begin to flow out of the bleeder screw. Tighten the lock nut (3/4-inch) then tighten the 10mm bleeder screw. You could crack just the 10mm bleeder screw, but I've found it is quicker to also crack loose the locking nut as well. There is no other lift pump to maintain prime & supply fuel (a lot of Cummins performance folks are familiar with high-performance electric lift pumps, such as those from FASS and AirDog; this Cummins engine does not use any type of electric nor high-performance lift pump). If kept airtight, the stock fuel supply system will do a fine job of maintaining prime for the IP; I've let my M931A2 sit without starting for several weeks at a time and my truck will fire right up in just a second or two. So it can be done!
**NOTE: If you have a LOT of air in your fuel supply line, such as when replacing fuel filters and/or fuel supply lines, it helps to crack open the banjo bolt on the side of the secondary fuel filter, as shown in this post by member MtnSnow. Once fuel flows from this banjo bolt, tighten it and then crack open the bleeder screw & lock nut on the top side of the IP; you'll have your prime back in no time this way.**
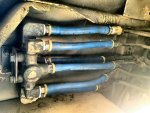
The first most likely culprit will be your flexible fuel supply hoses. If you have only one tank, you will need to replace 2 flexible fuel lines: one from the tank supply line to the primary fuel filter (typically the big canister behind the driver's side front wheel/tire), and then from the primary filter to the manual lift pump on the side of the engine block. If you have a wrecker, dump, or a tractor, then you get to have even more fun: you will have to replace 8 (yes, EIGHT) flexible fuel supply (1/2-inch) & return (3/8-inch) hoses. These connect through the fuel tank selector valve mounted underneath the cab floor, behind the driver's seat (look up from right behind the air cleaner housing, by driver's step). You can see 3 supply & 3 return lines connecting to the fuel tank selector valve. Some early A2 trucks had crimped swivel connectors with their fuel hoses; other trucks have Push-Lok connectors, which are re-usable and all you have to do is purchase new hose, saving you money.
**Be sure to use fuel hose rated for diesel fuel; most hydraulic hose is OK for diesel fuel as well. Some NAPA & truck-supply stores sell diesel fuel hose by the foot; non-corporate NAPA stores might be able to fabricate new hoses with new connectors as well (NAPA corporate bosses don't like this service and have eliminated it from most corporate-controlled stores...look for an independent NAPA store and ask if they can make new hoses). If not, seek out a a shop that carries/makes hydraulic hoses; worst case, you can order it on the Interwebs. I like the Push-Lok connectors, as they are re-usable and save you money; they also don't require hose clamps. I would recommend against using NOS fuel supply hoses, as you don't know how old they are; they could have sat on a shelf in some warehouse for 10 years or more, and have pinholes in them that aren't visible to you, yet still allow air into your fuel supply lines.**
On a truck with a fuel tank selector switch, I like to start by removing the supply & return lines at the rear first, then work my way forward. They are all generally the same length and difficult to mix up...the top hoses (1/2-inch hose) are the supply from the tanks, and the bottom hoses (3/8-inch hose) are the return lines back to the fuel tanks. As they are two different sizes, they are difficult to mix up. The rear-most pair of hoses (on your right as you look up at at them) will service the driver's side tank, the middle hoses go to/from the engine, and the forward-most pair of hoses (on your left as you look up at them) service the passenger-side fuel tank. You don't need to be much of a contortionist to work open-end wrenches into the tight spaces to loosen & re-tighten the fittings...I like to first loosen the flare fitting on the far end of the hose, then the fitting on the fuel selector switch, as this allows the hose to rotate as you loosen it. If your fuel tank selector switch is a tight fit like mine, you might need to break out the crows-foot sockets to use with your ratchet. My 1/2-inch Push-Lok connectors use 7/8-inch, 15/16-inch, and 5/8-inch open end wrenches/crows-foot sockets; my 3/8-inch Push-Lok connectors use 3/4-inch, 11/16-inch, and 9/16-inch wrenches. The hardest ones to get at are the far ends of the hoses, attaching to the hard lines heading to the fuel tanks; luckily these are flared fittings that should only be snugged tight, once broken loose they loosen pretty easily with your fingers...then you can loosen the connector at the selector valve.
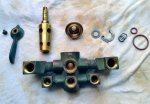
You may also want to consider servicing your selector valve itself at this point; it is held in place by two bolts. The Sticky at the head of this section does a good job of explaining how to do it without removing the fuel hoses. But if you've gone through this much work already, you might as well remove it and service it. I had a problem with my existing selector valve, so I purchased a take-out unit from another member (JCAppelJr) and rebuilt it with new O-Rings. I also disassembled mine, used 0000 steel wool to clean the internal parts, and greased up everything upon re-assembly for smooth operation. As my upper parts were heavily rusted, I soaked them in Evapo-Rust overnight, scrubbed with a wire brush the next day, coated them in grease for protection, and loaded them up with extra grease to try to keep any moisture out before tightening down the top cap.
Once the flexible fuel lines are replaced to/from the selector valve, find & remove the flexible fuel line between the selector valve and the primary fuel filter. Once again, mine used Push-Lok connectors so I only had to change out the hose itself. Then do the same for the flexible fuel line between the primary fuel filter and the manual priming pump on the side of the engine block. When attempting to reprime the fuel system, crack open the banjo bolt on the secondary fuel filter mount (as in this post from MtnSnow) to bleed out the air while you are endlessly pumping away. It takes me about 200 pumps on the manual primer button before I get fuel out of the loosened banjo bolt. And when you take a break from pumping the primer button, be sure to close the banjo bolt so that any fuel you've been lifting doesn't drop back into the tank! Finger-tight is fine, and works for me. I've had my fuel supply line completely empty on a couple of occasions, and used the manual priming pump to get the air out of the line & a steady flow of fuel up...it takes me about 200 pumps on the button, but it works just fine. You have to crack a bleeder/bolt open while pumping, otherwise you aren't doing anything to help yourself as no fuel will be lifted. Once fuel is steadily flowing from this banjo bolt, tighten it and then loosen the bleeder on the back side of the IP and begin pumping the manual primer button again...it won't take long before fuel is steadily flowing out of this bleeder as well...tighten everything down and give your engine a crank to fire it up.
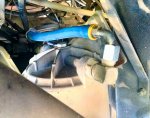
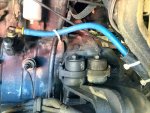
**If you are having trouble slipping the fuel hose over your Push-Lok connectors, I like to apply a light coat of silicone spray on the connector, and I heat the inside end of the hose with a heat gun to make it more flexible. When it cools it will retain it rigidity but conform better to the connector, making it very difficult to remove.**
OTHER PROBLEMS: Some other common issues are cracked flare fittings on the fuel supply elbows on top of fuel tanks ("draw straws"), swollen-shut flexible in-tank return hoses, broken solder joints on "draw straws" (which causes supply tube to fall out of brass elbow and roll around inside fuel tank...they're lots of fun to try to fish out), cracks/holes/breaks in copper hard supply lines, and worn manual priming pumps. For the cracked flared fuel supply line, loosen the flared nut and remove it from the brass elbow on top of the fuel tank to inspect it for damage (it should be obvious!). If these are over-tightened, the copper supply line can crack near the flared end which will let air into supply lines and loss of engine prime. You may also notice some fuel leaking out around the supply elbow on top of the fuel tank. You will have to cut off the cracked/broken end and reflare the end of the hard supply line...it's not hard to do & the necessary tools aren't that expensive anyway. Slide the flare nut backwards on the hard line so you can re-use it when done (snug is fine, don't overtighten it!).
While troubleshooting a loss-of-prime issue after replacing all flexible fuel hoses on my truck, I noticed fuel leaking from the return line fitting on top of the driver's side tank. It was cracked at the flared fitting, and I repaired it as described above for the supply line flared fitting...but when I removed the brass elbow from the tank, I saw that the drop-down in-tank line was a flexible hose that was swollen shut and in the process of disintegrating. I went to my local hose repair shop, and they fabricated new elbows with steel tubing brazed to them for me. I replaced these on both tanks, and inspected the flared end of the return line on the passenger side tank for any potential damage (none noted). My truck instantly ran better after this fix!

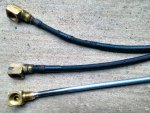
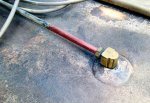
If you know you have fuel in a tank, but can't get any to draw up the supply line, your "draw straw" may have broken off like mine did on the driver's side tank. The solder joint had broken and the copper draw tube fell down into the tank, all the way forward, making it difficult to fish out with a very long piece of coat hanger. I brazed both of these copper draw straws onto the brass elbows, and re-installed them into the fuel tanks. I also inspected the flared fittings to ensure that there were no cracks/damage/breaks.
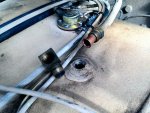

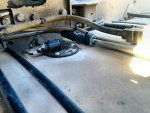
I replaced the worn manual lift/priming pump on my truck...after all I've gone through up to that point, it made sense to just replace it. My local Cummins dealer had the older style in stock, but minus the gasket...so I had to make my own gasket out of oil/diesel-resistant gasket material that I bought at my local NAPA. At the top of the banjo fitting above the manual pump is a pressure switch; follow these wires to the electrical plug and disconnect the plug there (4 wire bundle). Hold the banjo nut/bolt below with a wrench to prevent it from turning while you remove the pressure switch, then loosen the banjo nut/bolt and remove it along with the 2 copper crush washers. My crush washers were in good shape, but I annealed them anyway to soften them, and they worked flawlessly upon re-installation. Remove the fuel supply line coming from the primary fuel filter, remove the elbow fitting, and then remove the manual priming pump from the engine block by removing 2 bolts with a 10mm socket. Mine was RTV-ed pretty solidly, so I gently worked it loose and later cleaned off all traces of the gasket remnants from it & the engine block. I sealed the new gasket I made to the new manual priming pump, then applied more gasket sealer to the engine block side, and bolted it back into place. Keep in mind that the plunger/actuator on the back side of the priming pump is spring-loaded and you will have to maintain steady pressure on it while trying to re-install the two bolts, otherwise it will slip off of the internal cam inside the engine block & you get to start all over again. Once done, re-install the fuel hose supply elbow and then the hose; install the banjo nut/bolt with crush washers, then re-install the fuel pressure switch and reconnect its electrical plug. Crack open the secondary fuel filter banjo bolt & prime away, then do the same at the IP bleeder.
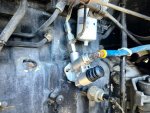
I did replace the flexible return hose from the IP to the selector valve, as the existing hose was cracking at every bend. It connects the IP to a hard line at the frame...mine used a Push-Lok connector at the IP, but I re-used the hose clamp that was on it to keep my new hose from unraveling/fraying. In the photo you can also see that I replaced the air compressor oil line with a new one as well, along with the new power steering hoses (replaced when I removed & rebuilt the leaking power steering reservoir).
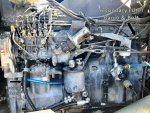
**NOTE: I don't throw away old hoses; I clean them and keep them as insulation for hoses/wiring/etc. to prevent chafing/cuts. You can see some of these repurposed hoses in my pics. Cheap & effective!**
That should resolve the most common fuel priming & no-start woes; my truck will fire right up after sitting for long periods with no issues so far, regardless of which tank is selected. I hope you have the same good luck with your truck!
Well then I hope to put most of the common issues to rest with this thread, and that others can pitch in with suggestions & fixes for a "One-Stop Fix."
The A2-series trucks rely on an airtight fuel system to maintain its prime; it has a manual priming pump on the driver's side of the engine that also helps keep the IP primed during operation (there is a spring-loaded actuator on the inside of this manual pump, out of view inside engine block, that rides on a cam inside the block). If any air is allowed inside the fuel supply line, then the truck will lose its prime when shut off, allowing fuel to drain back into the tank(s). There is a bleeder screw, with lock nut, on the back side of the IP (between the IP and engine block, all the way forward near top of IP); the bleeder screw requires a 10mm open-end wrench and the lock nut requires a 3/4-inch open-end wrench. Crack both of these open while pumping furiously away on the manual priming pump, and eventually fuel will begin to flow out of the bleeder screw. Tighten the lock nut (3/4-inch) then tighten the 10mm bleeder screw. You could crack just the 10mm bleeder screw, but I've found it is quicker to also crack loose the locking nut as well. There is no other lift pump to maintain prime & supply fuel (a lot of Cummins performance folks are familiar with high-performance electric lift pumps, such as those from FASS and AirDog; this Cummins engine does not use any type of electric nor high-performance lift pump). If kept airtight, the stock fuel supply system will do a fine job of maintaining prime for the IP; I've let my M931A2 sit without starting for several weeks at a time and my truck will fire right up in just a second or two. So it can be done!
**NOTE: If you have a LOT of air in your fuel supply line, such as when replacing fuel filters and/or fuel supply lines, it helps to crack open the banjo bolt on the side of the secondary fuel filter, as shown in this post by member MtnSnow. Once fuel flows from this banjo bolt, tighten it and then crack open the bleeder screw & lock nut on the top side of the IP; you'll have your prime back in no time this way.**
The first most likely culprit will be your flexible fuel supply hoses. If you have only one tank, you will need to replace 2 flexible fuel lines: one from the tank supply line to the primary fuel filter (typically the big canister behind the driver's side front wheel/tire), and then from the primary filter to the manual lift pump on the side of the engine block. If you have a wrecker, dump, or a tractor, then you get to have even more fun: you will have to replace 8 (yes, EIGHT) flexible fuel supply (1/2-inch) & return (3/8-inch) hoses. These connect through the fuel tank selector valve mounted underneath the cab floor, behind the driver's seat (look up from right behind the air cleaner housing, by driver's step). You can see 3 supply & 3 return lines connecting to the fuel tank selector valve. Some early A2 trucks had crimped swivel connectors with their fuel hoses; other trucks have Push-Lok connectors, which are re-usable and all you have to do is purchase new hose, saving you money.
**Be sure to use fuel hose rated for diesel fuel; most hydraulic hose is OK for diesel fuel as well. Some NAPA & truck-supply stores sell diesel fuel hose by the foot; non-corporate NAPA stores might be able to fabricate new hoses with new connectors as well (NAPA corporate bosses don't like this service and have eliminated it from most corporate-controlled stores...look for an independent NAPA store and ask if they can make new hoses). If not, seek out a a shop that carries/makes hydraulic hoses; worst case, you can order it on the Interwebs. I like the Push-Lok connectors, as they are re-usable and save you money; they also don't require hose clamps. I would recommend against using NOS fuel supply hoses, as you don't know how old they are; they could have sat on a shelf in some warehouse for 10 years or more, and have pinholes in them that aren't visible to you, yet still allow air into your fuel supply lines.**
On a truck with a fuel tank selector switch, I like to start by removing the supply & return lines at the rear first, then work my way forward. They are all generally the same length and difficult to mix up...the top hoses (1/2-inch hose) are the supply from the tanks, and the bottom hoses (3/8-inch hose) are the return lines back to the fuel tanks. As they are two different sizes, they are difficult to mix up. The rear-most pair of hoses (on your right as you look up at at them) will service the driver's side tank, the middle hoses go to/from the engine, and the forward-most pair of hoses (on your left as you look up at them) service the passenger-side fuel tank. You don't need to be much of a contortionist to work open-end wrenches into the tight spaces to loosen & re-tighten the fittings...I like to first loosen the flare fitting on the far end of the hose, then the fitting on the fuel selector switch, as this allows the hose to rotate as you loosen it. If your fuel tank selector switch is a tight fit like mine, you might need to break out the crows-foot sockets to use with your ratchet. My 1/2-inch Push-Lok connectors use 7/8-inch, 15/16-inch, and 5/8-inch open end wrenches/crows-foot sockets; my 3/8-inch Push-Lok connectors use 3/4-inch, 11/16-inch, and 9/16-inch wrenches. The hardest ones to get at are the far ends of the hoses, attaching to the hard lines heading to the fuel tanks; luckily these are flared fittings that should only be snugged tight, once broken loose they loosen pretty easily with your fingers...then you can loosen the connector at the selector valve.

You may also want to consider servicing your selector valve itself at this point; it is held in place by two bolts. The Sticky at the head of this section does a good job of explaining how to do it without removing the fuel hoses. But if you've gone through this much work already, you might as well remove it and service it. I had a problem with my existing selector valve, so I purchased a take-out unit from another member (JCAppelJr) and rebuilt it with new O-Rings. I also disassembled mine, used 0000 steel wool to clean the internal parts, and greased up everything upon re-assembly for smooth operation. As my upper parts were heavily rusted, I soaked them in Evapo-Rust overnight, scrubbed with a wire brush the next day, coated them in grease for protection, and loaded them up with extra grease to try to keep any moisture out before tightening down the top cap.

Once the flexible fuel lines are replaced to/from the selector valve, find & remove the flexible fuel line between the selector valve and the primary fuel filter. Once again, mine used Push-Lok connectors so I only had to change out the hose itself. Then do the same for the flexible fuel line between the primary fuel filter and the manual priming pump on the side of the engine block. When attempting to reprime the fuel system, crack open the banjo bolt on the secondary fuel filter mount (as in this post from MtnSnow) to bleed out the air while you are endlessly pumping away. It takes me about 200 pumps on the manual primer button before I get fuel out of the loosened banjo bolt. And when you take a break from pumping the primer button, be sure to close the banjo bolt so that any fuel you've been lifting doesn't drop back into the tank! Finger-tight is fine, and works for me. I've had my fuel supply line completely empty on a couple of occasions, and used the manual priming pump to get the air out of the line & a steady flow of fuel up...it takes me about 200 pumps on the button, but it works just fine. You have to crack a bleeder/bolt open while pumping, otherwise you aren't doing anything to help yourself as no fuel will be lifted. Once fuel is steadily flowing from this banjo bolt, tighten it and then loosen the bleeder on the back side of the IP and begin pumping the manual primer button again...it won't take long before fuel is steadily flowing out of this bleeder as well...tighten everything down and give your engine a crank to fire it up.


**If you are having trouble slipping the fuel hose over your Push-Lok connectors, I like to apply a light coat of silicone spray on the connector, and I heat the inside end of the hose with a heat gun to make it more flexible. When it cools it will retain it rigidity but conform better to the connector, making it very difficult to remove.**
OTHER PROBLEMS: Some other common issues are cracked flare fittings on the fuel supply elbows on top of fuel tanks ("draw straws"), swollen-shut flexible in-tank return hoses, broken solder joints on "draw straws" (which causes supply tube to fall out of brass elbow and roll around inside fuel tank...they're lots of fun to try to fish out), cracks/holes/breaks in copper hard supply lines, and worn manual priming pumps. For the cracked flared fuel supply line, loosen the flared nut and remove it from the brass elbow on top of the fuel tank to inspect it for damage (it should be obvious!). If these are over-tightened, the copper supply line can crack near the flared end which will let air into supply lines and loss of engine prime. You may also notice some fuel leaking out around the supply elbow on top of the fuel tank. You will have to cut off the cracked/broken end and reflare the end of the hard supply line...it's not hard to do & the necessary tools aren't that expensive anyway. Slide the flare nut backwards on the hard line so you can re-use it when done (snug is fine, don't overtighten it!).
While troubleshooting a loss-of-prime issue after replacing all flexible fuel hoses on my truck, I noticed fuel leaking from the return line fitting on top of the driver's side tank. It was cracked at the flared fitting, and I repaired it as described above for the supply line flared fitting...but when I removed the brass elbow from the tank, I saw that the drop-down in-tank line was a flexible hose that was swollen shut and in the process of disintegrating. I went to my local hose repair shop, and they fabricated new elbows with steel tubing brazed to them for me. I replaced these on both tanks, and inspected the flared end of the return line on the passenger side tank for any potential damage (none noted). My truck instantly ran better after this fix!


If you know you have fuel in a tank, but can't get any to draw up the supply line, your "draw straw" may have broken off like mine did on the driver's side tank. The solder joint had broken and the copper draw tube fell down into the tank, all the way forward, making it difficult to fish out with a very long piece of coat hanger. I brazed both of these copper draw straws onto the brass elbows, and re-installed them into the fuel tanks. I also inspected the flared fittings to ensure that there were no cracks/damage/breaks.


I replaced the worn manual lift/priming pump on my truck...after all I've gone through up to that point, it made sense to just replace it. My local Cummins dealer had the older style in stock, but minus the gasket...so I had to make my own gasket out of oil/diesel-resistant gasket material that I bought at my local NAPA. At the top of the banjo fitting above the manual pump is a pressure switch; follow these wires to the electrical plug and disconnect the plug there (4 wire bundle). Hold the banjo nut/bolt below with a wrench to prevent it from turning while you remove the pressure switch, then loosen the banjo nut/bolt and remove it along with the 2 copper crush washers. My crush washers were in good shape, but I annealed them anyway to soften them, and they worked flawlessly upon re-installation. Remove the fuel supply line coming from the primary fuel filter, remove the elbow fitting, and then remove the manual priming pump from the engine block by removing 2 bolts with a 10mm socket. Mine was RTV-ed pretty solidly, so I gently worked it loose and later cleaned off all traces of the gasket remnants from it & the engine block. I sealed the new gasket I made to the new manual priming pump, then applied more gasket sealer to the engine block side, and bolted it back into place. Keep in mind that the plunger/actuator on the back side of the priming pump is spring-loaded and you will have to maintain steady pressure on it while trying to re-install the two bolts, otherwise it will slip off of the internal cam inside the engine block & you get to start all over again. Once done, re-install the fuel hose supply elbow and then the hose; install the banjo nut/bolt with crush washers, then re-install the fuel pressure switch and reconnect its electrical plug. Crack open the secondary fuel filter banjo bolt & prime away, then do the same at the IP bleeder.

I did replace the flexible return hose from the IP to the selector valve, as the existing hose was cracking at every bend. It connects the IP to a hard line at the frame...mine used a Push-Lok connector at the IP, but I re-used the hose clamp that was on it to keep my new hose from unraveling/fraying. In the photo you can also see that I replaced the air compressor oil line with a new one as well, along with the new power steering hoses (replaced when I removed & rebuilt the leaking power steering reservoir).

**NOTE: I don't throw away old hoses; I clean them and keep them as insulation for hoses/wiring/etc. to prevent chafing/cuts. You can see some of these repurposed hoses in my pics. Cheap & effective!**
That should resolve the most common fuel priming & no-start woes; my truck will fire right up after sitting for long periods with no issues so far, regardless of which tank is selected. I hope you have the same good luck with your truck!
Last edited:


