• Steel Soldiers now has a few new forums, read more about it at: New Munitions Forums!

  • Microsoft MSN, Live, Hotmail, Outlook email users may not be receiving emails. We are working to resolve this issue. Please add support@steelsoldiers.com to your trusted contacts.

"Major Zippidy" M923 build

juanprado

Well-known member
Steel Soldiers Supporter
5,518
2,737
113
Location
Metairie/La (N'awlins)
I would like to thank Chris for this wonderful forum and the information that is readily available here. Hats off to the tech gurus and mods for making it happen also.

Many members here have been very helpful to me and I appreciate all the support and info and the warm cooperative atmosphere on ss. Thanks to those who have sold me parts and to the customers who have supported me. All ss transactions have been super and I would not hesitate to deal with these folks again.

My truck was a GL purchase picked up on the most outrageous day here locally- Mardi Gras 2012 from Ft. Polk. When all are headed here to party, I drove in the opposite direction away and when the fools were leaving, I was driving back.:) I did break down 18 miles from home on a 230 mile driving recovery with a bad water pump belt that I have mentioned on other posts along with the bottom part of my muffler that blew out somewhere on I-10. It was an optional piece of metal. Stories for another day. :(

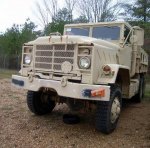
"crawdaddy" is responsible for me being here and pointing me to GL as I was originally looking to buy a cucv for my son's first car, then saw the ton of deuces coming out of Pineville and Jacksonville in the fall of 2011. The deuces made me start thinking it was possible for me to get a new "toy" then the automatic, abs, power stg, and plain bad azz looking 5 tons sealed the deal. No, my son never did get that green blazer, he got a cherokee instead. fat lady sings

I hope I can help others with some of the things I have done.
 

Attachments

Last edited:

juanprado

Well-known member
Steel Soldiers Supporter
5,518
2,737
113
Location
Metairie/La (N'awlins)
Adding Reverse back up lights and back up alarm

I work for the Boy Scouts and use my truck often around Cub & Boy Scouts. I wanted to add a safety feature as kids are sometimes drawn to big vehicles at the wrong time.

I knew this was very doable after I read the attached Allison manual that outlined there was a switch port on the tranny. I sold parts for 20 years, ASE parts cert, and like a parts challenge.

My research and contacts with tranny shops and Allison confirmed that these mt654 are sold naked to customers with out electronics. It is up to the chassis builder to determine what neutral safety, pressure switch, and electronics are specd for the vehicle with the appropriate connectors.

My goals was to do this cheap and easy. All back up light switches work the same, no matter the tranny or mfg. They are normally open, when reverse is engaged the pressure switch closes the contacts and the circuit is complete. Only variables are price, thread size, and connectors. Most tranny have approximately same reverse pressure or the switches have a range of psi for operation.

I used an allison 23041298 as it came with the switch, male and female connectors, and pins. It is also a name brand quality hd part. I found it on epay and was priced right at $12. Remember any reverse switch will work. For those who want a true military look and feel, use the reverse switch off an m35a3 auto with the appropriate 2 pin military connector. Erik's has both but a lot more $. The m35a3 switch is probably more water proof than my set up but I already went through one 100 year storm (Katrina) so I figure I am good on that end. I also don't see me testing the fording capability of my truck. Something for you off roaders to consider on this mod.

There is a 1/8 npt thread port on the right passenger side at the rear of the tranny above the oil pan line next to the id tag. Remove plug, install favorite switch.

I wanted back up lights that looked "OE" so I used lights designed for a fmtv from epay. You can easily substitute your favorite work lights or lights off a m35a3. Notice the ones on the fmtv are 12v and marked such. Change the bulbs out. They have 2 sockets per fixture. They take the standard 24v 1683 bulb for taillights and turn signals. I used 2 led bulbs for the bottom sockets with the bigger "eye" and the incandescent on top. These are one wire fixtures.

Mine are mounted on the mudflaps at a height I thought were most noticeable by foot traffic and cars. Drill 2 bolts and easily mounted. I used internal star washers to ensure a good ground as they are one hot wire with no ground wire. Run wires, tuck them out of the way. I used a 4 way connector at the frame to bring the 2 light wires, back up alarm hot lead and power source together.

There are tons of back up alarms. I chose cheap, loud, and US made. Peterson #781. It is 102db. many flavors out there, some auto sensing, different db and you can put $200 to $15. 781 was $17 plus ship from epay. I mounted it on the top of the cross member by the pintle hook on the passenger side looking backwards but protected and out of harms way. It takes 2 bolts but I used one bolt already there holding a wiring loom clamp holding the rear light socket harness. Switch to a longer bolt and reattach the clamp and alarm. I saw no need to drill another hole and just used one bolt on the side of the alarm with the ground strap. One screw post with a ring terminal for your hot wire run to the 4 way with your lights and the hot wire.

Run a hot wire to the pressure switch. I have installed the pulse distribution box in the battery box so I ran a 10 amp circuit breaker and used one of the 8 24v taps. Mine is set up to be constant hot so if you accidentally leave the truck in reverse after you shut down and power down, She will beep at ya as the shifter does take some getting used to. I know that I would always bring the shifter to the top thinking park as most civilian cars and medium duty trucks I was familiar with but hey there is no park and that is reverse. Nice holes in battery case right over tranny to run the wire straight down and you are in the right place.

Run Wire from other side of switch to back of truck. I used existing wiring and air brake line routing and just piggy backed another wire along frame. Connect to your 4 way with lights and back up alarm. I used the Allison supplied connectors at the switch but use what ever works for the switch you bought. I wrapped everything in multiple layers of good stuff electrical tape.

Enjoy your easy mod. I have also attached install directions from switch and alarm for reference.
 

Attachments

Last edited:

juanprado

Well-known member
Steel Soldiers Supporter
5,518
2,737
113
Location
Metairie/La (N'awlins)
GSS 9110 Military Air Seats

I had seen several posts on these seats on ss and had a dream and drooled to get one. Luckily a close by ss member "Amphibious" had some " Left drivers side" for sale and I jumped on the oppty. :p They were also tan which matches my truck.

Cool seats that are heavy with blast protection weighing 100lbs. I was looking for the safety of a 3 point seat belt harness, air ride comfort, adjustable, and headrest. They deliver on all counts!

http://www.globalseating.com/9110.php

Thanks to "billabongkong" who advised me to mount them on a channel to raise them up for greater height and seat comfort as he had already mounted one. Thanks for all the advise.

I used some u shaped channel that was slotted, painted green already, and had rolled double lip bottom from WW Grainer. I used part number 4A974. It is a 10ft length. I cut 2 lengths and mounted the rails long wise from front to back.

My seats did not have tethers and the OE ones on the springer were only 4 inches which is way too short for this mod so I used 2 Superior seat belt extensions 12 inch long part number 46-3300B. Advance and O' Reilly sell it.

When I removed the springer seat I was surprised at how much rust there was on the seat base in between the floor and the base. The cab had no rust but The seat base was really pitted. Another reason to mount it on a channel to keep it dry and moisture from being trapped under it.

I did not use the original cab holes because they did not align up with the slider base. I measured and drilled new ones through the floor. Nice thing about the slotted channel is I did not have to drill it and the slots allowed for adjustment. I used the same holes on the new seat for my template. I used 3 inch 3/8 grade 8 on the front holes and 3 1/2 inch on the back holes.

Tech support had advised me to reinforce the floor due to the weight and to meet current standards. On the 2 front holes I had no room to mount a plate so I just used some heavy fender washers. On the back, I used a steel bar cut to length with holes drilled for the bolts to pass through on the underside of the cab with the large washers and lock nuts. I need 2 soldiers B to lift the seat. It is a bear to get in the cab.

Thanks to "m35a2AZ" who shared pics of his m934 OE air seats, I decided to run the air from the same location and try to stay with the same set up. The OE set up used a bendix pressure protection valve mounted to the side of the truck next to the air tanks and getting air from the secondary tank. I used a Midland Haldex KN31000 valve that has 3 ports.

I chose to use a unused port on the side of the air tank. I used a 1/2 npt bushing to 1/4 and a close nipple to mount it out of the tank. I plugged the other side port on the valve and used the top port. I ran the 1/4 air line straight up the frame in between the air tank brackets and across the hollow cross member on top of the tranny that already had other wires and Air lines. Easy run and I ran it into the cab through one of the 3/8 bolt holes that mounted the springer that was clear.

I used a chinaharbor air pressure regulator set to 85psi with push to connect fittings mounted to the cab reinforcement by the seat belt behind the parking brake handle out of the way. I also used a 1/8 closed nipple and a 90 elbow so I could see the gauge clearly while seated as the adjustment knob is also easy to reach.

When I first mounted the seat belt tethers I used the original holes. The seat rides higher and I found I had stretched the tethers to their max reach but the seat could go higher. I then removed them and used another set of bolt holes that are 2 inches higher and already drilled. It is like the cab is already set up for it. The picture attached shows them at the wrong location but you can see the other bolt holes further up.

I also removed the shoulder point seat belt at the top of the seat and ran it through the short brace at the middle height of the cab so it would not get pinched by the seat back against the cab frame when pushed all the way back as the shoulder point seat belt comes out of the back of the seat. I then re attached it to the top of the seat. The cab brace holds it out of the way and it is the perfect width to mount the military pouch with the seat belt cutter strap knife. I found them quite reasonable on ebay especially when bought in multiples.

I once was in a accident with my suv lying on its side. Due to the inertia lock I could not release the seat and I will hopefully never be in that predicament again.

last item is to cut a few notches in the floor mat and tuck it back. I did take the oppty while the seat was out to re glue the cab insulation with contact cement that was peeling away back to the foam pad and plug 2 holes by the convoy poles I was not using that mud daubbers had decided to use to build quite a colony.
 

Attachments

Last edited:

BillabongKong

Member
Steel Soldiers Supporter
107
5
18
Location
Glen Ridge NJ
Awesome Install Juan!
I am sure your pictures and advice will help others.
Let me know when your in the New York area ,
we will do some wheelin in the Pine Barrens !
 

juanprado

Well-known member
Steel Soldiers Supporter
5,518
2,737
113
Location
Metairie/La (N'awlins)
I found the seat to be real close in size as far as drivers. The seat base and dimensions are about the same. Now the seatback is much taller and does have the head rest. Maybe a few inches wider but it fit great. The left seat belt is maybe an inch clearance to the metal cab support as it sticks out and plenty of room on the passenger side to get to the brake/transfer levers. I am 5'7 210lbs so not a problem for me but I do have the seat all the way back and like it like that with plenty of room to the wheel. With the air up it feels more like I am sitting in a chair at a natural height.

I could see your height being an issue with the ride with the air up but I also have it on a 2inch channel riser that might not be the best for you. Might be best to mount straight to the floor and test fit with air pressure to the seat?
 

1 Patriot-of-many

Well-known member
Steel Soldiers Supporter
2,155
63
48
Location
Zimmerman MN
Did you add the "Europe" placards(Have no idea what they are called)? Where did you get them? I came on my M1009 but always thought about putting them on my trucks. Nice job on the backup lights!
 

juanprado

Well-known member
Steel Soldiers Supporter
5,518
2,737
113
Location
Metairie/La (N'awlins)
"delineation" signs & stickers

Thanks Patriot!

I posted a parts wanted ad for the "delineation" signs here. Weldersam hooked me up.

They are stickers made by 3m in 2 sizes. 3M also provided the military with sign backings. Most are just stickered on but the ones on mud flaps seem to be on some type of material. Mine I think were actual mudflaps on a 800 or a trailer? Mine were real beat up on the yellow outer edges but I found strips of the exact 3m yellow/orange on ebay so I did a cut n paste on the edges. There is a faint line but not real visible.

The small ones are available on ebay and I have found the large ones with a parts dealer in Europe on the internet but the shipping is probably the killer.

They are nice and bright at night with light reflecting off them. I live in the the land of some of the highest non insured motorist population in the US and wanted some extra visibility. You would be surprised how good my truck's camouflage works as folks are constantly testing my brakes and making Kamikaze moves. :) Seems that not all can see my big beast clearly.
 

Crawdaddy

Member
442
2
18
Location
Louisiana
Do you think a seat like that will fit in the cab of a deuce? I'm assuming the deuce and 900 series cabs are very similar in dimensions, but the deuce has a larger steering wheel and the trap door for the master cylinder to contend with. How high is the actual seat cushion from the baseplate? How deep is the seatback?
 

juanprado

Well-known member
Steel Soldiers Supporter
5,518
2,737
113
Location
Metairie/La (N'awlins)
wheel check flags

I was at my local truck pro and saw they stocked the wheel check flags to alert on loose lug nuts.

I liked the idea and had seen them on garbage trucks and bus fleets.

They were .65 each. you can probably do better with a hd account with them but I am small potatoes to them.

They are installed with the collar and flag spaced off the rim as I at first installed them flush.

Since our trucks are right and left threads make sure to flag accordingly.

Fast, easy, and hopefully piece of mind.

http://www.wheel-check.com/
 

Attachments

juanprado

Well-known member
Steel Soldiers Supporter
5,518
2,737
113
Location
Metairie/La (N'awlins)
Fuel can holder

Nothing exotic here but I wanted to add another Jerry can holder and my rear mud flaps have dileanation signs and back up lights. Forward mud flap was available.

Straight 4 bolt mounting and I used strap holder loop brackets that came off my m101. I must have had 2 dozen bolted to the bed in various places. Used a military strap across the top with 2 brackets for extra hold down with the standard strap through the middle.

Fuel can sticker on ebay or at Rick Larson's decals
 

Attachments

Last edited:

juanprado

Well-known member
Steel Soldiers Supporter
5,518
2,737
113
Location
Metairie/La (N'awlins)
4 way lug nut tool

I acquired a nos 4 way truck hd lug wrench off a military cable reel trailer and wanted to find a way to carry it. It is bulky. I mounted on the brackets already holding the mud flaps. It supports it nicely and only took 1/2 coarse bolt, nut, washers, and a stainless wing nut from Depot.

These wrenches are nice to help with those stubborn lugs and have a budd socket, 1 1/2 and 2 others.
 

Attachments

juanprado

Well-known member
Steel Soldiers Supporter
5,518
2,737
113
Location
Metairie/La (N'awlins)
Extra Fire Extinguisher

I was fortunate to acquire 2 10lb fire extinguishers off a GL F700 katrina relic in Jan. They were dirty, discharged but perfectly serviceable. I had them refilled and they wiped down easily.

TimnTrucks was my source for the HD bracket off a generator trailer I believe. It has already vertical or horizontal mounting holes pre drilled.

I mounted on the back of the first tool box with 4 bolts through the tool box. I also used foam stick on insulation from Home depot inbetween the box and the bracket. I also used some on the inside collars of the bracket as the OE canvas was dry and had no cushion on where the extinguisher lays down.

All weather thick baggie was from a Canadian vendor on ebay with a visibility window to see the gauge easily.

Pretty straight forward.
 

Attachments

Last edited:

juanprado

Well-known member
Steel Soldiers Supporter
5,518
2,737
113
Location
Metairie/La (N'awlins)
Spin On Oil Filter Conversion

Having seen many threads on this so I took the plunge. My buddy GoldnEagle told me it was a cinch. :)

I used a Baldwin brand OB1368 ( It is a reboxed fleetguard) from B Line Filters in Odessa TX. They were the cheapest I could find @ $69 plus shipping $9 432-580-3020 www.blinefilter.com

The OE canister has a 1/8 pipe plug drain that takes a 7/16 wrench and the long bolt is a 9/16.

Pretty straight forward and easy to change. I did use a piece of hose on the canister drain to my bucket to keep the mess down.

Make sure to remove the old gasket and follow the instructions and use the correct gasket for "horizontal" application.

These bases take the standard Cummings filter all HD filter vendors make in extended, standard and high filtration. Use your favorite vendor and filter.

I got the a/c cheap off ebay from a liquidator for $5 plus ride so that was my choice. :)

Capacity was 7 gallons. It might be a 1/2 -1 quart low now after start up but I was going to drive it and check it out after it was fully warmed up.

I used Kendall Fleet synthetic blend 15w40. Use your favorite oil. My choice was dictated as I found some close out local cheap.
 

Attachments

Last edited:

juanprado

Well-known member
Steel Soldiers Supporter
5,518
2,737
113
Location
Metairie/La (N'awlins)
Frame Number

Having seen some threads on M939 Frame numbers, I actually saw mine clear as mud in front of me while doing the oil change and spin on conversion.

I know my truck started Green and then sprayed Tan CARC so it has at least 2 coats of paint but clearly visible on the frame facing out in between the steering box and the firewall for those hunting it down through thick paint.
 

Attachments

Top
AdBlock Detected

We get it, advertisements are annoying!

Sure, ad-blocking software does a great job at blocking ads, but it also blocks useful features of our website like our supporting vendors. Their ads help keep Steel Soldiers going. Please consider disabling your ad blockers for the site. Thanks!

I've Disabled AdBlock
No Thanks