• Steel Soldiers now has a few new forums, read more about it at: New Munitions Forums!

  • Microsoft MSN, Live, Hotmail, Outlook email users may not be receiving emails. We are working to resolve this issue. Please add support@steelsoldiers.com to your trusted contacts.

MEP-003A

Guyfang

Moderator
Staff member
Moderator
17,052
24,950
113
Location
Burgkunstadt, Germany
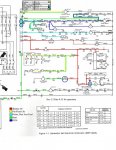
Look at the comment #117. The wire diagram. Look at the S1 master switch, pin 26. Wire P66D16 runs from S1-26 to TB 5-9. During start up, you should have at S1-26, 24 VDC. At TB5-9, you should have 24 VDC. From TB5-9, the wire goes through J2 and J3 and comes to the K5. It should have 24 VDC there also. so you need to measure the path to see where you are losing volts?
 

Ray70

Well-known member
Steel Soldiers Supporter
2,668
6,227
113
Location
West greenwich/RI
Not to side track you away from the solenoid voltage issue, but if you wire the solenoid up ( or even remove it ) and it still won't even smoke out the pipe there are other things going on.

Couple questions are:
Do you hear the loud click of the glow plug solenoid when you turn S1 to the left to pre-heat?
Do you hear the fuel pumps running when you turn S1 to Aux and Prime/Run?
And have you tried running the pumps in the Prime / Run position for a few minutes before warming the glow plugs and trying to start it? ( if you have a stuck open check valve your fuel system may have drained back and / or pulled in some air ) while it was sitting all that time.
 

Johncar48

Member
91
30
18
Location
Kerrville, tx
Ray fuel pumps come on like usual in prime position, heard glow plug relay kick in and glow plugs are heating up. I jumped a wire from positive battery terminal to positive input of IP solenoid and it pulled up perfectly and the starter motor engaged. I did not have CB2 pushed in when I did this. Guess when weather permits I'll check fuel flow to injectors. Where does S1 get it's 24V from please.
 

Guyfang

Moderator
Staff member
Moderator
17,052
24,950
113
Location
Burgkunstadt, Germany
1645613436710.jpeg

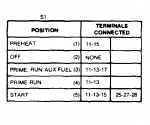
Look at comment #123. Its also shown here in the schematic. Look at the S1 schedule for START. Measure at terminals 11,13,15,25,27 and 28, while holding the S1 in the Start position. You should get 24 VDC.

Look at the schematic above. The power comes into the S1 on pin #11.
 

Johncar48

Member
91
30
18
Location
Kerrville, tx
So after studying your schematic (with colored lines...and thank you for that) the only thing between the batteries and S1-11 to bring the voltage down from 24V would be CB2, if I'm reading the schematic correctly. Would you agree?
 

Guyfang

Moderator
Staff member
Moderator
17,052
24,950
113
Location
Burgkunstadt, Germany
Yep. And I have seen it where the CB2 was the problem. So what we did, was to "jump" the CB2. We used a wire with two roach clips on the ends to jump from CB2-1 to CB2-2. If that changes the voltage readings, you may want to exercise the CB2 a few times, (at least 40-50) and then see if that changes the readings.
 

Johncar48

Member
91
30
18
Location
Kerrville, tx
Not sure what to do next. Charged batteries, jumped CB2 and nothing. Solenoid still doesn't pull up. So I've got 25v going in to CB2-1 and 25v coming out of CB2-2 but when I move S1 to start position CB2-2 drops to 18.7v. When I apply 24v directly to solenoid it pulls up like it should and when I manually hold the solenoid in the up position and crank the engine....nothing, not even a little smoke.
 

Guyfang

Moderator
Staff member
Moderator
17,052
24,950
113
Location
Burgkunstadt, Germany
Look at TB5-9. There should be two wires hooked up there. One of them is P66F. It goes from TB5-9 to the K5-1.
Disconnect the wire P66F at TB-5-9.
Disconnect the wire P66H at K5-1.
Measure for ohms between the two ends. What do you get?
 

Guyfang

Moderator
Staff member
Moderator
17,052
24,950
113
Location
Burgkunstadt, Germany
The other wire on the K5-2. It is P55T. It goes to J1/P1, The wire number changes to P55R and goes back to TB4-13,14 and 15. They are all hooked together. Find the wire P55P55R. Measure at the end of P55T, (disconnected from K5-2) P55R, (disconnected from TB4-13, 14 and 15.) You should get continuity.
 
Top
AdBlock Detected

We get it, advertisements are annoying!

Sure, ad-blocking software does a great job at blocking ads, but it also blocks useful features of our website like our supporting vendors. Their ads help keep Steel Soldiers going. Please consider disabling your ad blockers for the site. Thanks!

I've Disabled AdBlock
No Thanks