• Steel Soldiers now has a few new forums, read more about it at: New Munitions Forums!

  • Microsoft MSN, Live, Hotmail, Outlook email users may not be receiving emails. We are working to resolve this issue. Please add support@steelsoldiers.com to your trusted contacts.


MEP-016B Control Panel Operation

seek

Member
69
0
6
Location
Mocksville nc
Hello

Could someone give me a short explanation on 2 of the controls. I had a serice guy out and he got a call and had to leave before I could ask for clarifcation. I did a search and did not see the information and the TM just does not explain it.

The output selection switch will stay in the 120v 1 phase position.

1. voltage selector has 6 positions, what are each of v2 through v3.1 positions for.
2. is the current selector switch 1-1,1-2,1-3 = 120,240,208 on output selection switch?

To run a radio I wonder if they really needed all the complexity of this machine. even through the controls are set I would like to understand what I got.

thank you
 
Last edited:

Isaac-1

Well-known member
1,970
48
48
Location
SW, Louisiana
Those just select what the meter is showing, and setting depends on how have the output voltage set using the voltage selector knob inside the control box (120V single phase only, 240V, 120/208 3 phase, or 120V 3 phase only).

In other words the front panel voltage selector shows voltage either line to line or line to neutral for the single voltage meter, and the amp selector does the same for the amp meter. It has no effect on the generator output.
 

seek

Member
69
0
6
Location
Mocksville nc
I now understand, thanks

My hertz meter was acting up and if its not the load I had on it or the fact the control box was not buttoned up tight during that run, I bought another one.

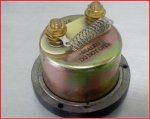
This is the exact same one EXCEPT it has a coil on the back. Mention was made of EMI. I thought they all were pulse protected. I included a photo. Should i use this as is or remove the coil. Maybe it was a later production of mine. Same nsn, same numbers printed on dial, just that coil.

Thank you
 

Attachments

Last edited:

Isaac-1

Well-known member
1,970
48
48
Location
SW, Louisiana
My guess is that wire coil is for electrostatic discharge protection during storage and should be removed at time of installation, but that is just a guess. (does it come off easily when the nuts are removed?) I would be curious to know the resistance of that wire coil when removed from the posts, as it might be some high resistance material, possibly designed to dampen the action the gauge, ....
 
Last edited:

seek

Member
69
0
6
Location
Mocksville nc
that is a better way of looking at it and makes more sense. It will be towards the end of next week before I get my hands on it as they dropped it off to the post office yesterday afternoon. I will answer those questions as soon as i get it. From the photo each post has one end of the coils spade under a nut, but we will see.
 

seek

Member
69
0
6
Location
Mocksville nc
I made my life a little harder today. Long story short the L2 Load terminal wire lock? broke, the wire around its waist snapped.

Must I replace the entire terminal?

Should I try and wrap another tiny piece of wire to hold the tension? I know that gets very hot with the exhaust pipe very close by.

I am not even sure what role the wire plays because I have never used them and its searing hot and I had trouble seeing through the sweat, I would image its critical.

Suggestions?
 

Attachments

seek

Member
69
0
6
Location
Mocksville nc
The gauge arrived quickly.

The coil fell off when I moved the nut slightly. definitely not meant to stay. meters are different and I am not electrically incline, but using the
continuity test mode on my radio shack meter it was about 10. since its a tiny coil I had trouble holding it.

Is that what you were expecting?​
 
Last edited:

seek

Member
69
0
6
Location
Mocksville nc
Today I finally got around to starting the generator to test the gauge and it is not correct, needles over to the hard right while running.

I cranked the generator with my kill a watt and got it loaded and warmed up and dialed in. I see a screw on the front and it does not have any effect on the needle adjustment. The engine is purring, my kill a watt shows a very consistent 59.9 htz the meter is about 65 htz.

Is there anything I can check, change or do?

thank you
 
Top
AdBlock Detected

We get it, advertisements are annoying!

Sure, ad-blocking software does a great job at blocking ads, but it also blocks useful features of our website like our supporting vendors. Their ads help keep Steel Soldiers going. Please consider disabling your ad blockers for the site. Thanks!

I've Disabled AdBlock
No Thanks