• Steel Soldiers now has a few new forums, read more about it at: New Munitions Forums!

  • Microsoft MSN, Live, Hotmail, Outlook email users may not be receiving emails. We are working to resolve this issue. Please add support@steelsoldiers.com to your trusted contacts.

MEP-802A CR1 Diode Replacement Questions

Ifixthings

New member
16
1
0
Location
Green Sea, SC
Some history:

Picked up 2 mep802's in July of 2015. One had 14 hours and one had 19 hours on the clock. Both were rebuilt in Feb of 2010.

Had no problem getting both units up and running. Ran the unit with 14 hours on it up to 21 hours and sold it.

As for the unit with 19 hours, we have been using it as an off grid power source over the last year, up until 2 weeks ago (we finally got electric to our new property! Yea! ). The unit now has 1475 hours on the clock and has been working VERY, VERY well.

Last week while running the unit to keep everything in good working condition with a 30% load, it died for no reason. It had been running about 2 hours. No crank at master switch, no crank at the dead crank switch nothing. No fuel pumps running, nothing.

Batteries are new and there is 24 volts at the MT4 shunt. I have verified and tested the master switch, emergency stop switch, CB1, FU1 and dead crank switch per the tech manual. All is well.

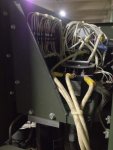
Then I noticed the CR1 diode... it appears to have slow roasted!!! Nice and crispy!

QUESTIONS:

1. Do I need to remove the entire panel (4 screws) to replace the CR1 diode or can it be left where it is mounted and the replacement installed?

2. Is it solder to the stand-off connections or just twisted/ crimped (Hard to tell)? I purchased 20 of the 1N5406 diodes in case I messed up a couple trying to install one (Ha!) Or, in case one would blow right away after replacement.

3. Would this diode just have went bad or should I be prepared to start digging into the overload /short circuit relay or the over voltage relay???

Thank You in advance for any guidance or assistance with this CR1 project.
 

kloppk

Well-known member
Steel Soldiers Supporter
1,981
3,105
113
Location
Pepperell, Massachusetts
1. Do I need to remove the entire panel (4 screws) to replace the CR1 diode or can it is mounted and the replacement installed?

2. Is it solder to the stand-off connections or just twisted/ crimped (Hard to tell)? I purchased 20 of the 1N5406 diodes in case I messed up a couple trying to install one (Ha!) Or, in case one would blow right away after replacement.

3. Would this diode just have went bad or should I be prepared to start digging into the overload /short circuit relay or the over voltage relay???
1 & 2. You ought to be able to do the repair with the panel in the genset. Just a bit difficult to access it via the drop down panel opening. Might be easier to remove the top cover for better access to it. CR1 is soldered to the standoffs. Instead of soldering a new on in right away you might want to attach the new one temporarily with clip leads and see if it burns up immediately or not. If it burns up then you will have to search for the cause. Most likely a short somewhere in the 24 volt circuit to ground.

3) The overload / short circuit relays have to do with issues on the generators AC output and not the 24 volt DC part of the wiring. I suspect you developed a short to ground somewhere on the 24 volts DC circuit after CR1 which caused it to fry.
Shorts like this can be a pain to locate.
 
Last edited:

Hard Head

Member
Steel Soldiers Supporter
540
21
18
Location
Greenville SC
I had an 803 do this and it had developed a short circuit where a cable had rubbed the diagonal brace in the rear section of the control panel. I always remove the lid now and put a piece of slit rubber hose or door protection molding down the edge of the bracket. Check it out in your unit!
IMG_2347.jpg
See the picture!
 

Attachments

Ifixthings

New member
16
1
0
Location
Green Sea, SC
Thank You kloppk for the reply and the advice using a couple of clips first!! Very good idea! It is raining here now but will try this tomorrow. Also, Thanks for the info concerning the overload/ short relays. I just noticed what they said on the boxes as I was looking at the CR1 diode.

Will reply back with an update as soon as it can be tried.
 

Ifixthings

New member
16
1
0
Location
Green Sea, SC
Thank you too Hard Head for your reply, the pictures and excellent idea. I will pull the top cover off to install the new diode after testing the new CR1 using clips as suggested by kloppk.

As a side note, your Avatar is SOOOO TRUE! I'm sure all the extra diodes purchased will fall into a black hole somewhere in the shop after we get pass this project.
 

Ifixthings

New member
16
1
0
Location
Green Sea, SC
Okay, a slight break in the rain... Just cut off the fried CR1 diode and used test leads and clips to test a new diode. The unit started right up!!!! YEA!!!

I only let the unit run for about 30 seconds and the new diode did not blow in that small time frame of operation. Tomorrow or when ever I can completely remove the top cover, the CR1 will be installed for good.

Another question: Has anyone ever installed screw lugs onto the stand-offs so that the diodes will be held in place by 2 screw terminal? It would make they very easy to replace.
 

kloppk

Well-known member
Steel Soldiers Supporter
1,981
3,105
113
Location
Pepperell, Massachusetts
I suppose you could.
One normally wouldn't ever have to replace CR1.

If you don't find the short then you may want to do this.
The potential short that took out the original diode may reappear in the future and find yourself needing to replace CR1 again.

Seems a bit odd the design uses a 3 amp diode for CR1 but CB1 is rated at 7.5 amps. :shock:
 
Last edited:

Guyfang

Moderator
Staff member
Moderator
15,994
22,416
113
Location
Burgkunstadt, Germany
When you solder in the standoffs, do not heat up the standoff for too long. The will get brittle and snap off. Been there and done that. CR-1 burns out very rarly. Mostly its things like hardheads pictures that cause shorts. Super picture, super fix. Easy too!

I never work in the control cube without taking off the top. Simply easier.
 

Ifixthings

New member
16
1
0
Location
Green Sea, SC
Okay, last silly questions... Has anyone epoxy the nuts in place on the inside of the control cube BEFORE disassembly? Is there any reason NOT to epoxy them in place first?
On the removal of other panels, I have had to deal with holding the nuts while reaching the exterior bolt. Sometimes this can be a pain.
 

kloppk

Well-known member
Steel Soldiers Supporter
1,981
3,105
113
Location
Pepperell, Massachusetts
Not sure the epoxy would hold well.
Some people install Pop Nuts in those spots so they don't have to deal with getting a wrench into the tough spots.
 

Guyfang

Moderator
Staff member
Moderator
15,994
22,416
113
Location
Burgkunstadt, Germany
Not sure the epoxy would hold well.
Some people install Pop Nuts in those spots so they don't have to deal with getting a wrench into the tough spots.
The only problem with pop nuts is that they are a pain to remove if someone cross threads a bolt. After you have removed the bolts/nuts a few million times, ya just don't even think about it anymore!! But have to admit, I like the pop nuts. I use a cordless screwdriver for such nice jobs. Saves a lot of time.

Not a bad idea to remove the neg. terminal before starting. I had to replace the control cube wire harnesses on two gen sets when someone dropped a wrench into the control cube while removing the nuts. Another hint is to get most, if not all of the nuts/bolts started before completely tightening them up.
 

Hard Head

Member
Steel Soldiers Supporter
540
21
18
Location
Greenville SC
I wish you guys were nearby. I fix generators for folks that buy from GL at Warner Robins, Benning, Bragg, and Jackson. They just send them to me and I send them to the buyer onces they are runners. I use high strength aluminum rivnuts that I get from a nascar parts supplier in Charlotte NC. I put over a 100 rivnuts in an 803. I even put the steel ones on skid next to the fuel tank since it is almost impossible to get to the tie down ring nuts! I am enclosing a few pics. If you need to service a fuel line or strip and clean everything you can do it in record time once the cabinet is done.

IMG_2350.jpgIMG_2352.jpgIMG_2353.jpgIMG_2354.jpg
 

Ifixthings

New member
16
1
0
Location
Green Sea, SC
Going to try it. Just got back from HF and purchased their Threaded Insert Riveter Kit tool #1210 along with an eBay assorted order of 100 extra rivet nuts in both steel and aluminum. Since the case is aluminum, I plan on installing the aluminum first. If they don't last, I'll switch to the steel rivet nuts. As panels need to come off, I think rivet / pop nuts will be replacing the nuts and bolts.

I was thinking of the epoxy just to hold the nut and washer in place which would prevent them from falling out. Decided the above idea will be a better long term solution.

Thanks again!
 
Last edited:

Hard Head

Member
Steel Soldiers Supporter
540
21
18
Location
Greenville SC
Going to try it. Just got back from HF and purchased their Threaded Insert Riveter Kit tool #1210 along with an eBay assorted order of 100 extra rivet nuts in both steel and aluminum. Since the case is aluminum, I plan on installing the aluminum first. If they don't last, I'll switch to the steel rivet nuts. As panels need to come off, I think rivet / pop nuts will be replacing the nuts and bolts.

I was thinking of the epoxy just to hold the nut and washer in place which would prevent them from falling out. Decided the above idea will be a better long term solution.

Thanks again!
I love them. I use them anywhere I can now. Beats the heck out of carrying 2 nut drivers or wrenches around. Now I just keep my handy Klenk Four-in-one POCKET SOCKET with me and I can remove just about any hex bolt on a genset. If you don't have one get one you will find it quite handy!
 

Hard Head

Member
Steel Soldiers Supporter
540
21
18
Location
Greenville SC
I love them. I use them anywhere I can now. Beats the heck out of carrying 2 nut drivers or wrenches around. Now I just keep my handy Klenk Four-in-one POCKET SOCKET with me and I can remove just about any hex bolt on a genset. If you don't have one get one you will find it quite handy!
I buy these 500 at a time

HomePro #HNR1032AC
- 100 pieces of 10/32 aluminum nutserts with knurls
- Grip range .020 - .130
- Rec. hole .297

- Strength of steel with no rusting
 

Daybreak

2 Star Admiral
Steel Soldiers Supporter
1,521
741
113
Location
Va
Howdy,
At some point and time the Fermont MEP-80x units starting using the caged nuts. My 2007 units do not have them, but the 2009 units do. Yes, the 2009 units are so much easier to remove the panels etc...
 

Ifixthings

New member
16
1
0
Location
Green Sea, SC
Complete the CR1 replacement this evening. Let the unit run for about 20 minutes and the new diode did not burn out in that time frame (Yea!). This week end I'll put a load on it and let it run for a couple / few hours just to be sure it will be ready to go if and when we need it again.

While the control cover was off, I looked closely at all of the wiring to see if I could find any wire rubbing something it shouldn't. Didn't see anything but that doesn't mean I didn't miss something...

And wouldn't you know it, The HF Threaded Insert Riveter Tool DOES NOT include the 10-32 nut setter! Oh well... Had to put back the factory nuts. Already ordered extra 10-32 rivet nuts off of eBay yesterday. So now I'm looking at the POP PNT110 setting tool since I will be returning the HF tool. I'm sure they will be used the next time one of the panels need to come off. Come to think about it, the alternator belt squeals every now and then...

Thanks Again Everyone for your help and input!!!!!!!!!!

Some Pics of the before and after:

IMAG4282.jpgIMAG4280.jpg
 

Guyfang

Moderator
Staff member
Moderator
15,994
22,416
113
Location
Burgkunstadt, Germany
The diode does not burn out often. I "found" about 6 of the resistor/diode assemblies in a dark corner. Used them one at a time over the 7 plus years worked as a contractor. Still had one left over when I quit. Its rare when it happens. Would like to know why.
 

Ifixthings

New member
16
1
0
Location
Green Sea, SC
Hopefully Guyfang, the new one won't burn out for a long time. I too, would like to know what causes this to happen. Since this unit is used in a dense wooded area, I was wondering if one of those small lizards or other small creature crawled into the unit and shorted something. I just don't see that happening with DC current. Besides, at least where I was looking, there were no dead creatures. Time will tell...
 
Top
AdBlock Detected

We get it, advertisements are annoying!

Sure, ad-blocking software does a great job at blocking ads, but it also blocks useful features of our website like our supporting vendors. Their ads help keep Steel Soldiers going. Please consider disabling your ad blockers for the site. Thanks!

I've Disabled AdBlock
No Thanks