MixManSC
Member
- 35
- 77
- 18
- Location
- Columbia SC
Thought I'd make a contribution for my first post....
If your 6 function fault indicator panel is all faded the attached PDF is a vector stencil. Two ways are included. The left is the lettering and white lines only. The right version is the same but reversed on an oversize background to use as a stencil to paint the lettering (better way). You can use the first and just have the lettering itself cut out, masked and applied as vinyl on top without much fuss. One note on the viny – “I enjoy weeding the excess vinyl away from tiny lettering” said no sign professional, ever. Tiny lettering is a bit of a pain to weed the excess vinyl away from – or weeding the lettering itself away to make a stencil….
Mine was terribly faded, even the black anodized background. So I removed it. Fairly easy to remove - you will need to reach in to get to the nuts and I was also able to remove the GFCI in place and not disconnect that or clip any wire ties. The main module on the upper half just has a big plug on it.
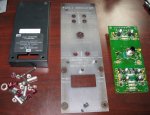
To remove the actual fault panel, you have to first remove the 4 nuts on the back (do not use a screwdriver on the front unless the screws are spinning, there is a second nut under the metal cover) and the metal cover comes off. Then there are 4 more nuts holding the circuit board on some standoffs to the metal panel. The red indicator lenses just have a bit of silicone around each on the back side, you can pick that silicone off with a fingernail and pop the lenses out. What I discovered on mine is that the black anodizing on the back side of the panel is still perfect and the holes are all perfectly symmetrical. So you can just flip the panel over, apply the stencil, spray it white, and peel the stencil back off.
Any sign shop can cut this for you out of some vinyl or anyone with one of the home Cricut (cricket) type hobby machines should also be able to cut the stencil (or just the lettering) out of adhesive vinyl. Use decent quality vinyl so that when you peel the stencil back off after painting it does not leave any adhesive...
Hope someone might find this useful. Enjoy.... Before and after photos as well.


Attachments
-
138.2 KB Views: 10

