• Steel Soldiers now has a few new forums, read more about it at: New Munitions Forums!

  • Microsoft MSN, Live, Hotmail, Outlook email users may not be receiving emails. We are working to resolve this issue. Please add support@steelsoldiers.com to your trusted contacts.


MEP-803a Painting Project

JeremyWigmore

New member
12
14
3
Location
Nova Scotia, Canada
Hello all,

I’ve happily joined the MEP-803a team thanks to a few prominent members on this site.

I’m planning to make a spring project of refinishing the machine to replace a few rusty screws, straighten the dented panels and apply new paint. A few questions for the hive-mind:

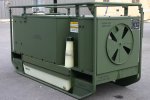
1. Paint colour confirmation. My machine is currently the three-colour grenn camo, but I’d like to paint it the same colour as the one posted by fpchief: https://www.steelsoldiers.com/threads/2011-mep-803-wiring-for-house.169523/. I believe this colour is Woodland Green #990, but I’d appreciate a confirmation before I try to source some paint.

2. Paint brand recommendation. Scanning the forum for vehicle restoration suggests the Aervoe paints. Any other recommendations for a quality product? I’d like to get as close as possible to the actual paint colour, but I don’t care about refinishing with CARC. I’ve looked through the local hardware stores for something similar, but I’ve not found anything close enough yet.

3. Stencils. Short of any spending a few days with a text editor and scissors to make my own, any suggestions for tracking down a set of stencils to re-apply the lettering (high voltage, etc).

Any and all suggestions appreciated!

Jeremy
 

Coug

Well-known member
Steel Soldiers Supporter
2,795
3,973
113
Location
Olympia/WA
For paint you can go into any hardware store with a mixing machine and either take a sample for them to match, or ask them to match Federal Standard paint codes. I've personally done a few projects with Behr Marque matched to FS 34094. In the Marque it comes out a little darker and just a slight pit of sheen to it, and the Behr Ultra is reportedly more flat of a color, but I kind of like it, and haven't had any issues yet with anything I painted it with, straight over the CARC after a good pressure washing, spraying on some Purple Power cleaner for 30 minutes, and another good pressure washing.

I've bought my paint at Home Depot and only takes them a few minutes to mix up a can to the right color.
 

Light in the Dark

Well-known member
Steel Soldiers Supporter
3,522
4,964
113
Location
MA

Light in the Dark

Well-known member
Steel Soldiers Supporter
3,522
4,964
113
Location
MA
Yes, I would recommend disturbing the paint as little as possible. If you can paint right over it, thats the best thing to do for your own health.
 

JeremyWigmore

New member
12
14
3
Location
Nova Scotia, Canada
Thanks fellas - I appreciate the info. I'm familiar with the CARC paint and its health-friendly properties, so I'll be avoiding disturbing the base coat.

I asked around the maintenance shop at work about sourcing some of the same paint used on these heaters, but no luck. I might be able to borrow a piece long enough to get the paint matched at home depot - good call. Looks to me like Woodland Green?

Interestingly enough, the Canadian Army also uses the TQG series (5, 10, 30kW, maybe others)- we've had a trailer-mounted MEP-805b parked outside for the last number of years. Poor thing doesn't see much use, and what it does see is quite light duty. Last I saw it had 640 hours on it and was running four or five heaters.....well short of 30kW!

I'll keep hunting and be sure to post up some pictures when I get cracking on the project.

Cheers,

Jeremy
 

Attachments

Hard Head

Member
Steel Soldiers Supporter
540
21
18
Location
Greenville SC
I may have a couple gallon cans of the poly based CARC left in green. I know I have brown, black, and grey primer. It takes a gallon to put a light coat on an 803. I prefer a nice enamel paint instead with a slight sheen. Everything looks better with a little shine lol. Any bare spots use a self etching primer designed for aluminum. You can also get powder coat in the correct colors. It is easy to strip the unit down and paint or powder coat every piece perfectly. I recommend replacing rusted bolts and nuts and paint the bolt heads to match. Get really good zinc or aluminum alloy bolts and nuts. I replaced every bolt in my 803 with aluminum rivnuts and aluminum alloy bolts., except for the ring attachment bolts where I used yellow zinc due to the size and use of the bolt. No galvanic corrosion so far! No popped paint on bolt heads.
 

Ray70

Well-known member
2,331
4,932
113
Location
West greenwich/RI
I purchased a set of stencils that I had custom made by a place on-line called Custom Cut stencils. ( I can probably dig up the proof layout they used for mine if anyone needs it ) They basically charge by the letter and can make stencils out of oil board as well as other plastic materials. It cost about $100 for everything I had made. A bit pricey, but I have used them several times.
The best way I found to use them was to add about 12" of masking paper around the edge of each stencil to keep overspray off the machine, then tape it lightly into position and have someone wearing gloves help you by making sure the stencil is pushed up against the body panel, especially where you have to go over the pop rivets and bolts that are sticking out of the machine.

If you are painting the machine first, I use the Gillespe paint from Rapco Parts. it is available in quarts, gallons and spray cans. You can get all colors, 383 green, the desert tan, the brown ( if you machine is tri-color camo ) Buy all you ever need in one shot to save on shipping.
for the flat black and stencils I use Rust-oleum high heat flat black. I found it sprays better, dries faster and looks closer to the original than all the other flat blacks I tried.

To recreate the camo pattern you don't want to tape off the individual colors, that will leave too sharp of a paint line, you want a slightly fuzzy edge. Best thing I found was to take large pieces of cardboard and cut out the pattern you want then use that as your stencil. this will give you a better looking edge.
Paint the entire machine green, then apply the black and brown using the Rapco spray can 383 brown and the Rustoleum high heat flat black.

Another option if you want to tape it off is to outline the patterns with DART tape ( door arperture refinishing tape ) it is a 1/2" diameter bead of foam with a line of light tack adhesive on one edge used to make door and hood openings when painting a car. It's available at any automotive refinishing supply store for $35 a box ( one box is plenty ) this will also give you a soft edge instead of a crisp paint line.
 

Ray70

Well-known member
2,331
4,932
113
Location
West greenwich/RI
Here are the files I used. There are 2 sheets. I believe the first sheet gives you what you need for an 803A , for an 802A you need to substitute the "Heavy objects" stencil from 3/4" to 1/2" because the top cover is smaller.
I ended up ordering both so that I can stencil both machines, but please verify against your machine and what size you want because I have seen more than 1 size stencils used. It depends on if it is original or a tier2 reset. Also depends if an 802 or 803.
They will create a proof sheet for you to check and approve before they cut your stencils. Check them carefully because there were a few alignment errors on my first proof from them. ( left justified instead of center )
Unfortunately you can't attach word docs here, so I had to convert to .pdf to post them.
Web address is www.customcutstencil.com
email is customcutstencil@gmail.com
 

Attachments

Top
AdBlock Detected

We get it, advertisements are annoying!

Sure, ad-blocking software does a great job at blocking ads, but it also blocks useful features of our website like our supporting vendors. Their ads help keep Steel Soldiers going. Please consider disabling your ad blockers for the site. Thanks!

I've Disabled AdBlock
No Thanks