- 18,189
- 27,330
- 113
- Location
- Burgkunstadt, Germany
Its located below the control panel.

Steel Soldiers now has a few new forums, read more about it at: New Munitions Forums!

So I don’t connect that cable on the starter. It’s for charging batteriesItem #21 is the slave port
View attachment 891989
I do have oneLook at the set. Do you have the slave port? If not, then you do not need to hook up cable # p55y2n. It will not be there.
Do I hook the positive one or negative one?I do have one
Look at the set. Do you have the slave port? If not, then you do not need to hook up cable # p55y2n. It will not be there.
[/QUOTE
Do I have to hook the positive one or negative one?

notice the Negative from the battery goes to the starter body(big body), and the positive goes to the solenoid(small body)your battery side should look like this pic.... there should also be 2 smaller wires coming from your control box(panel) that hook up to the respective + and - terminals on the starter, then there is the small trigger wire to activate the solenoid. Your other post got deleted and I forgot what I wrote on there, but I will be back to town on Wednesday if they don't get you squared away by then.
So it doesn’t matter witch cable from the slave port to the starter p55y2nnotice the Negative from the battery goes to the starter body(big body), and the positive goes to the solenoid(small body)
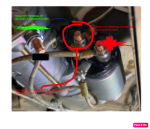
So that red arrow pThis is how your starter should look.... nothing should be connected to the output wire of the solenoid that goes to the starter except for the starter itself. There are 2 additional wires IIRC that MUST be connected to the solenoid and starter for the + and - to the control box, in Addition to the trigger wire for the solenoid that looks like you had hooked up.
i know that should it be red or black to connect the slave to the starter p55Y2n or the red arrow pointing to the black wire is the p55Y2n?This is how your starter should look.... nothing should be connected to the output wire of the solenoid that goes to the starter except for the starter itself. There are 2 additional wires IIRC that MUST be connected to the solenoid and starter for the + and - to the control box, in Addition to the trigger wire for the solenoid that looks like you had hooked up.

Give me a second... I am going to use Guy's picture of the back of the starter to help youSo that red arrow p
i know that should it be red or black to connect the slave to the starter p55Y2n or the red arrow pointing to the black wire is the p55Y2n?
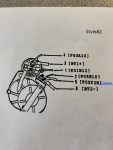
J15 is the slave. The pos side of the slave goes to the pos side of BT1. The neg side of the slave goes to the ground stud. There, wire #P55Y24 goer from the ground stud to the starter
View attachment 891993
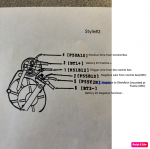
thank you so much this helps alotPlease keep in mind that this is all off the top of my head. The slave +(P50K2) can also connect to the BT1+ or the + side on the solenoid(this is how mine is run on the 003a). Hopefully it helps you to differentiate the wires.
And normally it is hooked to the +side of the solenoid. The schematic is a bit misleading.Please keep in mind that this is all off the top of my head. The slave +(P50K2) can also connect to the BT1+ or the + side on the solenoid(this is how mine is run on the 003a). Hopefully it helps you to differentiate the wires.


I could be mistaken, but that looks like an 8xx slave port. If memory serves, the 003a is a round 2pin(side by side pins) instead of the round single pin..
@Vic_949 ,
I think you have gotten a lot of answers - but I don't think we have answered the NATO wiring question that you had when I explained what a Slave Port was for. My apologies.
What you need to know - from the Slave Port:
The single pin that pokes out is the POSITIVE Post
The "sleeve" part of the NATO connector (about 1 1/2 diameter) is the NEGATIVE Contact.
Picture below is of the Slave Cable
View attachment 892004