• Steel Soldiers now has a few new forums, read more about it at: New Munitions Forums!

  • Microsoft MSN, Live, Hotmail, Outlook email users may not be receiving emails. We are working to resolve this issue. Please add support@steelsoldiers.com to your trusted contacts.


My Build Thread: M909 Recreational Vehicle

2StateTrigger

New member
27
0
0
Location
N. Tampa, FL
CBRTodd,

Just subscribed as I wish to follow along since I'm considering the same type of build for a 925A2....Did you consider any commercially available campers that could have possibly been a direct bolt-on?
 

cbrTodd

Well-known member
Steel Soldiers Supporter
257
464
63
Location
Indianapolis, Indiana
CBRTodd,

Just subscribed as I wish to follow along since I'm considering the same type of build for a 925A2....Did you consider any commercially available campers that could have possibly been a direct bolt-on?
2StateTrigger,

No I did not consider putting a 'normal' camper on the back, because I bought the M109 for the express purpose of making it into a camper. I only went with the 5 ton chassis because of how cheaply I was able to get a good one at the time. Otherwise I would have continued to build on the 109 chassis and mitigated its weaknesses through other means, like I am doing to that truck now that it is my 'big pickup'.

Looking back, it probably would have been cheaper to put a camper on the back, but just like putting the 109 box on the 923, I doubt that much of anything would have been 'bolt on' about the process. Count on needing to drill quite a few holes in the frame at a minimum. If you don't spring mount it like the 109 box was done originally, the twisting of the frame while off road would likely rip a camper apart if it was solid mounted or done with u-bolts like most box trucks, and I don't know if travel trailer frame rails are thick enough to stand up to the spring mounts. It would probably also be taller, which is undesirable in my opinion since my truck ended up being about 12' tall with the short 109 box.

It is also my personal belief that it looks better from the outside with mostly military parts, even if they weren't together originally. You know how opinions are, though.

To each his own, you just have to be smart about what you do. Make sure you post pictures in your own build thread! [thumbzup]
 

2StateTrigger

New member
27
0
0
Location
N. Tampa, FL
2StateTrigger,

...If you don't spring mount it like the 109 box was done originally, the twisting of the frame while off road would likely rip a camper apart if it was solid mounted or done with u-bolts like most box trucks, and I don't know if travel trailer frame rails are thick enough to stand up to the spring mounts. It would probably also be taller, which is undesirable in my opinion since my truck ended up being about 12' tall with the short 109 box.
Glad I asked cause it had not occurred to me that the flex in the frame would rip the camper apart.....Thx....
 

Mike929

Member
Steel Soldiers Supporter
820
22
18
Location
DFW, Tx
Curious if there are any news or experiences with your military RV?

Trying to start my own, but a slow start. Have a 931 truck and a 109 box, but considering a bigger box and extending truck frame 3-4 feet. 931 frame ends at the rear tire with no overhang.
 

cbrTodd

Well-known member
Steel Soldiers Supporter
257
464
63
Location
Indianapolis, Indiana
Curious if there are any news or experiences with your military RV?

Trying to start my own, but a slow start. Have a 931 truck and a 109 box, but considering a bigger box and extending truck frame 3-4 feet. 931 frame ends at the rear tire with no overhang.
I don't have much new with it right now honestly. The biggest 'upgrade' I have done to it was actually building a barn big enough to park it in. I feel a lot better about it not rusting away with it out of the elements.

I did find a leak in the roof at the end of the 2019 camping season which ended up with me tearing out the bathroom walls and the inner sheet metal to clean up the resultant damage. It was all caused by a leak at one of the lap joint seams that progressed without me catching it. I can post some pictures from that when I get a minute.

If I had any advice to give on the camper portion it would be to use the best materials possible for waterproofing, and cut back any rust a lot farther than you think is necessary to make sure you get it all. The M109 box isn't huge but it has been OK size wise so far. If I had to do it over again, I might start with a custom box to get more space though. It would have been hard for me to do that in the driveway where I built the truck but now with an indoor space to work it would be easier. Either way, we only go on weekend type trips fairly close and it works fine for that. It does make 'social distancing' hard at state parks when everybody that walks by wants to come talk to us about it though.

It would be nice to have a pass through to the cab as well, which I think could be done with a custom box or maybe even with the M109 box on your 931 if you relocated the spare tire. But you would have to design that in from the beginning and change the order of how the springs mount the van body to the frame, and that ship has sailed for me.

Another piece of advice, the closer that you can make it to where it is 'ready to go' as soon as you stop somewhere, the more enjoyable it is. When I first started using it I had buckets for waste water, separate covers to keep limbs out of the AC unit, stuff I had to tie down, etc. The more of that that I made permanent solutions for, the less hassle it was to use it. I still don't have a better solution for stowing the ladder rather than ratchet straps to hold it to the rear tool box, but other than that it is ready to go when I park it and plug it in or fire up the generator.
 

Mike929

Member
Steel Soldiers Supporter
820
22
18
Location
DFW, Tx
I don't have much new with it right now honestly. The biggest 'upgrade' I have done to it was actually building a barn big enough to park it in. I feel a lot better about it not rusting away with it out of the elements.

I did find a leak in the roof at the end of the 2019 camping season which ended up with me tearing out the bathroom walls and the inner sheet metal to clean up the resultant damage. It was all caused by a leak at one of the lap joint seams that progressed without me catching it. I can post some pictures from that when I get a minute.

If I had any advice to give on the camper portion it would be to use the best materials possible for waterproofing, and cut back any rust a lot farther than you think is necessary to make sure you get it all. The M109 box isn't huge but it has been OK size wise so far. If I had to do it over again, I might start with a custom box to get more space though. It would have been hard for me to do that in the driveway where I built the truck but now with an indoor space to work it would be easier. Either way, we only go on weekend type trips fairly close and it works fine for that. It does make 'social distancing' hard at state parks when everybody that walks by wants to come talk to us about it though.

It would be nice to have a pass through to the cab as well, which I think could be done with a custom box or maybe even with the M109 box on your 931 if you relocated the spare tire. But you would have to design that in from the beginning and change the order of how the springs mount the van body to the frame, and that ship has sailed for me.

Another piece of advice, the closer that you can make it to where it is 'ready to go' as soon as you stop somewhere, the more enjoyable it is. When I first started using it I had buckets for waste water, separate covers to keep limbs out of the AC unit, stuff I had to tie down, etc. The more of that that I made permanent solutions for, the less hassle it was to use it. I still don't have a better solution for stowing the ladder rather than ratchet straps to hold it to the rear tool box, but other than that it is ready to go when I park it and plug it in or fire up the generator.
Thanks for the details, definitely leaning on a custom box based on what I've learned and with your advice. Main pull for the 109 box is how cool it looks. I'm 6'3", so custom box would allow me to stand up straight and do the pass through.

Thanks again for your response.
 

peashooter

Well-known member
1,038
202
63
Location
Hanover, minnesota
As a fellow m109box/camper owner, I would agree with everything cbrtodd said. I also chose to rebuild the 109 box since it seemed like it would be easier, but In the long run i am quite sure its more work. If you can handle the initial cost and daunting thought of building a box from scratch, I think you will end up being glad you did. The 109 box can mostly be rebuilt except for some areas that will rust and you have no access to from any side. I repaired all the box rust when i first got it and resealed all the seams, but rust came back and I have now reskinned my box with aluminum and replaced the windows as well. The existing box just isnt a great design for a camper. Ideally you would want to put an a/c on the roof or back of the box, but most of us put them in the front window opening which presents other issues. The windows arent great, the floor has no insulation and adding it is tricky for us talk guys, and adding anything to the inside means drilling/cutting metal.
But using a 109 box is a big jumpstart on making a camper, it also is pure military which is fun, but sooner or later...rust.... oh the rust...
 

cbrTodd

Well-known member
Steel Soldiers Supporter
257
464
63
Location
Indianapolis, Indiana
...but sooner or later...rust.... oh the rust...
That's one of the few sure things in life... death, taxes, and rust in an M109 van body!

Like peashooter said, you can get into most areas of the M109 box, but almost every part of it is steel and will eventually rust no matter what you do. All of the effort you put in just buys time, and the quality of your work and the supplies you use determines how much time.

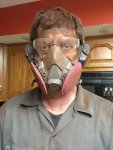
What I found in late 2019 was that a roof seam had continued to rust and popped loose one of the patch panels that I had put on originally. I didn't inspect it regularly enough to catch it early, so it leaked water in and caused a bunch more rust inside the ceiling. I had to take out all the interior ceiling panels and the bathroom walls to get access to the problem area. The fix involved a lot of running an angle grinder in front of my face to knock down the rust, followed by POR-15 to neutralize and encapsulate it. AKA buy some time. Here are a few pictures of the fun.

20200424_141031.jpg
20200509_202653.jpg
IMG_1405.jpg
 

cbrTodd

Well-known member
Steel Soldiers Supporter
257
464
63
Location
Indianapolis, Indiana
I did decide to add a few minor upgrades while I had things apart. It had always been a bit stuffy inside without the AC when using the windows for ventilation, so I added in a roof vent in the main space, which actually helped the circulation a lot.
20200709_215324.jpg

I cleaned up the wiring to the TV so it goes through the wall and looks a little nicer, and I added external speakers to the TV so that I can hear it over the AC unit when it is running. And both the TV and the speakers run off 12V DC through transformers, so I should be able to use them without 120V power if I ever actually finish the 12V wiring that I ran for them.
20200718_212048.jpg

I finished out more of the bathroom, which I had never done the first time. I also took out the original breaker system with the black out light interlocks that I never used, and added a 3-way light switch to the main lights right over the rear door so I didn't have to make it to the front of the camper to turn them on. Apparently I never took any pictures after I made and installed patches over the now unused holes in the wall.
20200718_212034.jpg
20200718_212112.jpg

All the 'improvements' were little things, but these fixes improved on things that had been aggravating me for years now. This was how it stayed for the 2020 camping season. I'm still working on a minor project on it now, but I'm not quite ready to share pictures yet.
 

Another Ahab

Well-known member
17,815
4,139
113
Location
Alexandria, VA
. The fix involved a lot of running an angle grinder in front of my face to knock down the rust, followed by POR-15 to neutralize and encapsulate it.

View attachment 829518
Rust never Rests.

Nice posts, thanks!

A couple of questions:

- What is POR-15, is that an off-the-shelf neutralizing gel or something?

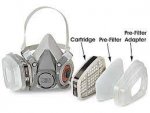
- And where did you get those pre-filters for the respirator?

That's a 3M-7500 isn't it? I don't recall ever seeing those pre-filters for it, but they look useful.
 

cbrTodd

Well-known member
Steel Soldiers Supporter
257
464
63
Location
Indianapolis, Indiana
Rust never Rests.

Nice posts, thanks!

A couple of questions:

- What is POR-15, is that an off-the-shelf neutralizing gel or something?

- And where did you get those pre-filters for the respirator?

That's a 3M-7500 isn't it? I don't recall ever seeing those pre-filters for it, but they look useful.

POR-15 is a system of rust neutralizing and encapsulating paints that I think actually come close to doing what they are advertised to do, which is rare these days. Their metal prep appears to act similarly to phosphoric acid in that it eats the rust away and leaves a phosphotizing compound behind that etches the surface to make the paint stick better. The paint itself is a pain to work with, but it does seem to be effective. It cures with humidity and will turn any can into a single use item if you get any onto the groove in the lid - you won't be able to open it a second time. I use a paper cup to dip it cleanly out of the can and I fill the can with argon prior to closing it, so I can get multiple uses from a single can. But for most jobs you would be better off buying just what you need for the job.

The respirator is a 3M half face style with P100 2091 cartridges. I got the whole assembly off Amazon a while back. I don't know much more about it than that, but it seems to keep most of the crud out of my lungs. I wonder if I can find new refills for it now, given that anything associated with breathable air filtering has essentially been unavailable for the last year...

Rust repair is one of my least favorite parts of owning older vehicles, but it is a necessary evil if you want to keep them around.
 

Another Ahab

Well-known member
17,815
4,139
113
Location
Alexandria, VA

POR-15 is a system of rust neutralizing and encapsulating paints
that I think actually come close to doing what they are advertised to do,
Thanks a million, cbrTodd, I have never heard of this system, very cool!

The standard 3M pre-filters (hat I am aware of), don't have that big surface area of the ones that you use (see pic attached).

I was just wondering because the bigger surface area might mean they don't clog up as fast, but who knows?
 

Attachments

ckouba

Well-known member
Steel Soldiers Supporter
562
1,527
93
Location
Oregon
@cbrTodd Does POR work well over mill scale? Specifically, will it bond well enough to seal up the exterior skin of a camper box, or will it pull the scale away? Any suggestions on metal prep?
 

cbrTodd

Well-known member
Steel Soldiers Supporter
257
464
63
Location
Indianapolis, Indiana
Thanks a million, cbrTodd, I have never heard of this system, very cool!

The standard 3M pre-filters (hat I am aware of), don't have that big surface area of the ones that you use (see pic attached).

I was just wondering because the bigger surface area might mean they don't clog up as fast, but who knows?
I have some of the cartridge style filters like you showed, and on the package it said that they were for organic solvent particles. I think they are intended to filter out mists like with paint vapor, etc. I know that when I use those to go into the crawl space under the house, I can't even smell the musty odor until I come back out and I take off the mask and smell it on my clothes. The ones in my picture above are just for dry particles but they seem to work well at keeping them out of my lungs!
 

cbrTodd

Well-known member
Steel Soldiers Supporter
257
464
63
Location
Indianapolis, Indiana
@cbrTodd Does POR work well over mill scale? Specifically, will it bond well enough to seal up the exterior skin of a camper box, or will it pull the scale away? Any suggestions on metal prep?
To be honest, the only new steel that I've used it on was hot rolled sheet with very thin mill scale. This was on the patch panels that I put on the roof in this latest round - every other time I have used the stuff it has been on old metal. Keep in mind that I'm not an expert with this stuff, I'm just sharing what I think has worked for me.

Here's how I've used it. Before I started the process, I would scuff the panels with the DA sander and rough it up a bit. The instructions say that it needs mechanical adhesion and not too smooth of a surface. There is a degreaser that they sell, but I've never used it - I figure anything that gets the oil / grease off is good enough, and I've been using lacquer thinner for that. Once I could see the scratch marks all over it, I would use the POR metal prep to phosphotize / prepare it for the actual paint. Supposedly their metal prep etches the surface and makes the top coat adhere better. From there, I just paint on two thin-ish coats of the paint, several hours apart. The instructions say to recoat when it is nearly dry to the touch with a slight finger drag. It also says to use thin coats, but I've never seen this stuff want to lay down in what I would call a very thin coat either. From there, once it is cured, you can leave it as-is if it isn't exposed to UV light, but if it is on the exterior surface it needs to be topcoated with something that is UV stable. If you don't topcoat it when the second coat of POR is almost dry, then you are supposed to sand it for adhesion. The stuff is rock hard when dry so I think it would be wise to follow the directions on that part for sure.

A few parting thoughts:
-I personally would trust it on the exterior skin of the camper if you gave the metal a good scuff when you started.
-If you didn't want to use their prep solution, I think you would get about the same results with a 50/50 mix of phosphoric acid and water.
-I personally would be leery of using it on something like check plate steel where the mill scale is thicker. Not because I think it would pull the mill scale off the metal, but because I think it might not stick to the thicker mill scale.
-For non-welded joints between sheet metal panels, I would not want to just use this as the sealant. It is hard and I'm guessing it would crack. I'm a fan of the 3M polyurethane seam sealer that comes in a metal tube - it seems to be good stuff, even better than the Loctite polyurethane caulk that I did the first round.

I hope this helps!
 

ckouba

Well-known member
Steel Soldiers Supporter
562
1,527
93
Location
Oregon
Sorry Todd, I posed that question poorly. What I am looking to know is if the POR15 will provide sufficient bond to use the real sealant over. I have lots of raw tubing and if all I have to do is POR it and then use the Sika or other appropriate adhesive/sealer, I would be very happy. Right now, I am planning on blasting and powder coating (farmed out). Does that make more sense?
 

cbrTodd

Well-known member
Steel Soldiers Supporter
257
464
63
Location
Indianapolis, Indiana
Sorry Todd, I posed that question poorly. What I am looking to know is if the POR15 will provide sufficient bond to use the real sealant over. I have lots of raw tubing and if all I have to do is POR it and then use the Sika or other appropriate adhesive/sealer, I would be very happy. Right now, I am planning on blasting and powder coating (farmed out). Does that make more sense?
Ah, I understand your question now. As long as you scuffed the tubing up well prior to applying the POR-15 system to it, I think it would stick fine. The biggest problem in my mind would be getting even coats on tubes that run vertically. The stuff doesn't go down well in thin coats, and seems to want to run, at least for me. As long as you could get the coverage right, I think you would be happy with the results. Just be sure it doesn't get fully hardened in between the two mandatory coats or it won't adhere to itself. Or plan on scuffing it again for each coat. And it would probably be a good idea to scuff it for the sealant to adhere well, too.
 

cbrTodd

Well-known member
Steel Soldiers Supporter
257
464
63
Location
Indianapolis, Indiana
It's not exactly related to the 'camper' portion of my truck, but I just finished an upgrade to the truck. A while back I decided that I wanted extra fuel capacity, so I added a tractor tank on the right hand side in place of the cargo truck toolbox. To keep from making the plumbing more complicated, I just added a transfer pump mounted on the spare tire carrier, and welded a bung into the original tank to dump fuel from the second tank. I added a second fuel gauge so I could tell how much fuel each tank has, without needing a switch like the tractors use. I relocated the battery gauge to a new hole I made in the dash, which meant I also had to relocate the defroster pull cable further right. The way it is set up now, the bottom corner gauges are both fuel gauges, which I'm hoping makes it easier to remember which is which. The fuel pump is the left of the two added switches with the indicators down below (the right one is reserved for a future use - TBD).

20210227_211613.jpg

20210220_174337.jpg

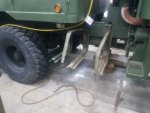
The new tank is shorter than the original toolbox, so it left a little extra space behind it that I decided to use. I took a different cargo truck toolbox and sectioned it vertically and on the length, and then turned it 90 degrees to look kind of like the tractor toolboxes. It took making some custom brackets to make it stable there without 2 "L" brackets underneath it, but it should give me a place to store the power cords and water hoses that I carry. I was happy that I could do all this without having to drill any more holes in the frame - I had enough fun with that when I mounted the van body!
20201112_221900.jpg

20210411_181159.jpg

20210410_210825.jpg

20210602_214932.jpg

I made some custom brackets and a step so that I can still stand behind the cab when necessary. I have magnetic mount antennas for my phone and for the TV, which won't fit into the barn if I leave them up on top of the van body where they work best, so I do need to climb up there regularly to attach and remove them. It was easy enough to add in a locking cover for the fuel cap too, so I went ahead and did it. It may not keep anyone from draining the tank since there is still a drain plug on the bottom, but it should keep foreign objects out of this tank.

I did an overdue maintenance activity over the last few weeks, too. I had wanted to repack the wheel bearings for a while since I hadn't done it when I got the truck. It took me a while, but I finally got through all 6 hubs. In the process I found torn knuckle boots (which were OK last year) and replaced them with non-zipper style boots, which wasn't particularly hard to do but it did feel like it took forever! I'm glad I did the job though, the front axle bushings in the spindles looked like they could use a bit more grease, and the left middle wheel bearing was definitely adjusted too tight, although the bearings were still good enough to be reused. I'm glad my truck is an A2 too, the outboard brakes make the parts that you have to lift much lighter!

20210522_193615.jpg,

20210528_130110.jpg

And just for @DJones I sanded and re-painted that flaking spot of paint that you pointed out at Haspin last year. I hope I've brought things up to compliance with your standards :D
 
Top
AdBlock Detected

We get it, advertisements are annoying!

Sure, ad-blocking software does a great job at blocking ads, but it also blocks useful features of our website like our supporting vendors. Their ads help keep Steel Soldiers going. Please consider disabling your ad blockers for the site. Thanks!

I've Disabled AdBlock
No Thanks