• Steel Soldiers now has a few new forums, read more about it at: New Munitions Forums!

  • Microsoft MSN, Live, Hotmail, Outlook email users may not be receiving emails. We are working to resolve this issue. Please add support@steelsoldiers.com to your trusted contacts.


My CUCV spin on fuel filter mod

m1010plowboy

Well-known member
Steel Soldiers Supporter
3,791
2,306
83
Location
Edmonton, Canada
Spin on fuel filter mod.

Giving the M1010 another option so thought I'd bump the post and share the part numbers and prices. The truck was modified by the PO with the help of Steel Soldiers. Something like GP relay, Doghead starter relay, electric fuel pump, 12 volt alternator, cut-off switches to isolate battery's, removed fuel pressure sensor, hummer rims....ha ha hummer rims. It was a great runner.

The problem began as a delayed start. Glow plug relay would click off in 5 or so seconds but now it's more like 10 or 12 so I'm hedging my newest bet on GP relay....or not.

Did the continuity check on the glow plugs, checked for leaks and am now reading about fuel pressures, shopping for clear fuel tubing......and again calling someone who loves being a mechanic.

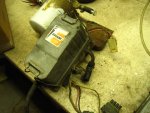
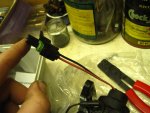
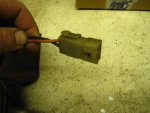
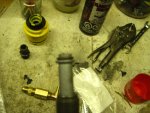
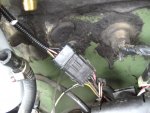
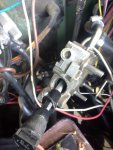
Read a great thread about the fuel pressure sensor so I started taking things apart and it turns out ....I don't have one. While the fuel filter base was out I thought I'd take it apart. Found and replaced an o-ring on the fuel heater.


If you read this thread and it solves your problem then my job for the day is done. http://www.steelsoldiers.com/showthread.php?37862-Fuel-Pressure-Switch-and-Hard-Starting-CUCV

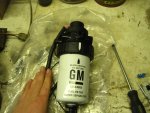
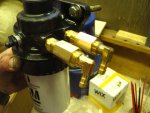
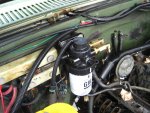
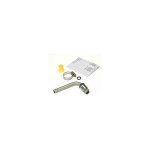
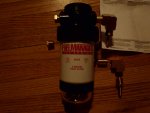
So I went to http://www.stanadyne.com/ to find a local dealer and ended up buying this.


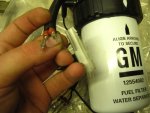
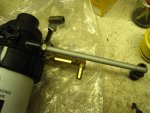
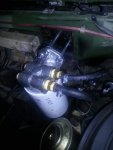
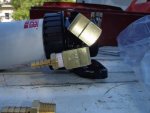
They gave me some 90's but I ended up on a second shopping spree to find some that would bring the barbed pieces further away from the base. They were too big and I couldn't thread them past each other so.....try before you buy.


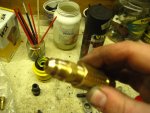
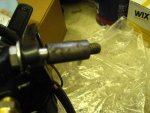
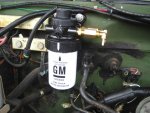
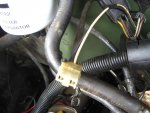
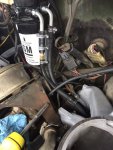
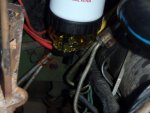
You can't mount this one directly to the fire-wall because of the heater wires behind it so I temporarily mounted it to the original mount to bring it away from the fire-wall. Unfortunately that doesn't work either because the glass spin-on will rub on the injection lines so don't do what I do..........

I'll figure out a different way to mount it later but wanted to get things back together to hear it purrrrr again............

It's not running so I'm going to go drive a deuce.
 

Attachments

blueblaze

Member
94
7
8
Location
Chapleau, Ontario
Along with the fuel manager, using a fuel filter head from a 96-02 chevy van with a 6.5 diesel is a stanadyne fuel manager aswell. GM# is GF647 and the filters are WIX# 33537. Also 5 Micron. Has a fuel heater, WIF sensor and a bleeder. If you modify the plugs on the truck its 100% compatible with the WIF light in the dash and the fuel heater will run as factory. Also bolts right onto the mount. On the 90s 6.2 diesel engines in the square bodies its actually a 100% bolt on ordeal and replaces the Model 80 mount with no mods to the electrical plugs at all in my experience.
 

Nathanater

Member
33
0
6
Location
Lubbock
Along with the fuel manager, using a fuel filter head from a 96-02 chevy van with a 6.5 diesel is a stanadyne fuel manager aswell. GM# is GF647 and the filters are WIX# 33537. Also 5 Micron. Has a fuel heater, WIF sensor and a bleeder. If you modify the plugs on the truck its 100% compatible with the WIF light in the dash and the fuel heater will run as factory. Also bolts right onto the mount. On the 90s 6.2 diesel engines in the square bodies its actually a 100% bolt on ordeal and replaces the Model 80 mount with no mods to the electrical plugs at all in my experience.
Do you have any pics of your setup and any pics that would help with doing the install? About two weeks ago my box filter was leaking from the lowest hole and I had to run get a replacement filter before I loaded it up on a trailer to head to the river. A spin on filter would be great and I know where two trucks with 6.5s are sitting for parts.
 

blueblaze

Member
94
7
8
Location
Chapleau, Ontario
Yeah, ill have pics in a week or so. Truck isn't at my home location right now. Keep in mind this setup was only on the vans. The pickups had the submersion type fuel manager bolted to the back of the intake near the firewall. stay posted.
 

blueblaze

Member
94
7
8
Location
Chapleau, Ontario
As requested. Have a lot more pics of the entire process but the photo up loader is a PITA.
 

Attachments

blueblaze

Member
94
7
8
Location
Chapleau, Ontario
The thing I found out with this filter head though, is that it is designed for GM's o ring style fittings as I show. But I used 3/8 flare fittings to a coupler then to a regular NPT style fitting. NPT fittings will not fit direct into the housing. Flare fittings must be used. My reason for using the flare fittings instead of the O ring style is for the lack of finding a good way to get a 1/4 out line without using compression fittings and it was more expensive to buy those o ring style lines.the flare fittings have never leaked to this day. The only other mod I had to perform was to hog out the holes on the mount as it is threaded from the factory and that obviously won't work in this situation. I changed all the electrical plugs to weatherpak style connectors with pins instead of blades to plug right into the factory harness as shown, you can even see the wire colors from the old model 80 are the exact same on this head. Was this a little involved for some? maybe. But I did this to get a very factory style fuel filter and it was cheaper then buying a fuel manager from a supplier and this way I have a factory supplied filter more likely to be carried by an auto parts store.
 

Attachments

blueblaze

Member
94
7
8
Location
Chapleau, Ontario
One other thing I forget to mention is the use of spacers to get to the filter head away from the firewall as the blower motor wiring for your heater comes out right behind it. I used these sleeves as I pictured above which were the perfect length by chance. And the factory fuel heater plug on the truck needs to be changed to a weatherpak style to plug into the factory plug on the filter head. I'm just anal about it looking good. In reality you could just splice all the wires together with blade or bullet connectors and that would be fine while still being able to disconnect it.
 

Attachments

Ordak

New member
79
1
0
Location
Clarksburg, West Virginia
I am not if this has been touched on because I did not read all 23 pages of this thread but I completed this mod similar to the original posting. I did run across a problem with the fuel filter base and filter I was planning on using. I bought the fuel filter base NAPA #4770 (WIX #24770) and purchased the fuel filter NAPA #3123. Although the filter went on it stopped about 1/4" from the base surface. I took the filter back to NAPA and they did not have another to verify if the filter threads were messed up. He tried another fuel filter almost identical to the 3123 one but just taller and it worked. The part number for the taller one is NAPA #3415. With the taller I had to use the top left/passenger side hole (on the old fuel filter assembly bracket) and drill a second hole to mount the base firmly. I could only mount to 2 of the 3 holes on the new filter base with this setup unless I make my own bracket. I have plenty of clearance between the injector fuel lines and the one ground wire in that location. Also talking to the guy at NAPA, he said they do not stock many of these filters. I hope this helps someone who uses the 4 port filter base (NAPA #4770) instead of the 2 port filter base (NAPA #4309).
 

Whitfield

Member
116
5
18
Location
Richmond Virginia
As cheap as the late model Duramax 04 - 13 filter assemblies have become @ $120-ish (Part # 12642623 With GM filter).

I had to order one and give it a try. With factory Primer / Fuel heater / Water indicator / and slip on hose fittings (No Brass adapters necessary) it seems like a winner.

Now tapping my fingers for 5 days waiting on the Brown Truck...


LBZ1.jpgLBZ2.jpgLBZ3.jpg
 
Last edited:

Russm

Active member
244
69
28
Location
Ft. Wainwright, AK
Not sure what you used to seal your fittings, but I am not having luck with mine not leaking. I used thread sealant and cranked on them but still get seepage.
Make sure your sealant is resistant to oil. Or else the fuel will slowly dissolve it.
I used yellow teflon on mine. Its for natural gas fittings but 2 years since the mod and no issues yet.
 

Attachments

83k30

Member
62
38
18
Location
Jax, Fl
I did the same conversion, and had trouble with different sealants at first. The winner turned out to be a product called "Gasoila". Had to get the fittings clean and dry then let it set up for a little while. Good luck
 

Mad Texan

Well-known member
Steel Soldiers Supporter
657
1,150
93
Location
Chester County, PA
Make sure your sealant is resistant to oil. Or else the fuel will slowly dissolve it.
I used yellow teflon on mine. Its for natural gas fittings but 2 years since the mod and no issues yet.
I used the yellow but have been getting seepage... but it was the paste not tape
 

Mad Texan

Well-known member
Steel Soldiers Supporter
657
1,150
93
Location
Chester County, PA
I did the same conversion, and had trouble with different sealants at first. The winner turned out to be a product called "Gasoila". Had to get the fittings clean and dry then let it set up for a little while. Good luck
I've come across that product. I'll have to see if I can find it locally.

Edit: Tractor Supply has it!
 
Last edited:

emeralcove

Member
Steel Soldiers Supporter
134
14
18
Location
Battle Ground/WA
I changed out my fuel filter a couple years ago due to the Stanadyne base developing a leak that made very hard starting especially when parked on an incline, especially nose up-hill overnight. I did the mounting a bit different as the mount bolts are very hard tighten unless they are installed in the outer ends of the slots and the top two bolts are spaced too close together, I added spacer tubes as others have and used the 4 bolts of the factory filter bracket to fasten the the aluminum plate to it and an aluminum block at the top of the plate to add thickness so I could tap threads for the mounting hole nearest the rear battery. I countersunk a mounting hole for the bolt right next to this bot so I could use a countersunk Allen bolt thru the spacer tube into the factory mounting hole and a hex head bolt thru the filter base, mounting plate, and spacer tube into the other factory mounting hole in the firewall. As an anal attention to detail, I drilled a hole in the adapter plate where the factory bracket has a "V" stamped between the two lower mounting holes so any water that may splash up in there is not trapped because it can't drain out. I wasn't happy with brass fittings, they are really hard to install due to being so close together and the hose clamps really add to the "cobbled" appearance. I purchased a couple AN fittings that thread in straight and can be installed using a deep socket, the black finish matches nicely with the finish on the filter base. Using black 90 degree push on AN elbows eliminates the need to use bushings, hose barbs and the preformed hose as the 90 degree elbow allows easy smooth bends in the hose that will not "kink" over time. I you look close you can see one hose is not pushed on as far as I would like, be sure to to add a but of lube to the push on barb like a little diesel fuel or "Crisco" (we used Crisco to hold "O" rings in place when I was in the military when we worked on aircraft fuel systems, JP-4 dissolved the Crisco and JP-4 and diesel are pretty similar) or you will not be able to push the hose on all the way either. No hose clamps are needed so the finished product has a nice clean look.Fuel filter 1.jpg I have other pictures that are taking forever to send from my phone, if anyone is interested I will post them when they finally "arrive". I like the way this mount bracket works;
1. it holds the filter very solidly
2. it allows easy return to the factory set up if I ever wanted to.
3. it's clean appearance draws less attention to the modification.
4. it lets me use readily available fuel line purchased by the foot.
5. the hand primer seemed real important to me after have to bleed the air so often, but I after installing this filter, I don't have to use it. It is nice to have but that is a personal preference.
6. while I have not installed them at this point I can add a fuel heater and a water in the fuel sensor, so far I have not had a need but like the idea.
 

emeralcove

Member
Steel Soldiers Supporter
134
14
18
Location
Battle Ground/WA
Nice simple adapter, great detail in your sketch for others to duplicate. Might want to add a hole so water does not get trapped behind the aluminum plate and the "vee" stamped reinforcement in the stock bracket, I had to do the same thing on mine.
 

Mad Texan

Well-known member
Steel Soldiers Supporter
657
1,150
93
Location
Chester County, PA
I did the same conversion, and had trouble with different sealants at first. The winner turned out to be a product called "Gasoila". Had to get the fittings clean and dry then let it set up for a little while. Good luck
I've come across that product. I'll have to see if I can find it locally.

Edit: Tractor Supply has it!
So I tried the 'Gasoila', I let it sit over night after assembling. I started the bleeding procedure, finally started cranking with injector lines loose, after a couple of cranks I checked the fittings. Seeping again. Plan (?) D, get the right fittings. I had to track them down, the threads are 5/8-18 with a O-ring flare seal. I found a power steering return line fitting for a 78 mustang that is 90 degrees to 3/8 hose. It's not perfect, but it's not leaking. From Advanced they list at $5.11 each before discounts. I didn't find a one piece hose barb reducer but I'll get one and do it at the next filter change. I changed the O-ring out for Viton before installing them.

Part #'s
GATES
350290
Edelmann
39114
ACDelco
36-350290
GATES
35029
CONTINENTAL
11937
CARQUEST
35029
 

Attachments

ssdvc

Well-known member
971
639
93
Location
CT
I used some stuff by VersaChem called Prime Seal Gasket Sealer. Put it on the threads, assembled everything like I wanted it and let it sit and dry for a day or so. Knock on wood, I have not had a leak yet. Stuff works pretty darn good and I believe I got it from the local NAPA store.
 
Top
AdBlock Detected

We get it, advertisements are annoying!

Sure, ad-blocking software does a great job at blocking ads, but it also blocks useful features of our website like our supporting vendors. Their ads help keep Steel Soldiers going. Please consider disabling your ad blockers for the site. Thanks!

I've Disabled AdBlock
No Thanks