

Pawnshop
Active member
- 1,798
- 24
- 38
- Location
- Austin/Cedar Park Texas
OK, my stock box type fuel filter base was leaking (reportedly from a cracked housing) and being an overall PITA so I decided to convert to a spin on type filter arrangement. I searched here and online for photos and advice on the subject and came up dry so I decided to wing it, and I think it worked out OK. If anyone sees a potential problem with my setup PLEASE say something, I am no fluid dynamics engineer, nor am I a mechanic!
My parts list: (total cost about $100)
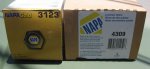
1-NAPA fuel filter base, pt#4309
1-NAPA fuel filter/water separator pt#3123
2-1-1/2" or 2" bolts, 3/8" coarse thread
2-big azz nuts
2- 1/2 NPT male to 3/8 hose barb fittings
1- 3/8 to 3/8 hose barb splice
1-3/8 to 1/4 hose barb splice (I had to make one)
6-hose clamps
12" of 3/8" fuel line (approx)
fuel resistant Teflon tape
I got the fittings from Home Depot, in three trips (don't ask)
I pulled the rear batt to get to the old unit (and that kills the sparkies in the area), pull the two fuel lines off the left side of the old filter housing REMEMBER (or make a note) the top/bigger one is IN from the tank and the bottom/smaller one is OUT to the motor (I clamped the lines shut with vise grips to reduce air in the lines, don't know how necessary that is), remove the three bolts holding the bracket to the firewall and pull the old filter and housing out, being careful not to get too much fuel all over the place as there is about a pint in the filter (NO SMOKING).
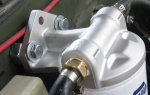
The mounting holes in the NAPA bracket ALMOST line up with the holes in the firewall (1/2 hole dia too narrow) and are too small to run the mounting bolts trough (that would be too easy) but thankfully the bracket is aluminum and easily modified. I used a cone shaped burr on a drill to enlarge and widen the holes then I discovered that the 2" bolts I got would not clear the housing so I angled the holes a bit till they went in (that is why I called for 2" OR 1-1/2" bolts). The bracket is thick and the holes are not so close to the edge that they weaken it to modify them. I used longer bolts because I discovered there is an electrical thingie sticking out of the firewall that the filter has to clear so I had to make the bracket stand off the firewall about 1". I did not have a piece of aluminum block to make a spacer so I got two of the biggest nuts HD had and that was just enough to make it clear.
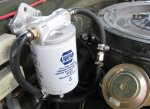
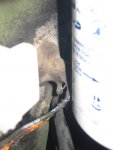
Once the bracket is firmly on the firewall the two 1/2" NPT male to 3/8 hose barb fittings can be installed on the new housing, be sure to teflon tape them good. The next time (if there ever IS a next time) I think I would try to find one 1/2" NPT male to 1/4" hose barb for the outlet side, if it exists, to reduce the fittings necessary for the reduction to follow. Use the 3/8 to 3/8 hose barb splice to add about 6" to the bigger inlet line and hook it to the right/IN side of the housing and a 3/6-1/4 hose barb splice to extend the smaller OUT line to the left/OUT side of the housing. I could not find a 3/8-1/4 hose barb splice so I made one from a 3/8 barb/1/4" NPT male threaded to a 1/4" barb/1/4" NPT female with a lot of teflon tape. If you can find a 3/8-1/4 barb splice that would be better, OR go 1/4" all the way to the housing if you can find a 1/2" NPT male with a 1/4" barb on it and a 1/4-1/4 barb splice and some 1/4 fuel line. Hose clamps at all the junctions of course. You could also just run new lines from the tank and to the IP if you want, that would remove the need for splices completely, I was lazy and did not do that (maybe later)
Once the lines are all tight, fill up the fuel filter with fuel and lube the gasket and spin on the filter tight and put you battery back in. Remove the pink wire from the injector solenoid (and the vice grips from the fuel lines if you have not already) and crank her over a few times to move the air through (it won't start with the pink wire off), check for leaks, fix leaks as necessary (I had to), connect pink wire and START! Let it run a bit looking for leaks, if no leaks then you are done! I had leaks (my teflon skilz are weak).
Clean up, police your tools and get back in the AC!
Again, if you see something I have done wrong, or a way to improve my design, PLEASE speak up!
Your individual results may vary, thanks for tuning in.
My parts list: (total cost about $100)
1-NAPA fuel filter base, pt#4309
1-NAPA fuel filter/water separator pt#3123
2-1-1/2" or 2" bolts, 3/8" coarse thread
2-big azz nuts
2- 1/2 NPT male to 3/8 hose barb fittings
1- 3/8 to 3/8 hose barb splice
1-3/8 to 1/4 hose barb splice (I had to make one)
6-hose clamps
12" of 3/8" fuel line (approx)
fuel resistant Teflon tape
I got the fittings from Home Depot, in three trips (don't ask)
I pulled the rear batt to get to the old unit (and that kills the sparkies in the area), pull the two fuel lines off the left side of the old filter housing REMEMBER (or make a note) the top/bigger one is IN from the tank and the bottom/smaller one is OUT to the motor (I clamped the lines shut with vise grips to reduce air in the lines, don't know how necessary that is), remove the three bolts holding the bracket to the firewall and pull the old filter and housing out, being careful not to get too much fuel all over the place as there is about a pint in the filter (NO SMOKING).
The mounting holes in the NAPA bracket ALMOST line up with the holes in the firewall (1/2 hole dia too narrow) and are too small to run the mounting bolts trough (that would be too easy) but thankfully the bracket is aluminum and easily modified. I used a cone shaped burr on a drill to enlarge and widen the holes then I discovered that the 2" bolts I got would not clear the housing so I angled the holes a bit till they went in (that is why I called for 2" OR 1-1/2" bolts). The bracket is thick and the holes are not so close to the edge that they weaken it to modify them. I used longer bolts because I discovered there is an electrical thingie sticking out of the firewall that the filter has to clear so I had to make the bracket stand off the firewall about 1". I did not have a piece of aluminum block to make a spacer so I got two of the biggest nuts HD had and that was just enough to make it clear.
Once the bracket is firmly on the firewall the two 1/2" NPT male to 3/8 hose barb fittings can be installed on the new housing, be sure to teflon tape them good. The next time (if there ever IS a next time) I think I would try to find one 1/2" NPT male to 1/4" hose barb for the outlet side, if it exists, to reduce the fittings necessary for the reduction to follow. Use the 3/8 to 3/8 hose barb splice to add about 6" to the bigger inlet line and hook it to the right/IN side of the housing and a 3/6-1/4 hose barb splice to extend the smaller OUT line to the left/OUT side of the housing. I could not find a 3/8-1/4 hose barb splice so I made one from a 3/8 barb/1/4" NPT male threaded to a 1/4" barb/1/4" NPT female with a lot of teflon tape. If you can find a 3/8-1/4 barb splice that would be better, OR go 1/4" all the way to the housing if you can find a 1/2" NPT male with a 1/4" barb on it and a 1/4-1/4 barb splice and some 1/4 fuel line. Hose clamps at all the junctions of course. You could also just run new lines from the tank and to the IP if you want, that would remove the need for splices completely, I was lazy and did not do that (maybe later)
Once the lines are all tight, fill up the fuel filter with fuel and lube the gasket and spin on the filter tight and put you battery back in. Remove the pink wire from the injector solenoid (and the vice grips from the fuel lines if you have not already) and crank her over a few times to move the air through (it won't start with the pink wire off), check for leaks, fix leaks as necessary (I had to), connect pink wire and START! Let it run a bit looking for leaks, if no leaks then you are done! I had leaks (my teflon skilz are weak).
Clean up, police your tools and get back in the AC!
Again, if you see something I have done wrong, or a way to improve my design, PLEASE speak up!
Your individual results may vary, thanks for tuning in.
Attachments
-
 75.7 KB Views: 3,232
 -
 56 KB Views: 2,615
 -
 51.7 KB Views: 2,577
 -
 42.8 KB Views: 2,271
Last edited:

