Well I guess it is about time I start a thread and introduce myself to the Steel Soldiers MV community. So, Hello!
I recently realized a long standing dream of being the proud owner of a 13000 lb yard ornament.... and it has been a steep and slippery slope from there!
I started stirring the pot really good around the end of May 2011 and this time there was no slowing down, I was wound up so tight there was no way out except through a Deuce! After watching the Gov Liquidation auctions for quite a while and reading from the wealth of information on the SS forum I decided that a private deal was my best option. I just didn't have time to dedicate to a responsible 1000 mile recovery of a 13000 lb vehicle, and I couldn't swallow paying half the acquisition cost in shipping. I quietly lurked about Craigslist and popular public auction sites until about two months ago when I made the plunge.
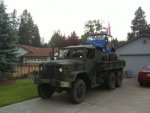
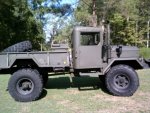
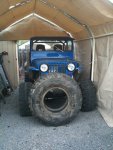
I located a ' 66 Kaiser M35A2 Wo/W from a private party about 200 miles away from my home town of Bend Oregon. She had only 250 hours on the engine, air shift t-case, a newer transmission, likely replaced during the 1989 military rebuild along with the engine. She sports a soft top, and not much else. Some minor rust, being a Pacific North West truck, that is just the way it goes, it comes with the territory.
I managed to convince a good friend of mine who lives in Portland to go preview the truck with cash in fist. If it met all the requirements I had laid forth, as well as pass a lengthily pre-purchase and pre drive inspection he had the green light to take it home with him.
Well as it may be, the fellow was working a few jobs and was downright tough to get ahold of, which nearly spoiled the whole thing! In the meantime I bumped into a smoking deal on a M105A1 trailer with the dual wheel landing gear, tarp, bows, and racks for 250 bucks, so while we stewed over getting ahold of the deuce owner, I sent my buddy after the trailer as it was just too sweet to pass up, now I had really locked myself into getting a M35.
An arduous two weeks drug on until we could arrange a meeting time to view the M35. The day and meeting time came and went, by this time I was so wound up I could hardly function and I wasn't even there to take a look at it! All checked out good, not a single leak on the entire truck (and it has fluids everywhere it should) all mechanical checked out, so the deal was done and my buddy bought the truck. Little did I know that the most difficult portion of the whole deal would be to get him to sign the title over to me!!!
I received a joyous picture of my new truck parked in front of my buddies house, waiting for a good mechanical scrutinizing, and a trip over the "hill" to home. I rallied a friend from the Bend side of the hill to go with me for the ride home.
We greased everything in the Lubrication order, plus some, and changed fluids in the transmission which had a bit of emulsified water. The transfer case oil was a tad on the old side, so it was drained and replaced as well. I replaced 4 tires and outfitted her with a set of troop seat racks which we had purchased from a really great fellow MV owner in the portland area. All else was good. Armed with enough tools to rebuild the thing on the side of the road, we hooked up to the M105A1 and headed for the mountains. I kept her at about 50 most of the way until we were faced with Mt Hood which she pulled at about 30 mph no problems, just slow") (4-6% grades, climbing to a little over 4000 ft from sea level).
(4-6% grades, climbing to a little over 4000 ft from sea level).
I rolled into Bend without a single mechanical issue, averaging about 12 MPG, and a grin ear to ear.
At this point the only person in my immediate family who knew about the whole mess was my loving and understanding wife. The rest were in for a surprise! (not having any kids, the dogs expressed as much excitement as they could and demanded a ride around the block immediately!)
Not more than a half hour after I got home, the deuce had wandered down the street and tried to play with a neighbor's tree, the tree lost") I had to actually look back to be certain the choker hadn't come loose of the tree, I let the clutch out and didn't feel anything, and the engine didn't even labor or come off idle.
I had to actually look back to be certain the choker hadn't come loose of the tree, I let the clutch out and didn't feel anything, and the engine didn't even labor or come off idle. 
From there the last few weeks have been one "great find" after another. Last weekend I found myself headed back over the mountains to Eugene to pick up a C model turbo from a fellow SS member, and a knuckle-boom crane from a semi-truck wrecking yard. The gentleman who sold me the turbo had swapped the C out of his deuce as the noise was not to his liking. I, growing up listening to logging equipment and earth moving equipment, have a special place in my heart for the throaty whistle delivered by a large disp. diesel engine exhausted straight off the turbo and can think of few sounds in this world to its rival! It's not for everyone, but it is sweet music to me!
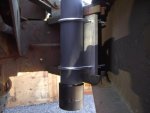
The crane I picked up is a Hiab Speedloader 173 (I believe, as the data tag was missing) but it should nestle itself right behind the cab, and I should only have to push the box back about 12-14 inches to accomplish the installation and I shouldn't have to hack the box up at all, just push it back.
Thinking I was about done with things for a spell, and I could let the pocketbook recover some, I ran across a great deal on 5 G20 pilote tires locally, such a good deal that to buy the 6th at full price I will still come out on top and smelling pretty! So I dug round the bottom of the barrel and came up with enough scratch to bring home the massive rubber. Wheels will have to wait for a bit, so the tires will have to hold down the shed for a while. In the mean-time I can start the labor work of stripping the paint, stopping the spots of rust, and getting the crane installed.
well that is PLENTY of a story for now, but I figured my first post should make up for the several months of lurking
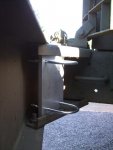
A Thanks is due already to the many great and informative threads out there, My inspection checklist was strong right down to the lower generator mounting bolt, which was (big surprise..) Loose.
I recently realized a long standing dream of being the proud owner of a 13000 lb yard ornament.... and it has been a steep and slippery slope from there!
I started stirring the pot really good around the end of May 2011 and this time there was no slowing down, I was wound up so tight there was no way out except through a Deuce! After watching the Gov Liquidation auctions for quite a while and reading from the wealth of information on the SS forum I decided that a private deal was my best option. I just didn't have time to dedicate to a responsible 1000 mile recovery of a 13000 lb vehicle, and I couldn't swallow paying half the acquisition cost in shipping. I quietly lurked about Craigslist and popular public auction sites until about two months ago when I made the plunge.
I located a ' 66 Kaiser M35A2 Wo/W from a private party about 200 miles away from my home town of Bend Oregon. She had only 250 hours on the engine, air shift t-case, a newer transmission, likely replaced during the 1989 military rebuild along with the engine. She sports a soft top, and not much else. Some minor rust, being a Pacific North West truck, that is just the way it goes, it comes with the territory.
I managed to convince a good friend of mine who lives in Portland to go preview the truck with cash in fist. If it met all the requirements I had laid forth, as well as pass a lengthily pre-purchase and pre drive inspection he had the green light to take it home with him.
Well as it may be, the fellow was working a few jobs and was downright tough to get ahold of, which nearly spoiled the whole thing! In the meantime I bumped into a smoking deal on a M105A1 trailer with the dual wheel landing gear, tarp, bows, and racks for 250 bucks, so while we stewed over getting ahold of the deuce owner, I sent my buddy after the trailer as it was just too sweet to pass up, now I had really locked myself into getting a M35.
An arduous two weeks drug on until we could arrange a meeting time to view the M35. The day and meeting time came and went, by this time I was so wound up I could hardly function and I wasn't even there to take a look at it! All checked out good, not a single leak on the entire truck (and it has fluids everywhere it should) all mechanical checked out, so the deal was done and my buddy bought the truck. Little did I know that the most difficult portion of the whole deal would be to get him to sign the title over to me!!!
I received a joyous picture of my new truck parked in front of my buddies house, waiting for a good mechanical scrutinizing, and a trip over the "hill" to home. I rallied a friend from the Bend side of the hill to go with me for the ride home.
We greased everything in the Lubrication order, plus some, and changed fluids in the transmission which had a bit of emulsified water. The transfer case oil was a tad on the old side, so it was drained and replaced as well. I replaced 4 tires and outfitted her with a set of troop seat racks which we had purchased from a really great fellow MV owner in the portland area. All else was good. Armed with enough tools to rebuild the thing on the side of the road, we hooked up to the M105A1 and headed for the mountains. I kept her at about 50 most of the way until we were faced with Mt Hood which she pulled at about 30 mph no problems, just slow
(4-6% grades, climbing to a little over 4000 ft from sea level). I rolled into Bend without a single mechanical issue, averaging about 12 MPG, and a grin ear to ear.
At this point the only person in my immediate family who knew about the whole mess was my loving and understanding wife. The rest were in for a surprise! (not having any kids, the dogs expressed as much excitement as they could and demanded a ride around the block immediately!)
Not more than a half hour after I got home, the deuce had wandered down the street and tried to play with a neighbor's tree, the tree lost
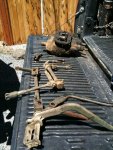
From there the last few weeks have been one "great find" after another. Last weekend I found myself headed back over the mountains to Eugene to pick up a C model turbo from a fellow SS member, and a knuckle-boom crane from a semi-truck wrecking yard. The gentleman who sold me the turbo had swapped the C out of his deuce as the noise was not to his liking. I, growing up listening to logging equipment and earth moving equipment, have a special place in my heart for the throaty whistle delivered by a large disp. diesel engine exhausted straight off the turbo and can think of few sounds in this world to its rival! It's not for everyone, but it is sweet music to me!
The crane I picked up is a Hiab Speedloader 173 (I believe, as the data tag was missing) but it should nestle itself right behind the cab, and I should only have to push the box back about 12-14 inches to accomplish the installation and I shouldn't have to hack the box up at all, just push it back.
Thinking I was about done with things for a spell, and I could let the pocketbook recover some, I ran across a great deal on 5 G20 pilote tires locally, such a good deal that to buy the 6th at full price I will still come out on top and smelling pretty! So I dug round the bottom of the barrel and came up with enough scratch to bring home the massive rubber. Wheels will have to wait for a bit, so the tires will have to hold down the shed for a while. In the mean-time I can start the labor work of stripping the paint, stopping the spots of rust, and getting the crane installed.
well that is PLENTY of a story for now, but I figured my first post should make up for the several months of lurking
A Thanks is due already to the many great and informative threads out there, My inspection checklist was strong right down to the lower generator mounting bolt, which was (big surprise..) Loose.
Attachments
-
![IMG_1497[1].jpg](/data/attachments/180/180840-c58b7befdf32572112e5daa918410a9b.jpg) 63 KB Views: 265
63 KB Views: 265 -
![IMG_1416[2].jpg](/data/attachments/180/180841-a4edfa582df867e3aeed9fac94bc41fe.jpg) 78.5 KB Views: 289
78.5 KB Views: 289 -
![IMG_1407[1].jpg](/data/attachments/180/180842-dd55ad894ca0f75a7f15545320d2644c.jpg) 98.1 KB Views: 271
98.1 KB Views: 271 -
![IMG_1475[1].jpg](/data/attachments/180/180843-cbb112d01a9f47bf7039cd7f846656f2.jpg) 66.6 KB Views: 301
66.6 KB Views: 301 -
![IMG_1409[1].jpg](/data/attachments/180/180844-d0ea1f289dd5450be8c29d31d078e3e0.jpg) 42 KB Views: 276
42 KB Views: 276 -
![IMG_1466[1].jpg](/data/attachments/180/180845-b5f9a9b06ca39c15860477d53b0e95e7.jpg) 73.4 KB Views: 278
73.4 KB Views: 278 -
 96.3 KB Views: 256
 -
 78.6 KB Views: 240

![IMG_1557[1].jpg](/data/attachments/185/185722-1a9999f78bdb37fa8e8c762171e92aee.jpg)
![IMG_1553[1].jpg](/data/attachments/185/185723-ec166a2c29c9e2d6b7a1c5051efd56e9.jpg)