• Steel Soldiers now has a few new forums, read more about it at: New Munitions Forums!

  • Microsoft MSN, Live, Hotmail, Outlook email users may not be receiving emails. We are working to resolve this issue. Please add support@steelsoldiers.com to your trusted contacts.

My new 1992 M998 Avenger

springer1981

Well-known member
844
1,150
93
Location
Maine
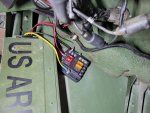
I purchased 24v to 12v DC to DC converter at 20 amps to setup a 12vdc fused electrical system. I tapped off the CB-1 circuit breaker that runs the heater fan. Nothing on the 12v system will draw much current so it shouldn't be a problem if the heat fan is running. Also it's not really a winter vehicle for me so using the heat is a rare occurrence.

I mounted the DC to DC converter behind the kick panel by the drivers door. This put it out of sight and didn't use up valuable real estate under the dash. I ran it to a nice little 6 circuit fuse box. I mounted that using some good double sided tape because I didn't want to put any unnecessary holes in my fender.

After it was all mounted I connected TCU (Transmission Control Unit) to it and tested, worked great.
12vdc.jpg
 

springer1981

Well-known member
844
1,150
93
Location
Maine
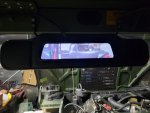
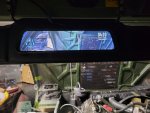
After getting the 12v system working I wired the Visor mounted rear view camera and tested it.

Rear view of my packed and cluttered garage.

Visor3.jpg

Front view from the dash camera function.

Visor4.jpg
 

springer1981

Well-known member
844
1,150
93
Location
Maine
Got the comms working today, one of the headsets has a bad ear. Replaced the headset and all is good now.

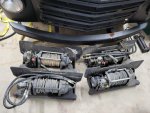
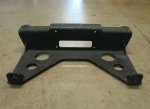
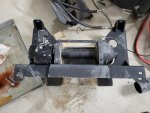
Also started working on the Rear Winch install. I have a rear winch mount and lines as well as the control valve and I have been looking for a winch. I came across and article about using a front winch in the rear mount and decided to go that route instead. So I started looking for a front winch and today a found 1... or 4.

1.jpg

Here is the rear mount
5.jpg
 

TOBASH

Father, Surgeon, Cantankerous Grouch
Steel Soldiers Supporter
Supporting Vendor
3,596
3,518
113
Location
Brooklyn, NY
I need to do the same. Will that bracket work with airlift bumper?
 
Last edited:

springer1981

Well-known member
844
1,150
93
Location
Maine
I started to fit the winch to the rear mount. I rotated it to lay the solenoids down and line up the bolt holes. The first issue is the winch cable feeds from the opposite side of the winch so it needs to be rewound on the spool. I set the winch to free spool to pull the cable out and that was much more difficult than I thought it would be. You have to keep tension on the cable the entire time so it doesn't unwind on the spool. Also as it unwinds each layer gets harder and harder to pull since the leverage changes, not to mention it's on the ground and you have to use your feet to hold it back while you pull the cable out.

Once I get it mounted and hooked up I will re-spool the cable in the opposite direction. I'll have to figure out the hydraulic connection points since it will be a non-standard hookup. Not difficult at all but the hose ends will need to be changed in a couple of places.

6.jpg
 

TNDRIVER

Well-known member
Steel Soldiers Supporter
334
509
93
Location
Cleveland,TN
Got the comms working today, one of the headsets has a bad ear. Replaced the headset and all is good now.

Also started working on the Rear Winch install. I have a rear winch mount and lines as well as the control valve and I have been looking for a winch. I came across and article about using a front winch in the rear mount and decided to go that route instead. So I started looking for a front winch and today a found 1... or 4.

View attachment 856032

Here is the rear mount
View attachment 856033
For anyone else, I see you pulled the trigger, a M/M 12,000 LB bolts right into the rear mount and mine works great with the hood mounted valve. Probably have to drill the inside corner braces for the mount. The 12,000 gives you a little extra grunt on the first wrap. My 2 cents worth.
 

springer1981

Well-known member
844
1,150
93
Location
Maine
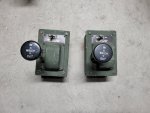
For the winch control I'm going to add a switch next to the remote winch hand controller plug to select Front or Rear winch. This way I only need one connector and controller and can easily switch between them.

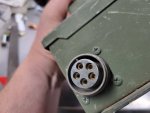
I also have a couple Heavy Duty Winch Controllers from a larger truck. It is a much more complicated controller in that it look like it can vary the rate of the winch as well as in or out. This function would not work for my winches since they don't support it. It's easy to defeat that circuit. I am going to wire it up so it will plug in to the oem winch plug on the dash and then mount it to the radio tray. It can stay hooked up and the on/off switch on it will work. Then I will add the same oem plug on the controller next to the plug in second picture. This would allow the remote hand controller to be able to be plugged in and used as normal, it would be turned on and off by the same switch and it would allow either controller to work for either the Front or the Rear winch.

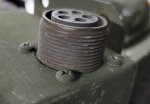
That said, I am looking for a connector that fits the winch controller in the pictures below. Any information would be helpful. Thanks.

2.jpg


7.jpg


4.jpg
 

springer1981

Well-known member
844
1,150
93
Location
Maine
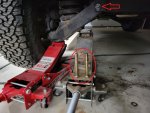
The Fun begins! The first step is to turn around the rear control arm bolts. This is the same process used when mounting the front winch. You can see I have 2 - 6" x 5/8" bolts (circled in red). After removing the nut from the control arm bolt I use one of the 6" bolts to drive it out while following it in to the bushing. With 2 floor jacks you can take the spring pressure off the control arm bolt making it easy to remove. Basically replace the OEM bolt with the new bolt. Then repeat the process using the other new bolt. Last, use the OEM bolt and do it one more time. The end result is the OEM bolt is now going through the control arm in the opposite direction putting the threads towards the rear.

8.jpg

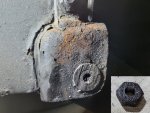
So the first bolt was a piece of cake but the other bolt, not so much. The bolt would not budge. I started drilling the bolt out until I had 1/2" hole in the center. Then I used a sawzall to cut the head of the bolt off as you can see in the picture below.

9.jpg


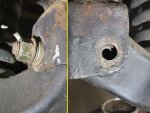
When trying to pound the bolt out from the threaded side there is no easy swing at it. I also tried using a air hammer and other destructive devices. The bolt would not budge. So after cutting the head off and having 1/2" hole drilled in it, I took a grade 8 1/2" bolt and cut the head off that to use as a punch. I inserted it into the hole drilled in the control arm bolt and proceeded to use a 5lb hand sledge to try to drive out the bolt. Still will not budge. Even tried heating up the bolt but not so much as to damage the rubber control arm bushing. Still will not budge.

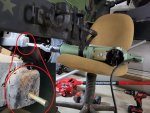
Time to pull out the Big Guns! Using the 1/2" cut off bolt as a punch (circled in red below), I used a Jack Hammer and proceeded to pound the crap out of it. Still will not budge. The next step is to use a spacer and nut on the threaded side and tighten it with an impact while jack hammering it and see if I can move that rusted in bolt. And if that doesn't work, I will continue to drill it out until I have drilled the bolt out completely. Failure is NOT an option!

10.jpg
 
Last edited:

Milcommoguy

Well-known member
Supporting Vendor
1,713
2,279
113
Location
Rosamond, CA
This might work??? Two man double team effort. Use a "bucking bar" on the opposite side close to the threads to back up all the pounding. It MUST be a SOLID, heavy BLOCK of steel. And of course your favorite "nut buster in a can" soaked over night.

Pounding with that much "wacking power" without backing support... something else is going to bend, break a weld or ...???

Eyeglasses are cool too.

Helper number two, ear plugs and hold on tight, CAMO
 

TOBASH

Father, Surgeon, Cantankerous Grouch
Steel Soldiers Supporter
Supporting Vendor
3,596
3,518
113
Location
Brooklyn, NY
These bolts are notoriously difficult to remove and cutting off the head might’ve not been the right place to start. I would’ve used a heavy Milwaukee super powerful impact wrench to try to twist the head of the bolt. It would either twist the bolt free or it would break off, either way would be beneficial. Now you are left with the shaft of the bolt that is too long and won’t move. You therefore need to use a sawzall and cut the shaft between the control arm and the carrying bracket.

I would suggest in the future you’re not cut off the bolt heads and instead try to torque the bolt in order to try to break up the rust between the bolt and the bushing’s steel inner liner. If that does not work you’ll need to use a sawzaall or a Gigli saw in order to cut the area of the bolt between the bracket and the control arm. This is a well-known difficult job.

You might want to spray everything down with penetrating oil over 24 hours before attempting this job. If you need to go the route of cutting the head and tail off of the bolt between the bracket and the control arm, you will then need to try to extract the bushing. I own a bushing extraction tool however that depends on removing the bolt first. Others burn or drill the rubber out and then fight the steel. You need to be very careful that when you remove the bolt and remove the bushing and insert the new bushing that you do not bend the control arm, which is a common problem.
 
Last edited:

springer1981

Well-known member
844
1,150
93
Location
Maine
This might work??? Two man double team effort. Use a "bucking bar" on the opposite side close to the threads to back up all the pounding. It MUST be a SOLID, heavy BLOCK of steel. And of course your favorite "nut buster in a can" soaked over night.

Pounding with that much "wacking power" without backing support... something else is going to bend, break a weld or ...???

Eyeglasses are cool too.

Helper number two, ear plugs and hold on tight, CAMO
Thanks for the recommendations. A block of steel that big and heavy would be very difficult to hold in place if I had one. I did check everything after each attempt with the jack hammer to make sure I wasn't doing unnecessary damage.
 

springer1981

Well-known member
844
1,150
93
Location
Maine
These bolts are notoriously difficult to remove and cutting off the head might’ve not been the right place to start. I would’ve used a heavy Milwaukee super powerful impact wrench to try to twist the head of the bolt. It would either twist the bolt free or it would break off, either way would be beneficial. Now you are left with the shaft of the bolt that is too long and won’t move. You therefore need to use a sawzall and cut the shaft between the control arm and the carrying bracket.

I would suggest in the future you’re not cut off the bolt heads and instead try to torque the bolt in order to try to break up the rust between the bolt and the bushing’s steel inner liner. If that does not work you’ll need to use a sawzaall or a Gigli saw in order to cut the area of the bolt between the bracket and the control arm. This is a well-known difficult job.

You might want to spray everything down with penetrating oil over 24 hours before attempting this job. If you need to go the route of cutting the head and tail off of the bolt between the bracket and the control arm, you will then need to try to extract the bushing. I own a bushing extraction tool however that depends on removing the bolt first. Others burn or drill the rubber out and then fight the steel. You need to be very careful that when you remove the bolt and remove the bushing and insert the new bushing that you do not bend the control arm, which is a common problem.
Thanks but I am not a beginner at difficult to remove bolts. I would like to touch on a couple things you suggested though. First, there is NO way you are breaking these bolts with an impact. The shank is 5/8" thick and it is rusted in place in a rubber bushing. You would rip it free from the rubber long before you could break that bolt. Also a broken bolt leaves a rough surface that is then very difficult to center a drill to drill it out. That is one reason why I drilled through the head of the bolt first. The other reason why is because it is easier to cut a hollow bolt with a sawzall when the time comes.

I did try to break it free with a "super powerful" Milwaukee impact. In fact I also tried a plug in AC impact that I thought would have more power and it turns out that one from Harbor Freight is junk by comparison and in the trash now.

I only would need to cut the bolt between the control arm and carrying bracket if I intended to remove the control arm and replace the bushing however I would still drill it out if I was considering that. I do not intend to do that. I do not consider cutting that to be very difficult in general but to avoid any chance of damage it would be just as easy to cut the bolt flush to the outside of the carrier bracket (like I did) and then drill out the bolt until it cleared the bracket.

My plan, as described above, is to put a spacer on the threaded side and then use the nut to apply a significant pulling force, with an impact, while I hit it from the other side with the jack hammer. If that doesn't remove it then I will continue the process of simply drilling the rest of the bolt until it can be removed from the bushing. I already have a 1/2" hole a good 2" into the bolt but I didn't have a 5/8" drill bit.
 

TNDRIVER

Well-known member
Steel Soldiers Supporter
334
509
93
Location
Cleveland,TN
Thanks but I am not a beginner at difficult to remove bolts. I would like to touch on a couple things you suggested though. First, there is NO way you are breaking these bolts with an impact. The shank is 5/8" thick and it is rusted in place in a rubber bushing. You would rip it free from the rubber long before you could break that bolt. Also a broken bolt leaves a rough surface that is then very difficult to center a drill to drill it out. That is one reason why I drilled through the head of the bolt first. The other reason why is because it is easier to cut a hollow bolt with a sawzall when the time comes.

I did try to break it free with a "super powerful" Milwaukee impact. In fact I also tried a plug in AC impact that I thought would have more power and it turns out that one from Harbor Freight is junk by comparison and in the trash now.

I only would need to cut the bolt between the control arm and carrying bracket if I intended to remove the control arm and replace the bushing however I would still drill it out if I was considering that. I do not intend to do that. I do not consider cutting that to be very difficult in general but to avoid any chance of damage it would be just as easy to cut the bolt flush to the outside of the carrier bracket (like I did) and then drill out the bolt until it cleared the bracket.

My plan, as described above, is to put a spacer on the threaded side and then use the nut to apply a significant pulling force, with an impact, while I hit it from the other side with the jack hammer. If that doesn't remove it then I will continue the process of simply drilling the rest of the bolt until it can be removed from the bushing. I already have a 1/2" hole a good 2" into the bolt but I didn't have a 5/8" drill bit.
I'M IMPRESSED , great work compared to most stuff here. By now i'm sure you realize the bushing is toast and will need replacing. For those attempting this winch bracket swap, if the bolts turn after loosening the nut, before removing them, give them a good spin in both directions with an impact wrench before trying to remove the bolt. It pulverizers the rust . Don't just remove the nut and try to drift the bolt out. I've also put a little water pruf grease on these bolts in case I wanted to remove them in the future. A 3/4 inch impact wrench and 150 psi helps. Kenworths have bigger NUTS! Just my 2 cents. Great work though. This would be garage junk for most people.
 

springer1981

Well-known member
844
1,150
93
Location
Maine
I'M IMPRESSED , great work compared to most stuff here. By now i'm sure you realize the bushing is toast and will need replacing. For those attempting this winch bracket swap, if the bolts turn after loosening the nut, before removing them, give them a good spin in both directions with an impact wrench before trying to remove the bolt. It pulverizers the rust . Don't just remove the nut and try to drift the bolt out. I've also put a little water pruf grease on these bolts in case I wanted to remove them in the future. A 3/4 inch impact wrench and 150 psi helps. Kenworths have bigger NUTS! Just my 2 cents. Great work though. This would be garage junk for most people.
Thanks for the feedback and advice. As of right now the bushing is no more "toast" than the rest of them. That said, the bushings as well as the rest of the truck turns 30 years old this year. ALL of the swing arm bushings *could* be replaced but none of them are so bad they *need* to be replaced yet. I have contemplated replacing them all but it is not required at this point in time. I might do a complete suspension overhaul someday.

And yes I did spin the other bolt to work some of the rust dust out of it.
 

springer1981

Well-known member
844
1,150
93
Location
Maine
Try a left handed twist drill and Kroil for daze and days.
Maybe a drill hog left handed 1/2' twist drill now that you got the center
Thanks for the suggestion. A left hand bit is usually used when a threaded bolt is seized in a threaded hole. The left hand bit can help release the clamp load of the threads and spin it in the right direction to unscrew it. In this case it doesn't matter, the bolt isn't threaded in, it's rusted in. The sleeve has rusted and swelled clamping bolt firmly. So firmly that when the head was still on the bolt it would not spin in either direction with an impact. A left or right hand drill bit isn't going to make a difference except the left hand drill bits cost more.
 
Top
AdBlock Detected

We get it, advertisements are annoying!

Sure, ad-blocking software does a great job at blocking ads, but it also blocks useful features of our website like our supporting vendors. Their ads help keep Steel Soldiers going. Please consider disabling your ad blockers for the site. Thanks!

I've Disabled AdBlock
No Thanks