• Steel Soldiers now has a few new forums, read more about it at: New Munitions Forums!

  • Microsoft MSN, Live, Hotmail, Outlook email users may not be receiving emails. We are working to resolve this issue. Please add support@steelsoldiers.com to your trusted contacts.

My replacement XM820e2 recovery and modification thread

wdbtchr

New member
883
3
0
Location
St. Louis, MO
To keep you cooling system clean in the future it's a good idea to add a coolant filter to your truck. I was so impressed on my M51a2 that I've been adding them to all my vehicles and tractors. The filters can be had with supplement additives for diesel engines or without for gas engines. I don't know if the diesel additives would make any difference on a gas engine but I figured I would take the chance.
 

goldneagle

Well-known member
4,450
896
113
Location
Slidell, LA
I removed the spare tire holder from the driver's side. There is a spare tire holder on the passenger side as well.

I had picked up a M931 tool box from Jeff Davis when I dropped off the oil and equipment. I cut the bolts that held the bottom brackets (were torch cut off the heavy angle that supports the box) Moved the yellow reflector to the other side and plugged the two holes left. Cleaned and painted the box CARC Green. Saturday after I pick up my lug nuts and Unistrut bolts I will install the tool box.
 

whiskey357

Banned
168
0
0
Location
chicago,ill
So far so good...sounds like a major rebuild 1 itme at a time....but what fun you are having RIGHT....hehehehe.............only thing left is the tranny and shocks for it ...........well have fun and later gator
 

goldneagle

Well-known member
4,450
896
113
Location
Slidell, LA
I got the Unistrut 3/8" nuts from Home Depot. I cut 3 short pieces of Unistrut to fit between the angle iron that will support the tool box. I attached the Unistrut to the bottom of the angles in the proper locations to align with the holes in the tool box. Once the Unistruts were secure i placed two 3/8" Unistrut nuts in each channel to line up with the holes in the bottom of the tool box . I secured the tool box to the Unistruts with six 3/8" bolts. A little touch-up paint and she is done.
 

Attachments

goldneagle

Well-known member
4,450
896
113
Location
Slidell, LA
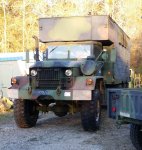
Been thinking about the electric hydraulic pump that runs the liftgate when the truck engine is off. It is set up to run on 3 phase power when a generator is attached to the truck for power. Since i do not have a 3 phase generator to do that i though about converting the pump to single phase power or 24 volts. Since I plan to use the liftgate as a work platform here at home I thought single phase would be the least expensive way to go.

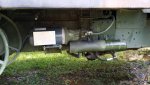
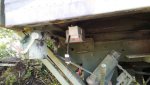
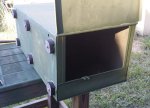
Yesterday I removed the pump and sealed off the hydraulic feeds to and from the pump. This allows me to still use the liftgate with PTO power. The electric pump was tapped in parallel to the PTO pump. The pump also had a badly cracked hydraulic hose going to it. I will replace it when I reinstall the pump assembly.

Once I removed the pump I used paint stripper and scraper to remove the paint off the data plate of the motor to determine the specifications of the motor. Basically its a 2HP 3 Phase motor. It has (4) 3/8" bolts securing the pump to the motor. Here is the data plate:Pump_1c.jpg


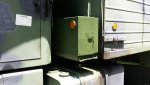
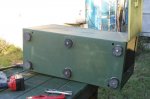
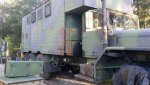
Here are some pictures of the motor/pump setup: Pump_1a.jpgPump_1.jpgPump_1b.jpg


When i had a chance last night I searched on Ebay (6500 listings) looking for a single phase replacement motor. After hours of looking I found 1 that matched my specifications. It looks like it will be a direct match (no modifications required.) I negotiated a good price on it. ($203.17 shipped) Here are some helpful pictures and specs on the motor:


Motor_1.jpgMotor_1a.jpgMotor_1b.jpg

I will update this entry once I receive the motor and attempt to hook up the pump.
 

goldneagle

Well-known member
4,450
896
113
Location
Slidell, LA
Today I assembled the new junction boxes and wired them for the hydraulic pump I purchased for the liftgate. I used a plastic 6" by 6" by 4" deep box to replace the original j-box that rusted out. I also attached a 3/16" thick flat bar on the back of the 6x6 box with (2) 1/4" bolts. I then attached a plastic switch box to the flat bar with 2 additional bolts. I also attached a short 12/3 SJOOW cord with a 20 AMP male plug to the 6x6 j-box. Once I wired the switch and power cord I installed the 6x6 j-box on the truck. I used the existing wires to pull new wires to the outlet box near the pump mount. I installed a new single 20 AMP receptacle and weather resistant cover on the outlet box. I then finished wiring the other end of the circuit by the liftgate and closed the 6x6 cover.

Here are some pictures of the work:Liftgate_Wire_1c.jpgLiftgate_Wire_1b.jpgLiftgate_Wire_1.jpgLiftgate_Wire_1a.jpg
 

goldneagle

Well-known member
4,450
896
113
Location
Slidell, LA
Ok I got some update on the liftgate pump project. The electric motor arrived Friday afternoon. Just as described! I tried to test it with my 20 amp outside line. It got the motor spinning but also tripped the circuit breaker. I guess when the data plate states 20 FLA they are dead on. Tried it again inside the shop with another line and same thing on the 2nd try. So it looks like I will not be running the motor/pump on 120 volt. Looks like I will need to rewire the motor as 220 volt by reconfiguring the wire in the j-box attached to the motor.

I installed the pump head to the motor. It was a perfect fit. (at least I got that right) Will have to test the motor when it's hooked up to the hydraulic system to see if it is rotating the right direction. There were no signs as to spin direction. I could not find any info in the manuals for direction of spin.

So it looks like I will need to modify the wiring on the truck as well. I have the wires set for 115 volts. It will require replacing the 1 pole switch with a 2 pole single throw switch. (luckily I have one in stock) I will need to add one additional conductor between the switch box and the j-box on the truck since I will be switching both 115 volt legs on the 230 volt line. I will also replace the 20 AMP 115 volt male plug with a 20 AMP 230 Volt twist lock male plug to match the one at the end of the extension cord I fabricated.

I wired up the motor for 230 volt and put a 230 volt plug on the end of the cord for testing. I made up an extension cord that has (2) 115 volt cords going to an inline splice. On the other side of the splice is a single cord that will run the 230 volts to the motor.

I use a underground splice kit to make the Y connection. I took the black wire from cord A and attached it to black on cord C (the 230 volt side). I took the black wire from cord B and attached it to the white wire on cord C. I then took both green wires from cord A and cord B and spliced them to the green wire on cord C. The white wires are not connected on cord A and cord B. I used the heavy duty shrink tube from the splice kit to cover over the splice I made. (Home Depot and electrical supply houses carry the UF Splice Kit)

I attached a female plug at the end of cord C that matched the plug at the end of the motor power cord. I plugged the (2) 115 volts male plugs into 2 different circuits. (the circuits must be on 2 different buss bars in the panel to get 230 volts) I then plugged the motor into extension cord. Motor spins great.

Today I decided to do some additional work on the motor power setup. I was trying to decide what outlet to use and what plug to use where the pump motor plugs into the truck. I had originally installed a 20 Amp 115 volt outlet to plug the motor into. i did not want to use it with the 230 volt setup (even though it would work) The solution was to rob the old 3 phase motor of the 3 pin Canon plug that was attached to it's power cord. I still had the receptacle and plate that fit the outlet box. Took me a bit to figure out how to take the plug apart but finally got it. I desoldered the original wires from the plug and receptacle and soldered new conductors on to them. (This way the motor/pump setup will look original) I retest the motor with the new connections and it works great. Now all I have to do is wait for some dry weather to finish the work on the truck.

I also had a new hydraulic hose made up to replaced the cracked hose that goes from the pump to the reservoir.

As a side note. If you ever had the old soldering gun made by Weller 8200 and need a replacement tip in a pinch just use #10 solid copper wire. I had an old tip on my soldering gun and it broke after years of service. I needed to desolder the wires from the plug and no replacement tips! Just bent a #10 copper wire and it worked great. Much cheaper that a replacement tip too!
 

goldneagle

Well-known member
4,450
896
113
Location
Slidell, LA
We had rain here for the last week. The yard is flooded in spots that never flooded before. It finally stopped raining this afternoon so I decided to get the hydraulic pump work done on the truck. I started by installing the power outlet that the pump motor will plug into. Once that was done I moved over to the back of the truck. I removed the SP switch as well as the 115 Volt male plug. I installed a 20 AMP 230 volt male plug on the power cord. I removed the wire going from the switch to the j-box. I had to add 2 additional wires (not 1 as I had previously stated) to the existing 3 wires. Using the 2 Pole Single throw switch I wired up the switch box and secured the cover.

I then started to connect the wires inside the j-box to supply switched 230 volt power to the pump motor. Once I completed that task I decided to attempt to install the pump/motor assembly.

I had to use my large Styrofoam blocks to lay the motor on because the ground was flooded in that area. Sitting on a 2nd block I tried to mount the motor. Looks like I need to drill 2 new holes for the back bolts. The bolt holes would not not line up with the mount base. After measuring and drilling the 2 holes I managed to mount the motor to the steel platform.

I attached the power cord to the receptacle I installed earlier. I drained the oil from the reservoir and attached the new hydraulic line to the pump. I also attached the other hydraulic line to the pump. Once the lines were attached I added hydraulic fluid to the reservoir. Now the installation was complete except for testing the pump to see if it is spinning in the correct direction. I will do that when the yard dries a bit. I do not want to put ruts in the yard from the truck tires.

Here are some pictures of the completed project:
 

Attachments

goldneagle

Well-known member
4,450
896
113
Location
Slidell, LA
UPDATE on the liftgate project: I tested the liftgate today using extension cords and it works! Another project out of the way.
 

goldneagle

Well-known member
4,450
896
113
Location
Slidell, LA
Today I had a visit from a friend who had promised to help me upgrade my tires and wheels on my truck. It had 11.00-20 NDTs. I had picked up some nice 14.00-20 on 5 ton rims for it a few months ago. Got a really great deal on them.

He brought some additional help to make it go easier. Had the truck jacked on one side and I had the air hoses run. Tried to use the 1" air gun but it would not spin! I had to bring out the Swench tool and the Roboimpact 3/4" driver. Between the two tools we did not have any trouble loosening any of the lug nuts! Here are some quick pictures of the trucks after the tires were installed.
 

Attachments

goldneagle

Well-known member
4,450
896
113
Location
Slidell, LA
Didn't get her painted yet. However I have been adding some tool boxes in place of the 2 spare tires behind the cab. I got 3 of them mounted with the 4th going in tomorrow. I am using the tool boxes from the M931 trucks. Will have 2 on each side.

I am using rubber spacers between the lower and upper tool boxes. These spacers came from large holes drilled in surplus tires to be used as bumpers on tug boats.
 

Attachments

Last edited:

srodocker

Well-known member
6,549
68
48
Location
Lacey, Washington
Love the build. Tons of storage which I like. When I buy tools I try to buy at least 2 so I can stock the truck. Which at the moment is inop. So all the stuff is sitting on the shop bench!
 
Top
AdBlock Detected

We get it, advertisements are annoying!

Sure, ad-blocking software does a great job at blocking ads, but it also blocks useful features of our website like our supporting vendors. Their ads help keep Steel Soldiers going. Please consider disabling your ad blockers for the site. Thanks!

I've Disabled AdBlock
No Thanks