• Steel Soldiers now has a few new forums, read more about it at: New Munitions Forums!

  • Microsoft MSN, Live, Hotmail, Outlook email users may not be receiving emails. We are working to resolve this issue. Please add support@steelsoldiers.com to your trusted contacts.

My solar panel install

sed6

New member
238
0
0
Location
OKC, OK
My solar panel install - with pics

Lots of good threads here about solar panels inspired me to add one to my '84 M925. I think it turned out well and I took lots of pics so I thought I'd document my efforts here.

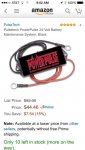
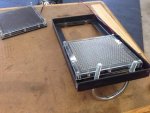
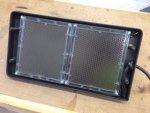
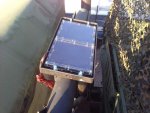
Pic1- I used a pair of 12v Wildgame solar panels wired in series I found on Amazon for $25ea. I decided to mount them on top of my tire davit.
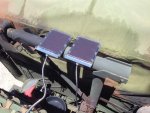
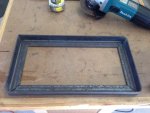
Pic2- I used some angle iron to fab up a frame to hold them and offer a small degree of protection.
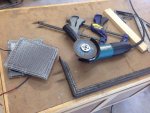
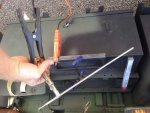
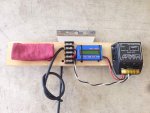
Pic3- I don't have a welder so I improvised and used my truck batteries. I disconnected them from the truck just to be safe. The process is called DCEN, DC Electrode Negative welding, look it up on Google.
 

Attachments

Last edited:

sed6

New member
238
0
0
Location
OKC, OK
Pic4- Frame all welded. Not perfect but it worked!
Pic5- A mock up of how it'll all go together.
Pic6- I originally planned to use some fancy strain relief for the wire running to the batteries but instead opted for a simple knot. I used a 12' extension cord to connect the batteries to the panel and simply cut off the plug ends.
Pic7- Here's the underside. I painted everything black but the overexposed pic makes it looks green.
 

Attachments

Last edited:

sed6

New member
238
0
0
Location
OKC, OK
Pic8- My mock up of the control panel. I used a $13 watt meter and a $14 charge controller. The red shop towel is where my Solargizer will be once it arrives. Since the amp output of the charger is so low I could have probably gone without the charge controller. However it provides protection against the panels draining the batteries and it has lights on it to show me everything is hooked up and working.
Pic9- Installed control panel.
Pic10- Close up of the watt meter and charge controller.
Pic11- Somehow I failed to take a pic of the panel installed. Here's what the panel looked like during mock up.

Hope you like!
 

Attachments

Last edited:

Artisan

Well-known member
2,762
227
63
Location
CDA Idaho
Well, I hope for more pics cause I can't see the method of the madness.
I thought all's you needed was a solargizer to do what your doing....???

What model Solargizer are you waiting for?
That might enlighten me.
 

sed6

New member
238
0
0
Location
OKC, OK
Oh gosh. Well the solargizer uses the batterys own power to pulse the battery to prevent sulfation on the battery plates and extend battery life. It doesn't actually add any juice to the battery. That's where the solar charger comes in, it will add juice to the battery to keep it topped off. The charge controller monitors the battery charge level and will allow the solar panels to fully charge the battery but then switches off when my batteries are full. The solargizer is hooked directly to the battery, not to any of the wiring I created on my control panel. Here's the solargizer I'm getting. Made by Pulsetech, same as the mil ones.

edit: I see where the confusion might be, I used the term solargizer incorrectly. That implies a complete system which includes a solar panel. I'm using a stand alone 'pulser' for which I don't know the correct name combined with a stand alone panel.
 

Attachments

Last edited:
Top