Potluckslammy
Member
- 61
- 83
- 18
- Location
- Umpire, AR
Flushed the coolant system on my first A3 last year. Looked like muddy river water coming out! Hoses needed replacing, but I balked at the prices for new rubber. Gave me pause to consider options!
Shopping around on the interwebs I discovered silicone hoses could be had for less, and should be a "lifetime" solution. It was a learning experience! And a few weeks ago I decided to take on the coolant system of my second Deuce, so decided to take pictures and post the results.
This one was worse off than the first one! Coolant was BLACK...Marine Corps coffee BLACK...grounds and all! Guessing there was quite a bit of rust in the system. Probably should have taken the radiator to a shop and have them give it a proper flush and pressure check, but radiator shops are uncommon anymore. Nearest one to me is over an hour away; that and the hassle of pulling the rad was reason enough to see what could be done with auto parts store flush and a garden hose.
Took what felt like forever to get the system "clean"! Flushed it 12 times in total over a week, including three bottles of super heavy duty coolant flush. Ran it up to N.O.T. for about an hour with the flush in it the first time, drained it, pulled the hoses and thermostat, then blasted clean water through it with the garden hose. Disgusting!
Did the flush with clean water until it ran clear. Back flushed the radiator and heater core. Buttoned it up, and ran it up to temp again. Drained and pulled hoses again....BLACK MUD!
Didn't take pictures of the sludge coming out...hands too filthy to manipulate the phone. But suffice to say I repeated this operation until the water just had a little tinge to it. The chemicals seemed to do a pretty good job on the metal, from what I could tell.
Will say that doing this operation was a good opportunity to clean and paint the thermostat housing, and that whole area...pretty corroded! Did the same with all the coolant hose fittings, and pulled the heater valve which was stuck. Putting it all back together was a breeze, having so much experience by now! . And know which parts and hoses were needed beforehand this time, they were already on hand.
Ok, so here's what I did for replacements:
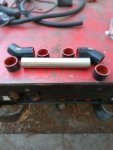
For the bottom hose I sourced a couple 2" i.d., 45degree silicone hoses, and a length of 2"o.d. stainless tubing, .060" thickness if I recall. It's sold by the foot so 12" in length. Cost about $12, including shipping...pays to shop around, too.
Knowing in advance, tried to order this stainless tube cut to 10"...but they sent me a full foot. Out came the measuring tape and the Sawzall! However putting it all together, figured 8"-9" would have been better. Remembered trimming the hoses last time, so did the same this time around. As seen in the picture I cut a good inch, or 1 1/4" off each end of the hoses. Some trimming is necessary if you want a good length of that pretty stainless to show, which I did. But realized after the fact that maybe not quite so much really needed cutting! And if you wanted to just splice in a 6" piece of tube to make it serviceable, that would be perfectly ok, too! Just do some fitting and figuring once you have your parts on hand. Measure twice...or three times...assemble four times, cut once!
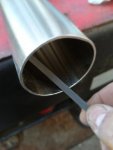
Remember to deburr the tube, inside and out. Those edges can be SHARP...bad for hoses, and fingers!
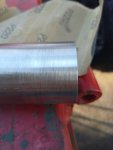
Something I did this time that I didn't do last time was rough up the first inch or so of the tube. It comes with a brushed finish, which doesn't give the hose much purchase, and there's no lip or rolled edge like on the other fittings to help hold it. 200 grit worked just fine.
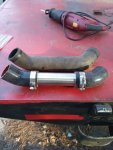
Here's the "nearly" finished replacement next to the original. Tried to eyeball it for length next to the oem hose, but during install it was clear some adjustments were needed. It's not quite as flexible going back on as the rubber one, and space is tight, so leave all your clamps a little loose.
I found it best to assemble the hose with a loose fit, then start on the engine side, slide the hose well up on the fitting. Orient your clamps so that they'll be easy to tighten. Then start working your way toward the radiator. You'll have to slide the tube back and forth inside the hose to better manipulate it in the space available. A little lubricant is very helpful here...WD will work, but I decided on some Sil-Glyde silicone grease left over from my airpack build. It's not harmful to the hoses...and just a dab is plenty.
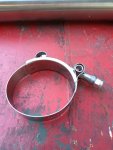
Here's the style clamp I chose to replace the originals. Don't remember what they're called, but they're fairly cheap, heavy-duty, stainless, nylon locking nuts, provide great clamping force, and won't deform and break like the originals. Plus they look really cool! Think I gave something like $12 for a pack of 10...maybe a little more. (One note here....the edges can be sharp, so I ran a file over them.)
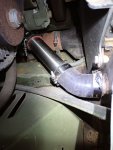
And here's the finished product installed! I think it looks pretty darned good! All together cost me something like $20...maybe $25. A significant savings over the original rubber, and should never need replacing.
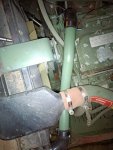
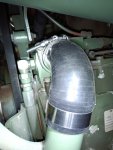
For the top end I bought a couple 2", 90 degree silicone hoses...they didn't need trimming. The metal crossover pipe had a significant issue with surface rust, so I hit it with a wire wheel, and repainted. Same stainless clamps as before to replace. Thermostat housing cleaned and repainted. Looks great!
One, last thing. As you can tell from the length of thread left sticking out from these clamps after tightening I think I mistakenly ordered 2 1/4", when it should have been a 2".
Shopping around on the interwebs I discovered silicone hoses could be had for less, and should be a "lifetime" solution. It was a learning experience! And a few weeks ago I decided to take on the coolant system of my second Deuce, so decided to take pictures and post the results.
This one was worse off than the first one! Coolant was BLACK...Marine Corps coffee BLACK...grounds and all! Guessing there was quite a bit of rust in the system. Probably should have taken the radiator to a shop and have them give it a proper flush and pressure check, but radiator shops are uncommon anymore. Nearest one to me is over an hour away; that and the hassle of pulling the rad was reason enough to see what could be done with auto parts store flush and a garden hose.
Took what felt like forever to get the system "clean"! Flushed it 12 times in total over a week, including three bottles of super heavy duty coolant flush. Ran it up to N.O.T. for about an hour with the flush in it the first time, drained it, pulled the hoses and thermostat, then blasted clean water through it with the garden hose. Disgusting!
Did the flush with clean water until it ran clear. Back flushed the radiator and heater core. Buttoned it up, and ran it up to temp again. Drained and pulled hoses again....BLACK MUD!
Didn't take pictures of the sludge coming out...hands too filthy to manipulate the phone. But suffice to say I repeated this operation until the water just had a little tinge to it. The chemicals seemed to do a pretty good job on the metal, from what I could tell.
Will say that doing this operation was a good opportunity to clean and paint the thermostat housing, and that whole area...pretty corroded! Did the same with all the coolant hose fittings, and pulled the heater valve which was stuck. Putting it all back together was a breeze, having so much experience by now!
Ok, so here's what I did for replacements:

For the bottom hose I sourced a couple 2" i.d., 45degree silicone hoses, and a length of 2"o.d. stainless tubing, .060" thickness if I recall. It's sold by the foot so 12" in length. Cost about $12, including shipping...pays to shop around, too.
Knowing in advance, tried to order this stainless tube cut to 10"...but they sent me a full foot. Out came the measuring tape and the Sawzall! However putting it all together, figured 8"-9" would have been better. Remembered trimming the hoses last time, so did the same this time around. As seen in the picture I cut a good inch, or 1 1/4" off each end of the hoses. Some trimming is necessary if you want a good length of that pretty stainless to show, which I did. But realized after the fact that maybe not quite so much really needed cutting! And if you wanted to just splice in a 6" piece of tube to make it serviceable, that would be perfectly ok, too! Just do some fitting and figuring once you have your parts on hand. Measure twice...or three times...assemble four times, cut once!

Remember to deburr the tube, inside and out. Those edges can be SHARP...bad for hoses, and fingers!

Something I did this time that I didn't do last time was rough up the first inch or so of the tube. It comes with a brushed finish, which doesn't give the hose much purchase, and there's no lip or rolled edge like on the other fittings to help hold it. 200 grit worked just fine.

Here's the "nearly" finished replacement next to the original. Tried to eyeball it for length next to the oem hose, but during install it was clear some adjustments were needed. It's not quite as flexible going back on as the rubber one, and space is tight, so leave all your clamps a little loose.
I found it best to assemble the hose with a loose fit, then start on the engine side, slide the hose well up on the fitting. Orient your clamps so that they'll be easy to tighten. Then start working your way toward the radiator. You'll have to slide the tube back and forth inside the hose to better manipulate it in the space available. A little lubricant is very helpful here...WD will work, but I decided on some Sil-Glyde silicone grease left over from my airpack build. It's not harmful to the hoses...and just a dab is plenty.

Here's the style clamp I chose to replace the originals. Don't remember what they're called, but they're fairly cheap, heavy-duty, stainless, nylon locking nuts, provide great clamping force, and won't deform and break like the originals. Plus they look really cool! Think I gave something like $12 for a pack of 10...maybe a little more. (One note here....the edges can be sharp, so I ran a file over them.)

And here's the finished product installed! I think it looks pretty darned good! All together cost me something like $20...maybe $25. A significant savings over the original rubber, and should never need replacing.


For the top end I bought a couple 2", 90 degree silicone hoses...they didn't need trimming. The metal crossover pipe had a significant issue with surface rust, so I hit it with a wire wheel, and repainted. Same stainless clamps as before to replace. Thermostat housing cleaned and repainted. Looks great!
One, last thing. As you can tell from the length of thread left sticking out from these clamps after tightening I think I mistakenly ordered 2 1/4", when it should have been a 2".

