DieselIron
Member
- 20
- 34
- 13
- Location
- Nashville, TN
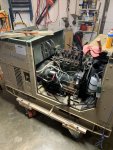
I picked up a basket case MEP-803A from Ft. Campbell, KY via IP. It had a locked up motor due to rainwater down the exhaust pipe, disconnected Quad/Excitor wire harness at the control panel, blown quad fix fuse, missing control panel cover and side cover, water in most of the front meters, etc.
There were some additional wires connected to the emergency switch that ran down to the load panel. Guess they tripped it remotely to shut it down. The K1 interrupter contactor was laying in pieces with the covers and little screws scattered over the bottom of the unit. The S1 switch was not secured with two additional S1 switches laying in the bottom of the unit.
Anyway, I knew I was in for a puzzle and needed a winter challenge anyway.")


First-order of business was to pull the head and see what I was in store for with the motor. The hour meter was showing 2071.1 hours.

Not to bad, the exhaust manifold was full of water on three ports. Guess one valve was leaky and dumped its water in the bore.

ATF and Marvell mystery oil overnight freed the crankshaft and pistons right up... then fill up #1 and #2 bores with evapo-rust for 24 hours.

100% better, just some minor pitting and staining on the bore walls.

A quick hone and it's ready to install the pistons with fresh rings.

The rod bearings were not worn bad at all and the rest of the lower end was fine, so put the lower end back together.
Now to address the head. The injector tips were very corroded and plugged so ordered four rebuilt units from flea bay.

I didn't get any pictures of the head but had to replace the valve guides as they were well worn. Installed new valves as well.
After grinding new seats it was ready to reassemble.
After Installing new filters, brass well nuts on the fuel tank, fresh fuel, and coolant, fresh JD plus break-in oil; I was not getting the E2 fuel pump to turn on. So checking the S1 switch I found CR4 was installed backwards, and S1 needed mounting screws. The Aux fuel pump was working but not the run pump... Duh, found I had left the battle switch turned on, my fault on that one. So after purging the air from the fuel lines up to the injectors, it fired right up on the first crank.
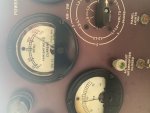
So now the motor was running fine, however, there was no oil pressure on the indicator as the meter was pegged full on. Corrosion in the meter, after cleaning the rear connection nuts, oil pressure indication was showing a steady 60 psi. The temperature meter was also suspect, so a quick 100 ohm resistor from G to S gave roughly mid-scale, so the meter is good to go.
After brushing away all the rust and carbon-spewing from the muffler, I let it run for twenty minutes to come up to normal temperature. Everything was looking good, now to check for power. The quad fuse was installed, restarted the generator... nothing. Turned off the generator the quad fuse was HOT. I knew the quad winding was good per the TM tests, so it must be the A1. Tear out A1 regulator and put it on the bench.
The second diode down was shorted. Replace all four diodes 1N5404 diodes with 1N5408 ones, a quick shot with High Voltage spray and rivet it back together. So after restarting, it now makes power. Woo hoo.

There were some additional wires connected to the emergency switch that ran down to the load panel. Guess they tripped it remotely to shut it down. The K1 interrupter contactor was laying in pieces with the covers and little screws scattered over the bottom of the unit. The S1 switch was not secured with two additional S1 switches laying in the bottom of the unit.
Anyway, I knew I was in for a puzzle and needed a winter challenge anyway.
First-order of business was to pull the head and see what I was in store for with the motor. The hour meter was showing 2071.1 hours.
Not to bad, the exhaust manifold was full of water on three ports. Guess one valve was leaky and dumped its water in the bore.
ATF and Marvell mystery oil overnight freed the crankshaft and pistons right up... then fill up #1 and #2 bores with evapo-rust for 24 hours.
100% better, just some minor pitting and staining on the bore walls.
A quick hone and it's ready to install the pistons with fresh rings.
The rod bearings were not worn bad at all and the rest of the lower end was fine, so put the lower end back together.
Now to address the head. The injector tips were very corroded and plugged so ordered four rebuilt units from flea bay.
I didn't get any pictures of the head but had to replace the valve guides as they were well worn. Installed new valves as well.
After grinding new seats it was ready to reassemble.
After Installing new filters, brass well nuts on the fuel tank, fresh fuel, and coolant, fresh JD plus break-in oil; I was not getting the E2 fuel pump to turn on. So checking the S1 switch I found CR4 was installed backwards, and S1 needed mounting screws. The Aux fuel pump was working but not the run pump... Duh, found I had left the battle switch turned on, my fault on that one. So after purging the air from the fuel lines up to the injectors, it fired right up on the first crank.
So now the motor was running fine, however, there was no oil pressure on the indicator as the meter was pegged full on. Corrosion in the meter, after cleaning the rear connection nuts, oil pressure indication was showing a steady 60 psi. The temperature meter was also suspect, so a quick 100 ohm resistor from G to S gave roughly mid-scale, so the meter is good to go.
After brushing away all the rust and carbon-spewing from the muffler, I let it run for twenty minutes to come up to normal temperature. Everything was looking good, now to check for power. The quad fuse was installed, restarted the generator... nothing. Turned off the generator the quad fuse was HOT. I knew the quad winding was good per the TM tests, so it must be the A1. Tear out A1 regulator and put it on the bench.
The second diode down was shorted. Replace all four diodes 1N5404 diodes with 1N5408 ones, a quick shot with High Voltage spray and rivet it back together. So after restarting, it now makes power. Woo hoo.
Attachments
-
 1.8 MB Views: 25