• Steel Soldiers now has a few new forums, read more about it at: New Munitions Forums!

  • Microsoft MSN, Live, Hotmail, Outlook email users may not be receiving emails. We are working to resolve this issue. Please add support@steelsoldiers.com to your trusted contacts.

Need crash course in M1078 LMTV

DARKOP

New member
18
10
3
Location
ALASKA
I am on a camping trip and stumbled across a 1998 M1078 less than 100 mile from my home. It looks like it’s never been touched. Has new Goodyear tires at 95+tread and a new spare. All the bed bows and new tarp. Has the troop heater in the back. Body is straight. No rust. Holds air and has a clean interior. 12000 miles on Odo. No leaks underneath. Oil in eng and xmsn. Is clear. There is Power with ignition switch, heater fan came on slow but wouldn’t start. Batteries look like military originals.
I talked with a guy who knows nothing about it but he gave my number to another guy who is going to let me inspect and drive it Monday. I’ll take tools and battery charger. And it’s in my price range.

This is a bit ahead of my schedule but............
I need a crash course in M1078. What should I look for when inspecting?

TIA
 

NDT

Well-known member
Steel Soldiers Supporter
10,498
6,631
113
Location
Camp Wood/LC, TX
This truck is 24 volts and there are 4 batteries that need charging up before you try to start it. Avoid “jumping it off” at all costs, that is how electronics get fried on these.
My ‘98 came ftom Alaska as well and has the Arctic heaters too.
 

Third From Texas

Well-known member
2,777
6,529
113
Location
Corpus Christi Texas
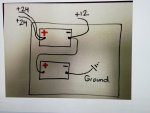
Charge each 12v battery independently (no need to disconnect anything). If even one won't hold 12v, they often won't crank. If at least two are holding, you can do a fast field mod to convert to dual bats opposed to quad (see image). And if you plan of driving it home, you may consider dropping in a pair of Walmart batteries...and you want to be familiar with the TM before your drive it.

We can provide you with a list of about 30 items to take with you on the recovery, but first things first...

20190724_141553.jpg
 

fuzzytoaster

Well-known member
Steel Soldiers Supporter
4,317
3,208
113
Location
Fort Worth, Texas
What to look for when inspecting:
  • Wet spots anywhere (should be a given)
  • Inspect the engine block in front of the compressor for common fatigue cracks
  • Check for the "oil line of death" as it's been referred to, if its been replaced that's a very good post-military maintenance sign
  • Check the shafts for play, fresh grease, and clocking of the shaft. If it's they're not aligned right there is a potential for damage if not already occurred
  • Pop the front grill cover off and inspect the transmission harness (up inside to the right in front of the radiator), they're commonly dry rotten
  • Actuate all the hydraulics to pinpoint any issues. Nothing like having a breakdown and you can't lift the cab.
  • If you swap the batteries and still have issues take the cover off the PDP (passenger side dash) and start inspecting relays. There are 12v and 24v relays as shown by the schematic usually printed inside the cover. You can play hot swap and try to start until you get good ones in place to get you home.
  • Be safe. Drive slow. Get familiar with the vehicle. Have fun. Share pictures!
 
Last edited:

Ronmar

Well-known member
3,881
7,549
113
Location
Port angeles wa
Up in the tech manuals section under present conflict vehicles, you will find all the A0 manuals, and the operators manual(has a -10 at the end). I would start with the op manual.

as mentioned they have 4 batteries that provide 12 and 24V. You need both 12/24 to run. These vehicles have a vampire load on the 12V side so the 12V batts are usually flat/damaged beyond repair from setting at a low state of charge(death to any battery). If it is typical you may find the 12-24V batteries(two closest to the frame) are OK. The two closest to you(furthest from frame) are the 0-12V batts and will probably read low/no voltage. You only need one good inner and one good outer battery to operate, so if you have a reasonable voltage on the inner batts, concentrate on them and move one of them to an outer position and wire them per the excellent diagram provided above. Leave the bad batts disconnected! I only run 2 batts in mine as it is a way better match for the alternator anyway.

before you drive it anywhere you really need to understand the basics of air brakes. There are some basic hints in the -10 operators manual...
 

BERZERKER888

Well-known member
Steel Soldiers Supporter
414
892
93
Location
Daytona, FL
I am on a camping trip and stumbled across a 1998 M1078 less than 100 mile from my home. It looks like it’s never been touched. Has new Goodyear tires at 95+tread and a new spare. All the bed bows and new tarp. Has the troop heater in the back. Body is straight. No rust. Holds air and has a clean interior. 12000 miles on Odo. No leaks underneath. Oil in eng and xmsn. Is clear. There is Power with ignition switch, heater fan came on slow but wouldn’t start. Batteries look like military originals.
I talked with a guy who knows nothing about it but he gave my number to another guy who is going to let me inspect and drive it Monday. I’ll take tools and battery charger. And it’s in my price range.

This is a bit ahead of my schedule but............
I need a crash course in M1078. What should I look for when inspecting?

TIA
following
 

Third From Texas

Well-known member
2,777
6,529
113
Location
Corpus Christi Texas
Grab a plastic tarp if you are going to drive it home. Because if you end up under the truck for some reason it will always be:

  • In mud
  • In fire ants
  • In a puddle
  • In gravel
  • In some sort of (please let it be animal) poo
  • In snow
  • In ice
*28 hours broken down during a a recovery in below freezing (and thank God I had a generator)

*the first 12 hrs DPS/Highway Patrol ignored us because they just figured we were a Nat Guard unit on maneuvers, LOL

20191210_191228.jpg
 
Last edited:

DARKOP

New member
18
10
3
Location
ALASKA
Up in the tech manuals section under present conflict vehicles, you will find all the A0 manuals, and the operators manual(has a -10 at the end). I would start with the op manual.

as mentioned they have 4 batteries that provide 12 and 24V. You need both 12/24 to run. These vehicles have a vampire load on the 12V side so the 12V batts are usually flat/damaged beyond repair from setting at a low state of charge(death to any battery). If it is typical you may find the 12-24V batteries(two closest to the frame) are OK. The two closest to you(furthest from frame) are the 0-12V batts and will probably read low/no voltage. You only need one good inner and one good outer battery to operate, so if you have a reasonable voltage on the inner batts, concentrate on them and move one of them to an outer position and wire them per the excellent diagram provided above. Leave the bad batts disconnected! I only run 2 batts in mine as it is a way better match for the alternator anyway.

before you drive it anywhere you really need to understand the basics of air brakes. There are some basic hints in the -10 operators manual...
OK, this is excellent information. I’ll take 2 good batteries with me as well as a 24v battery charger and a generator.
 

DARKOP

New member
18
10
3
Location
ALASKA
Grab a plastic tarp if you are going to drive it home. Because if you end up under the truck for some reason it will always be:

  • In mud
  • In fire ants
  • In a puddle
  • In gravel
  • In some sort of (please let it be animal) poo
  • In snow
  • In ice
*28 hours broken down during a a recovery in below freezing (and thank God I had a generator)

*the first 12 hrs DPS/Highway Patrol ignored us because they just figured we were a Nat Guard unit on maneuvers, LOL

View attachment 836046
I’m in Alaska so I’ve fixed many a vehicle on the side of the road in the gravel and dirt. I always have a tarp and piece of cardboard with me if possible.
 

DARKOP

New member
18
10
3
Location
ALASKA
What to look for when inspecting:
  • Wet spots anywhere (should be a given)
  • Inspect the engine block in front of the compressor for common fatigue cracks
  • Check for the "oil line of death" as it's been referred to, if its been replaced that's a very good post-military maintenance sign
  • Check the shafts for play, fresh grease, and clocking of the shaft. If it's they're not aligned right there is a potential for damage if not already occurred
  • Pop the front grill cover off and inspect the transmission harness (up inside to the right in front of the radiator), they're commonly dry rotten
  • Actuate all the hydraulics to pinpoint any issues. Nothing like having a breakdown and you can't lift the cab.
  • If you swap the batteries and still have issues take the cover off the PDP (passenger side dash) and start inspecting relays. There are 12v and 24v relays as shown by the schematic usually printed inside the cover. You can play hot swap and try to start until you get good ones in place to get you home.
  • Be safe. Drive slow. Get familiar with the vehicle. Have fun. Share pictures!
Noted! Thank you!
 

DARKOP

New member
18
10
3
Location
ALASKA
OK, I just got back into cell service and got caught up on your posts. I’m on my way home now and will stop tomorrow morning to do a thorough inspection and drive it. Questions: 1. Where is the “oil line of death” located? To the Turbo? 2. Which is the proper alignment of the drive shaft yokes for proper phase? 3. Is there a battery disconnect on these? 4. If in an emergency and if the truck has air, can they be flat towed to get it to a safe place? I’m in Alaska so I will be driving it home on a 2 lane highway with zero services between where it located to my town.
 

Ronmar

Well-known member
3,881
7,549
113
Location
Port angeles wa
There is a metallic oil line between the drivers side of the cylinder head and the back side of the governor. It is looped out like a diving board and it can oscillate, work-harden and break if the truck has a lot of vibration. Most people have been replacing it with a braided -4 hose with -4 JIC connectors and a couple of -4JIC to -4SAE adapters. some use off the shelf teflon brake lines or have a hydraulic hose made, just be sure to watch the bend radius of whatever hose you use. Here are the parts I chose. The 9” line allows me to just maintain the minimum 2” bend radius for the -4 braided line.


proper driveshaft indexing has the yokes on each end of the shaft inline with each other. If someone pulled the slip yoke apart and wasn’t paying attention they could mis-align them. You also want to get under there and check the shafts for excessive looseness in the slip yoke splines. There is a hinging test that uses a magnetic base to connect a dial indicator to one side to measure the movement on the other side. it is a small spec, but basically if you can feel/see movement in the slip yoke it is probably too much...

these things have real high driveshaft angles and because of the axle gearing really high driveshaft RPM. The driveshafts need to be in good shape or they will provide vibrations that will destroy that oil line, alternator mounts or shake other parts loose like the air compressor, or crack the timing case. There is a support bracket you need to look for on the rear end of the air compressor where the power steering hydraulic pump is attached. It connects from the lower hydraulic pump mount screw in to the side of the engine block And helps to support all the overhung compressor and PS pump weight bolted to the aluminum timing case...

you need air to release the park brakes and what’s in the tanks will eventually leak away. If you have to flat tow with a truck that does not have rear air gladhands, you can cage the rear parking brakes. There should be “T” bolts in holders on each rear brake can that can be inserted in the end of the can to mechanically compress the park springs to release the park brakes if the truck has no air... The procedure to do it is in the manual and you can probably find a brake caging video on Youtube:) probably should look to insure the caging bolts are in their holders when you are inspecting the truck...
 
Last edited:

Third From Texas

Well-known member
2,777
6,529
113
Location
Corpus Christi Texas
There is a metallic oil line between the drivers side of the cylinder head and the back side of the governor. It is looped out like a diving board and it can oscillate, work-harden and break if the truck has a lot of vibration. Most people have been replacing it with a braided -4 hose with -4 JIC connectors and a couple of -4JIC to -4SAE adapters. some use off the shelf teflon brake lines or have a hydraulic hose made, just be sure to watch the bend radius of whatever hose you use. Here are the parts I chose. The 9” line allows me to just maintain the minimum 2” bend radius for the -4 braided line.


proper driveshaft indexing has the yokes on each end of the shaft inline with each other. If someone pulled the slip yoke apart and wasn’t paying attention they could mis-align them. You also want to get under there and check the shafts for excessive looseness in the slip yoke splines. There is a hinging test that uses a magnetic base to connect a dial indicator to one side to measure the movement on the other side. it is a small spec, but basically if you can feel/see movement in the slip yoke it is probably too much...

these things have real high driveshaft angles and because of the axle gearing really high driveshaft RPM. The driveshafts need to be in good shape or they will provide vibrations that will destroy that oil line, alternator mounts or shake other parts loose like the air compressor, or crack the timing case. There is a support bracket you need to look for on the rear end of the air compressor where the power steering hydraulic pump is attached. It connects from the lower hydraulic pump mount screw in to the side of the engine block And helps to support all the overhung compressor and PS pump weight bolted to the aluminum timing case...

you need air to release the park brakes and what’s in the tanks will eventually leak away. If you have to flat tow with a truck that does not have rear air gladhands, you can cage the rear parking brakes. There should be “T” bolts in holders on each rear brake can that can be inserted in the end of the can to mechanically compress the park springs to release the park brakes if the truck has no air... The procedure to do it is in the manual and you can probably find a brake caging video on Youtube:) probably should look to insure the caging bolts are in their holders when you are inspecting the truck...
Der's cagin' bolt HOLDERS!!!???

Three trucks and a thousand times thru the manuals and I missed this. Lol
 
Top
AdBlock Detected

We get it, advertisements are annoying!

Sure, ad-blocking software does a great job at blocking ads, but it also blocks useful features of our website like our supporting vendors. Their ads help keep Steel Soldiers going. Please consider disabling your ad blockers for the site. Thanks!

I've Disabled AdBlock
No Thanks