• Steel Soldiers now has a few new forums, read more about it at: New Munitions Forums!

  • Microsoft MSN, Live, Hotmail, Outlook email users may not be receiving emails. We are working to resolve this issue. Please add support@steelsoldiers.com to your trusted contacts.

New to me M1010

GRmilitia88

New member
16
0
0
Location
Orange County, CA
Hey Steel Soldiers-

I have frequented this site just for entertainment purposes for years. Finally I have made my first step into the Military Vehicle world.
I got myself a 1984 M1010 Ambulance. 32k miles, straight body, no rust, great shape. Typical charging system problems, bad batteries, cracked dash, bad window seals.. the usual.
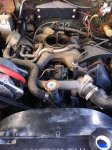
The engine runs strong.. when it's running.

This past weekend I had a couple hours to kill so I replaced the glow plug solenoid. Also replaced the oil pan gasket, oil filter, and filled her with some Castrol 15w40 w/ Lucas Oil Diesel Additive.

At my house waiting to be installed:

SME 7018601 Starter Solenoid per DOGHEAD relay.
Transmission Gasket and Transmission Filter for TH400 - along with lots of Dexron III
Lube-Locker Dana 60 Gasket
Lube-Locker 14 Bolt Gasket
Lots of Lucas Oil 75w90 for both differentials

Currently En Route to my house via UPS/USPS/FedEx:

Transmission Modulator (right now she has pretty rough shifts that lag until high RPMs so I figure this needs replacement and then a little tune)
21100E00 Battery Equalizer 24V to 12V - $367 shipped via eBay - also available at ase-supply.com for $559
3x (1 spare) - SDLA -150 Circuit Auto Reset Breaker - $18.95 ea via http://www.ase-supply.com/product_p/kx-sdla-150.htm
Glow Plug Card via Karl Hosterman at BMI - $85 shipped - http://www.glowplugcards.com/

Next Up:

255-70-16 BFG KM2 -$533 for 4 - Plan to fit these on the standard rims, then upgrade to military BFG Baja 37x12.5x16.5 on HMMWV 24 bolt.
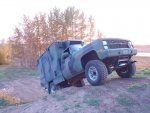

Pre Clean
Rear Open Close.jpg

After a little interior bath
Rear View.jpg


Rear View 2.jpg


M1010 Left Side.jpg

Yote on the hood
Eko and Campbulance.jpg
 

Recovry4x4

LLM/Member 785
Super Moderator
Steel Soldiers Supporter
34,014
1,814
113
Location
GA Mountains
Very nice. Looks like the M1010 population is up. What's the deal with the alternators in the back? Looks like someone was planning on going to the standard CUCV charging system. I really like mine!
 

Skinny

Well-known member
2,130
486
83
Location
Portsmouth, NH
I understand why the stock M1010 sucks but it has such great power potential when fixed with proper 24v wiring and a good 24 to 12 converter. Going to the other CUCV system although still powerful would be a downgrade IMO.


Nice rig!
 

Recovry4x4

LLM/Member 785
Super Moderator
Steel Soldiers Supporter
34,014
1,814
113
Location
GA Mountains
Mine was done the other way. The 24V Leece Neville alts were replaced with the 12V 160A versions. Since they are isolated grounds they were plumbed into each battery. Working great over a yr and the alts are very common on otr trucks.
 

Skinny

Well-known member
2,130
486
83
Location
Portsmouth, NH
That works too for a 12v conversion...320A should power a small village or hungry winch. Those Alts are monsters, I don't understand why someone would remove such a great piece of equipment to go down to say a Delco 10 or 12si??? Even one Neville would rock.


Back to the OP, any plans for the truck?
 

Recovry4x4

LLM/Member 785
Super Moderator
Steel Soldiers Supporter
34,014
1,814
113
Location
GA Mountains
Mine is still 24V. Each alt is assigned a battery. Runs the rear A/C effortlessly. Mark Burgess pioneered the idea and it works flawlessly.
 

m1010plowboy

Well-known member
Steel Soldiers Supporter
3,813
2,392
83
Location
Edmonton, Canada
M1010 movin on upgrades

That is a big ol' list of things to do so lucky 1010 to find you. Hope you can get things working without too much hassle because they can be fun. Getting in the back and rocking it back forth in front of a busy store is always fun.

We found it a little warm to sleep in the back and having a hot girlfriend only makes it worse so you're probably in trouble. I kept the 1010 so adding a roof vent/fan in the back or operable A/C ...... or getting a cold girlfriend is highly recommended.

Good luck with the process and thanks for the pics and updates that you add to this thread.
 

Attachments

GRmilitia88

New member
16
0
0
Location
Orange County, CA
Just as Plowboy said, I pretty much just plan to rock it back and forth in congested marketplaces with the aforementioned hot girlfriend (though now that you mention it I'll consider a cold hearted girlfriend for the summer months). :whistle:

My plan for this beauty is to turn her into The Campbulance. I thoroughly enjoy the outdoors, whether it be offroading, hiking, camping, or supporting my second amendment, I just enjoy being a free American (though California definitely likes to neuter our freedoms). I've always traversed the trails in my Jeep LJ, which has been great, but space is limited (even in the extended LJ). I was hungry for something that could carry everything I could possibly need, and the m1010 in my opinion was the ideal choice. Eventually she will have a roof rack, spare fuel cell, water storage, air compressor, dual batteries in the rear powered by solar units on the roof (with a draw so not to overpower), fridge, sink, stove, winch, 1 new alt in case my charging system ever fails (12v 160A like Recovry4x4 mentioned - if you have a link to Mark Burgess's write up, if he has one, that would be awesome) since I plan on powering rural villages, charging station for AAA, AA, CR123 batteries, along with a lot more. I will continue to update my progress piece by piece with pictures and explanations in case people want to refer to it at a later point for their own rigs. I am learning as I go along, so it's been such a fun project.

The two alternators in the rear of the truck are the alts out of the standard CUCV system. The wiring on the bench on the right side of that same picture is the entire wiring harness for the same system. The gentleman I purchased the truck from had quite a supply of surplus items and he tossed those in because as he said "it doesn't have a charging system." He also included what he told me was a replacement DUVAC which was still wrapped like new. The first day I had the truck I put the new Duvac in, which was actually just the larger box of the two units. When I compared the two larger DUVAC units, the mounting points were slightly off so I am not sure if it is for a later model or what the story is. However it won't be needed since that new equalizer is on it's way.

Thanks for all the great responses guys. Great looking rig Plowboy, mine originally was three color woodland, but it was repainted tan CARC for it's apparent acting stunt in E.R. Love the maintenance truck as well Skinny, those tires are legit!

Plowboy, love the pic with your dog on the hood. Breed, age? Mine is a German Shepherd / coyote mix that I rescued; he's about 4 now. Let's get some more members to shoot similar photos with their pups!


Here is the new DUVAC. See how it is only mounted using the center holes. The outer four mounting points weren't aligned with the existing bracket. Any explanation? Not that it matters as I have already removed this.
Duvac.jpg

Alts
Alt.jpg

6.2L beauty
Engine.jpg

Military issue dirt right there
1.jpg

Dashboard in like new condition
Passenger Side Cab.jpg

Portal to Beyond
To Beyond.jpg

Creepy shot of Lecter's RV
Torture Chamber.jpg
 
Last edited:

m1010plowboy

Well-known member
Steel Soldiers Supporter
3,813
2,392
83
Location
Edmonton, Canada
Campbulance

"""""""The Campbulance"""""""

Perfect name, concept and up-grades. They make a better retired camper than a deep off-road excursion toy because they're heavy and top heavy. Slow, lazy acceleration but with 4 tons of hill climbing, bottom end under the hood I'll be looking forward to your adventures.

Thanks for the kind words on "Push" the plowing 1010. It takes a lot of work in the beginning to get them cleaned up and running right but once you do, you'll never keep it clean.
279.jpg

This is a very time consuming and expensive photograph so I'll just save you the problem when doing silly things like this and give you the photo.

My son's dog, Baron the 'Boxer' was not happy on the hood and in every photo but that one, had the same expression on his face as Yote does. They do not like the hood for some reason.
 

GRmilitia88

New member
16
0
0
Location
Orange County, CA
I love the photo! Looks like a heck of a time, hopefully you had a tractor or a deuce to drag 'Push' out! I think I actually saw a video of this as it happened on YouTube while searching for other M1010s.

Thank you for the complement on the name, it always seems to make people laugh. Its coming together slowly but surely. On the list for this week is to install my new dashboard and get the electrical system figured out. I have the mounting bracket of the original DUVAC with a fabricator to make some additions to it so it can hold the new larger equalizer and still utilize the existing mounting points. (I'll post pics and info on this when it is complete).


Speaking of new equalizer, I am going the route ofLavarok's thread: http://www.steelsoldiers.com/showthread.php?37909-M1010-No-more-DUVAC!! but I have some questions in regards to the wiring.
Being a complete noob to all this, some of the answers might be pretty elementary, but I want to ensure I have a thorough understanding of my entire vehicle. I also just want to be thorough so I only have to do this once.

In that thread Lavarok refers to the 24V bus and the 12V bus. Is he referring to a specific bus on either of the Pos or Negative Terminal? If so can anyone explain to me where or which bus those are, and if not can you guys help point me in the right direction? I have thoroughly studied E-7 and E-12 of TM-34, but cannot find anything labeled as a bus other than the "Bus Bar Ground" in E-8 of TM-34. On a side note, is this the Ground Bus he is referring to at which he wired the ground from the Sure Power?

M1010 Electrical Question - Ground Bus.jpg


Yet another question.
There is a wire that leaves the IGN at the OEM Voltage Relay (E-12 of TM-34) and runs another wire where it looks to be spliced into. This wire runs from the Fuel Filter Assembly to some circuit terminals. The wire is in red in the following pics. I am just trying to properly remove the related wiring to the DUVAC. Is this necessary to remove with my equalizer swap or can I safely cap it and not risk any problems?

M1010 Electrical Question Part 1.jpg M1010 Electrical Question Part 2.jpg

Thank you all in advance. You guys are awesome.
 

m38inmaine

Well-known member
2,090
45
48
Location
Maine USA
The 24v bus is behind the the rear battery on the firewall, the 12v bus is next to the glow plug relay on the fire wall. Replacing the top alternator with a 12v unit would have been alot easier and no extra wires, fuses etc. and 160A of 12v power available. If the alternator failed they are repairable on the road, if the equalizer fails, it's a sealed unit and you are stranded.
 
Last edited:

GRmilitia88

New member
16
0
0
Location
Orange County, CA
Updates on the campbulance - things I have replaced -

- Oil pan gasket, oil filter, oil replaced
- Front and rear diff gaskets replaced, along with new fluid. I intended to buy twice the amount of fluid that I needed so I had enough on hand for whenever I change the fluid again, but I derped on the amount and ended up ordering double what had already been doubled so I have 75W90 Lucas Oil for days.
- Transmission filter, transmission pan gasket, transmission fluid, and transmission modulator (however she is still shifting hard at very high RPMs so I am going to see if adjusting this modulator makes the difference. I also plan to replace all the vacuum hoses just for good measure. Maybe I should do the vacuum lines first now that I think about it)

I have decided to avoid the equalizer and have gone the route Mark suggested above, "Plan B." I set the fancy equalizer and the beautifully fabricated mounting bracket aside, and ordered a new 12V 160A alt. (Leece Neville 110-555JHO). I also purchased new belts for the top alt (17590), bottom alt (17520), and power steering pump (15455). Eager to see how well this method functioned and with only an hour of sunlight available I quickly went to work. I got everything in place following Marks process and fired up the beast. That was certainly the fastest she has ever fired up since I've had her.

Time for a test drive so I grabbed the yote and hopped in for a cruise around the neighborhood. With both our heads hanging out the window in delight we mobbed around for about 5 minutes and brought her back home. She was charging! Yeehaw!

The only downside was that none of the dashlights worked. Also, only one headlight and one parking/turn signal light worked (both on opposite sides). My tail lamps and brake lights worked though. I have new HID headlights and clear corners which I planned to wait to install until her new paint job, but I might need to install them temporarily so I know the wiring at least is good to go. Hmm but maybe that isn't necessary since one light worked on either side.

I have a question for Mark, but knowing it could help others (and others might have insight) I figure I'll post it here.
I ran into some wires while doing this mod that I couldn't identify. Would love it if you guys could help out and try to help me identify it.

The wire below is a black wire that comes out of the harness everything else comes out of, but it was sitting unattached and uncovered. I wrapped some tape around it for now, but wanted to know what it was since it wasn't connected. Does anyone know? Also there is another thicker gauge wire in red which comes out of the harness that looks to have been capped for some time due to how dirty it is.
Plan B wire question.jpg

Here is another view of the two wires
Plan B wire question2.jpg

In this picture there is a thin orange wire that runs from the Positive Terminal on the lower Alt and goes into the wiring harness. This one comes out of the group of wires that was attached to the upper alt.
Plan B wire question3.jpg

When removing wires from the upper alt for the swap, I removed and taped back two yellow wires (one slightly thicker than the other) and a black wire. The only wire I reused was the black ground wire which ran from the negative terminal on the old alt to the engine ground which is right there next to it.


And finally, just news to share. I have a new black dashboard, black dashmat cover, new window seals, new foot pedals (fancy stainless ones haha), and of course the new lights and bulbs. I am eager to get all of these in place, but I am thinking I might wait until I repaint everything before I install all of that so it looks really clean. Only issue there is I might want to trim my fenders first before I paint so I can avoid repainting later. Especially since I plan on painting her with Monstaliner. I ordered the 40 color swatches last week so they should be coming any day now. I am thinking black for the interior of the cab, and OD or similar for everything else, but that all depends on how I feel once I see the swatches.
 
Last edited:

GRmilitia88

New member
16
0
0
Location
Orange County, CA
Took a look at my vacuum lines because of the bad shifting and here is what I found:

6.2v2.jpg
Ohhh shiney - New 12V alt

Vacuum Hose M1010.jpg
Well that's no good

Vacuum Hose M1010v2.jpg
What the? Why did they bother making these harnesses?

Vacuum Hose M1010v3.jpg
I touched this vacuum line and it disintegrated

Vacuum Valve M1010.jpg
Removed the "vacuum harness thingy" and replaced it with regular hose. The double fitting in this picture doesn't allow much more than a quarter inch of hose to get around it. I went ahead and attached the hose then taped it a bit to hold things together. I'll keep my eyes open for another one of those rubber fitments. I will follow up with another post of how mine looks now.

The awesome news is I fired her up and drove her around the neighborhood. To my delight she shifts much better. The shift is still pretty firm about half the time so there might be some minor adjustments that need to be made. The tip of advice for any others working on their M1010 would be to check/replace the hoses if you aren't shifting nicely. I didn't need to replace all of them though as some looked fine. If you're working on your own, look up vacuum hose replacement in your TM and you'll find some detailed pics of these vacuum hoses so you can't go wrong.

Still haven't looked into the lack of illumination in the dash, but def on my list. Another thing I noticed is that the brake light on the passenger side won't illuminate. I took both covers off and the running lights will work on both sides, but when the brakes are applied the second filament is only illuminated on the drivers side. The filament looked fine, but I popped a new bulb in there to see if that would do the trick. Still the same thing. Single filament ran (running lights), but the second filament which illuminates when braking is not working.

Campbulance office offroad.jpg
Check out this badass rig! He's really pushing that campbulance to the limit. I miss the campbulance when I am at the office so this guy will have to do to keep me comfortable while I play mild mannered worker.

Article.jpg
Saw this yesterday and thought it was hilarious so I had to share..

Got my swatches from Monstaliner yesterday, but haven't had time to even open the bag to take a look.

Funny side note, I had a nice little accidental burnout while taking her for a spin yesterday. People were beyond confused when they looked over to see that it came from the campbulance. Step aside BMWs and Mercs I'll shred these 235s!
 

Attachments

m1010plowboy

Well-known member
Steel Soldiers Supporter
3,813
2,392
83
Location
Edmonton, Canada
Looks like you have all the electrical worked out. Wish I could have backed you up on the electrical but you are now the teacher.

I need one of those mini 1010's. Can you tell me where you found that?

.........and what did you use to clean that engine? Simple green works but I have never seen my shroud shine, beautiful.

Great work, great thread.
 

GRmilitia88

New member
16
0
0
Location
Orange County, CA
The charging system seems to be in order, but I am still figuring out the wiring to each light as well as the dash relays.

The little toy M1010 came from eBay. It's made by an Austrian company called Trident. I found a spot online that has them in stock, it is here: https://www.reynaulds.com/products/Trident/90007.aspx though it's about 2x the cost. However $12 doesn't really break the bank haha.

You had it right with simple green. I sprayed the engine lightly with water, then coated it with a layer of simple green. Let that sit for a while then coated it in more. Misted it with water. Then sprayed again and scrubbed lightly with a small soft bristle scrubber (like a big tooth brush). Then finish it off with a thorough misting of H20 and voila.
 

Skinny

Well-known member
2,130
486
83
Location
Portsmouth, NH
Great...I now have to buy an HO scale of my dream fleet. There goes $100!!!
The only thing better than military trucks are toy versions you can bring in the house ;)
 
Top