• Steel Soldiers now has a few new forums, read more about it at: New Munitions Forums!

  • Microsoft MSN, Live, Hotmail, Outlook email users may not be receiving emails. We are working to resolve this issue. Please add support@steelsoldiers.com to your trusted contacts.

New to me MEP-803A with a charred ground

2Pbfeet

Well-known member
450
814
93
Location
Mt. Hamilton, CA
Here are the wires that I have no idea where they go.
To the extent that you can follow the chewed end and get a wire number, that will tell you which wire it is, and then you can look at the schematic to find the two ends, and double check with a DVM that the frayed bit goes to where you think does.

Similarly on the contactor, you know which terminal the chewed wires are attached to, and you know which wire they aren't (the 10ga power wire), and again, if you check the schematic for, say, B1 on the contactor (K1) you can see that there is a second wire attached that goes to terminal 20 on switch S6. My schematic is a bit mangled, so I can't tell if it is 002E or 002F. I suspect 002E. The schematic gives you a couple of different ways of looking at things; one by the overall schematic, but also the wire numbers that connect particular pieces with notation on where they are to be connected. So you get several views of the same wire or connection. I am a complete NOOB, so I may have misunderstood your photos and / or the schematic.

Basically, until you unscrew a wire, you have several different ways to figure out what it is and where it goes.

Does that help?

All the best,

2Pbfeet
 

Guyfang

Moderator
Staff member
Moderator
16,908
24,513
113
Location
Burgkunstadt, Germany
Here are the wires that I have no idea where they go.
Using the wire diagrams, you should be able to easy fix this damage. Wont say it will be fast, but its an easy fix. Here I will say, check every wire in your hand, 3-4 times. Then maybe ONE more time. You need to be 1000% right, on every one, or you might be trying to find a whole wire harness. Don't assume, check EVERYTHING, and KNOW. In your shoes, I would have someone with me to help. Two heads are better then one. Use a good multimeter and have a foolproof way to mark a wire so it will not come unmarked.
 

2Pbfeet

Well-known member
450
814
93
Location
Mt. Hamilton, CA
Using the wire diagrams, you should be able to easy fix this damage. Wont say it will be fast, but its an easy fix. Here I will say, check every wire in your hand, 3-4 times. Then maybe ONE more time. You need to be 1000% right, on every one, or you might be trying to find a whole wire harness. Don't assume, check EVERYTHING, and KNOW. In your shoes, I would have someone with me to help. Two heads are better then one. Use a good multimeter and have a foolproof way to mark a wire so it will not come unmarked.
Sounds like advice born of long experience.

Do you have a recommended foolproof way to label wires, or at least a favorite one?

All the best,

2Pbfeet
 

odge

New member
17
11
3
Location
Prescott, AZ
Thank you, all. I have my work cut out for me. Taking a four day weekend this next weekend so I should have some time to start doing this.

Do you recommend replacing these wires end to end rather than a splice. That is my plan anyway, just wondering what your advice is? I did not think to hand check every wire but will do so now that you recommend it.

I have a multi meter and can check continuity but checking ohms and resistance is more than my knowledge base at this time. I know just enough to get me into trouble.

I don't have any way to label wires at this time but it I have been thinking about how to do it.

Thanks,

O
 

2Pbfeet

Well-known member
450
814
93
Location
Mt. Hamilton, CA

Guyfang

Moderator
Staff member
Moderator
16,908
24,513
113
Location
Burgkunstadt, Germany
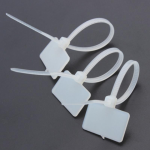
Its not that hot in the AC section. So go ahead and use the DYMO. We had some wire ties that had a tag on it. You could write the wire # on the tag. What ever you think will work for you. Some of the wires I would compleatly replace. Like the one that goes to the PP Ground. Its short, easy to do. If you decide to change whole wires, put some wire ties on the harness, loose, not tight. Then, if you can pull out whole wires, reinsert the new one. When done, tighten up the new wire ties, and clip out the old ones. Keeps things cleaner looking.
 

Guyfang

Moderator
Staff member
Moderator
16,908
24,513
113
Location
Burgkunstadt, Germany
Exactly. Maybe a tad smaller, but that's about we used.

In later years, when some of the sets we fixed were in the can point, I would take compleat wire harnesses, and strip individual wires out. So the wires looked like they had never been damaged. But you can do that when you have 12 guys in the section.
 

Farmitall

Well-known member
Steel Soldiers Supporter
544
276
63
Location
Eubank, KY
Exactly. Maybe a tad smaller, but that's about we used.

In later years, when some of the sets we fixed were in the can point, I would take compleat wire harnesses, and strip individual wires out. So the wires looked like they had never been damaged. But you can do that when you have 12 guys in the section.
I think those are the small ones and the picture is just a close up. I use to use those frequently doing mobile radio installations and building power supplies.
 

odge

New member
17
11
3
Location
Prescott, AZ
Using the wire diagrams, you should be able to easy fix this damage. Wont say it will be fast, but its an easy fix. Here I will say, check every wire in your hand, 3-4 times. Then maybe ONE more time. You need to be 1000% right, on every one, or you might be trying to find a whole wire harness. Don't assume, check EVERYTHING, and KNOW. In your shoes, I would have someone with me to help. Two heads are better then one. Use a good multimeter and have a foolproof way to mark a wire so it will not come unmarked.
Thanks for the advice. I was out checking wires (before is started to rain) and found 4 more 20 AWG wires that were chewed up.
 

odge

New member
17
11
3
Location
Prescott, AZ
Hey everyone, I was able to successfully start the generator up and put a small load on it through the front 10 amp courtesy outlet.
Thanks for all your advice on the project.
 
Top
AdBlock Detected

We get it, advertisements are annoying!

Sure, ad-blocking software does a great job at blocking ads, but it also blocks useful features of our website like our supporting vendors. Their ads help keep Steel Soldiers going. Please consider disabling your ad blockers for the site. Thanks!

I've Disabled AdBlock
No Thanks