schwenk industries
Member
- 188
- 1
- 18
- Location
- Illinois chicagoland suburbs
So a few weeks after I bought my M1009 the TH400 took a crap. I figured no better time to swap to a NV4500. I searched SS here and about every other forum about trucks and off-roading I could find. Could not find a detailed write up about any modifications or part numbers needed to complete the swap.(as far as I could see) Most info I found usually was along the lines of “oh yea with that adapter it all bolts right up!”(what adapter!) So I've decided to lay down everything I've found along theway including part numbers so you don't have to guess. I am busy withwork lately but I will add to this article as often as I have sparetime. Please pardon my grammar/ Spelling I'm a mechanic not a deskjockey.
I will be out lining a Automatic TH400/NP208 swap to a Manual NV4500/NP208 with stockstyle GM (1973-1984) mechanical clutch linkage instead of hydraulic (1985-UP). In a 1984 K5 M1009. Using the original T-case and as many off the shelf GM stock parts as possible. Most parts can be scavenged from a junkyard or purchased from either NAPA or LMC truck.
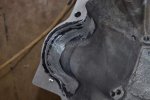
Trans: is a 1993-1995 GM 4WD NV4500 that has the 5.125 dia. Bearing retainer with a long throw-outbearing snout identical to the SM-465 input shaft and bearing retainer snout. 1996 and up transmissions have a 5.6” dia. Bearing retainer and no throw out bearing snout.


Bellhousing: I used an Advanced Adapters #712577 bellhousing (1993-1995) not to be confused with #712576 (1996-up)
-Also AA #715534 bracket (the AA bellhousing is not tapped for the bell crank ball stud)
(a complete list of parts and numbers will come at the end)
First thing obviously is going to be to drop your driveshafts and remove your old TH400 split the transfercase off the back and save that for later. I removed all the shiftlinkage (up to the steering column) Trans-cooler lines for the auto,and vac line for the modulator.
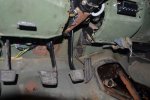
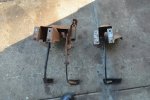
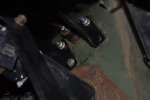
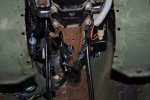
The Pedals: I Went to my favorite local junkyard that seems to keep square body GM trucks in stock any 73-84 manual GM truck should do. I pulled the drivers seat and steering column completely out of the truck to make my life easy. (you can probably wiggle the pedal bracket out with the column just laying on the floor.) Then you take the four bolts off your power brake booster and remove your pedal bracket. If you can torch the rivets that hold the bell crank bracket to frame, do so it is one of those hard to find parts, take it and pay the man for all this:
-Pedal assembly brake/clutch-------This part is not commonly available other than at a yard.
-Upper clutch rod
-Bell-crank
-Both bell-crank ball studs
-Bell crank frame bracket----This part is not commonly available other than at a yard. GM# 06264942
-Clutch return spring
-Clutch adjuster/Lower push rod Parts From a 1967-72 GM Truck. While your at the yard.
-Lower Clutch rod GM # 3996513
-Lower Clutch rod nut GM #3765322


To install pedal assy. Do the same as you did at the junk yard and install the new assembly from the yard where yours was. Up until here everything is straight forward and can be looked up in theTm's... More to add later.
I will be out lining a Automatic TH400/NP208 swap to a Manual NV4500/NP208 with stockstyle GM (1973-1984) mechanical clutch linkage instead of hydraulic (1985-UP). In a 1984 K5 M1009. Using the original T-case and as many off the shelf GM stock parts as possible. Most parts can be scavenged from a junkyard or purchased from either NAPA or LMC truck.
Trans: is a 1993-1995 GM 4WD NV4500 that has the 5.125 dia. Bearing retainer with a long throw-outbearing snout identical to the SM-465 input shaft and bearing retainer snout. 1996 and up transmissions have a 5.6” dia. Bearing retainer and no throw out bearing snout.
Bellhousing: I used an Advanced Adapters #712577 bellhousing (1993-1995) not to be confused with #712576 (1996-up)
-Also AA #715534 bracket (the AA bellhousing is not tapped for the bell crank ball stud)
(a complete list of parts and numbers will come at the end)
First thing obviously is going to be to drop your driveshafts and remove your old TH400 split the transfercase off the back and save that for later. I removed all the shiftlinkage (up to the steering column) Trans-cooler lines for the auto,and vac line for the modulator.
The Pedals: I Went to my favorite local junkyard that seems to keep square body GM trucks in stock any 73-84 manual GM truck should do. I pulled the drivers seat and steering column completely out of the truck to make my life easy. (you can probably wiggle the pedal bracket out with the column just laying on the floor.) Then you take the four bolts off your power brake booster and remove your pedal bracket. If you can torch the rivets that hold the bell crank bracket to frame, do so it is one of those hard to find parts, take it and pay the man for all this:
-Pedal assembly brake/clutch-------This part is not commonly available other than at a yard.
-Upper clutch rod
-Bell-crank
-Both bell-crank ball studs
-Bell crank frame bracket----This part is not commonly available other than at a yard. GM# 06264942
-Clutch return spring
-Clutch adjuster/Lower push rod Parts From a 1967-72 GM Truck. While your at the yard.
-Lower Clutch rod GM # 3996513
-Lower Clutch rod nut GM #3765322
To install pedal assy. Do the same as you did at the junk yard and install the new assembly from the yard where yours was. Up until here everything is straight forward and can be looked up in theTm's... More to add later.
Last edited: