• Steel Soldiers now has a few new forums, read more about it at: New Munitions Forums!

  • Microsoft MSN, Live, Hotmail, Outlook email users may not be receiving emails. We are working to resolve this issue. Please add support@steelsoldiers.com to your trusted contacts.

Operation: Ethel. Kendelrios M37 (re)build thread

cobra5

Active member
219
194
43
Location
Stevensville, Montana
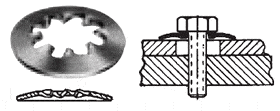
They are called "Toothed Periphery Type Washers". Google the name and you will see what the gentlemen are referring to for washers.

Kendelrio, you can either sandblast your hardware which will remove the rust and the plating or there's a two step process I used. I blasted them with a walnut media to remove the paint and then soaked them in Evaporust. Tedious work but they turn out great.
 

hasaboat

New member
11
22
3
Location
Romayor, TX
Thanks for the input. Probably 10% of these washers are metal fatigued and crumble once I clean them up with wire wheel on my bench grinder. Most of the bolts/washers that I am working with look just like the picture that Kendelrio sent, thanks for that. Generally these kinds of washers aren’t reused so I’m not sure which direction I’ll go in yet. Will definitely check with Fastenal. As always thanks to all!
 

John Mc

Well-known member
218
305
63
Location
Monkton, VT
The toothed periphery washers are no longer a stocked item at Fastenal.

When they did have them the part numbers were:
Size / Fastenal# / Manufactuer #
5/16" / 10229-11704 / DSTP-0312-16-02
3/8" / 10229-11705 / DSTP-0375-16-01

Here's a catalog page from a company that shows some with sizes up to 1/2", but no ordering info (scroll down for toothed periphery washers). You might have to call to find out:

McMaster Carr seems to have some. Their catalog lists sizes for "Internal-Tooth Lockwashers for Soft Material". Unfortunately, 3/8" is the largest size listed, and the CAD drawing for that size appears to be round (the drawing for the 5/16" one is square).
 

G744

Well-known member
Steel Soldiers Supporter
1,725
3,885
113
Location
Hidden Valley, Az
Beadblast all, paint and save all the good ones.

Get a set of NF taps and do ALL the threaded holes in the truck before reassembly.

The worst are usually those holding down the floor pan over the transmission.

Dodge didn't do squat to prevent rust on these trucks, so it is up to you later.

Neverseize on the threads does wonders for longevity...

G744
 

rtk

Well-known member
Steel Soldiers Supporter
1,190
446
83
Location
Lockport N.Y.
Beadblast all, paint and save all the good ones.

Get a set of NF taps and do ALL the threaded holes in the truck before reassembly.

The worst are usually those holding down the floor pan over the transmission.

Dodge didn't do squat to prevent rust on these trucks, so it is up to you later.

Neverseize on the threads does wonders for longevity...

G744
absolutely good advise , it is what I have done !!!!
 

kendelrio

Well-known member
Steel Soldiers Supporter
2,682
8,674
113
Location
Alexandria, La
Progress made today:

Removed both fenders and separated them into their components, had to se the cutting wheel to get a few off that didn't want to loosen up or stripped out with the impact...

Changed the coil, the positive wire ring terminal only had 3 wires holding it on!

Tomorrow I'll be pulling the starter and cleaning it up to see if I can get her turned over and running... :)

After that, the deconstruction begins in earnest.

Had some good helpers today!

20220117_112439.jpg

received_233637275595260.jpeg

received_299217018900627.jpeg

received_646875606361104.jpeg

20220117_142620.jpg

20220117_143751.jpg

And I must thank @rtk again. It's nice having a .pdf to look at on my phone, but having the physical TM actually saved me SO MUCH TIME!
 

M35fan

Well-known member
1,173
4,018
113
Location
Arab, Alabama
Progress made today:

Removed both fenders and separated them into their components, had to se the cutting wheel to get a few off that didn't want to loosen up or stripped out with the impact...

Changed the coil, the positive wire ring terminal only had 3 wires holding it on!

Tomorrow I'll be pulling the starter and cleaning it up to see if I can get her turned over and running... :)

After that, the deconstruction begins in earnest.

Had some good helpers today!

View attachment 856275

View attachment 856276

View attachment 856277

View attachment 856278

View attachment 856279

View attachment 856280

And I must thank @rtk again. It's nice having a .pdf to look at on my phone, but having the physical TM actually saved me SO MUCH TIME!
Wow yall are making great progress! And those pictures look great too. Gotta love that Louisiana weather. Shorts in January! 🤣 it's 34 degrees here. Keep up the good work.
 

rtk

Well-known member
Steel Soldiers Supporter
1,190
446
83
Location
Lockport N.Y.
Progress made today:

Removed both fenders and separated them into their components, had to se the cutting wheel to get a few off that didn't want to loosen up or stripped out with the impact...

Changed the coil, the positive wire ring terminal only had 3 wires holding it on!

Tomorrow I'll be pulling the starter and cleaning it up to see if I can get her turned over and running... :)

After that, the deconstruction begins in earnest.

Had some good helpers today!

View attachment 856275

View attachment 856276

View attachment 856277

View attachment 856278

View attachment 856279

View attachment 856280

And I must thank @rtk again. It's nice having a .pdf to look at on my phone, but having the physical TM actually saved me SO MUCH TIME!
 

kendelrio

Well-known member
Steel Soldiers Supporter
2,682
8,674
113
Location
Alexandria, La
The weather cooperated and I was able to get some things done.

Removed the rearview mirrors, windshield, doors, rear fenders, troop seats and hood.

In the process of getting under the dash to take off the windshield/vacuum tube for the wipers, I found the cowl vent has been bondoed over! 😳

Probably gonna need a new cab.... 🤷‍♂️

Probably Wednesday I'll be pulling the bed....

20220123_151822.jpg

20220123_151845.jpg
20220123_151845.jpg

20220123_152024.jpg

20220123_152045.jpg

20220123_152111.jpg

20220123_152143.jpg

The parts pile...

20220123_152522.jpg

And weather covering

20220123_153355.jpg
 
Last edited:

kendelrio

Well-known member
Steel Soldiers Supporter
2,682
8,674
113
Location
Alexandria, La
Also during the process I found out that the original vacuum operated wipers had been swapped for electric at some point.

Brilliant design on the hollow bolt/vacuum channel!

20220123_124138.jpg
20220123_124142.jpg

20220123_131835.jpg

Question for opinions:

Better to have the vacuum operated wipers or electric?
 

Mullaney

Well-known member
Steel Soldiers Supporter
Supporting Vendor
7,774
19,893
113
Location
Charlotte NC
Also during the process I found out that the original vacuum operated wipers had been swapped for electric at some point.

Brilliant design on the hollow bolt/vacuum channel!

View attachment 856788
View attachment 856790

View attachment 856791

Question for opinions:

Better to have the vacuum operated wipers or electric?
.
Electric is going to be more reliable. Vacuum operated wipers have a serious lack of vacuum on a long up hill pull for example. The manifold vacuum will go almost to zero and the wipers will stall. No big deal, unless it is raining hard... Electric wipers keep moving until the motor burns up.
 
Top
AdBlock Detected

We get it, advertisements are annoying!

Sure, ad-blocking software does a great job at blocking ads, but it also blocks useful features of our website like our supporting vendors. Their ads help keep Steel Soldiers going. Please consider disabling your ad blockers for the site. Thanks!

I've Disabled AdBlock
No Thanks