• Steel Soldiers now has a few new forums, read more about it at: New Munitions Forums!

  • Microsoft MSN, Live, Hotmail, Outlook email users may not be receiving emails. We are working to resolve this issue. Please add support@steelsoldiers.com to your trusted contacts.

P6 thrust bearing dodged a bullet…

Ronmar

Well-known member
4,366
8,238
113
Location
Port angeles wa
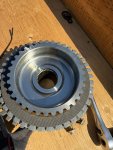
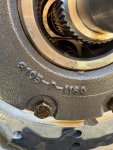
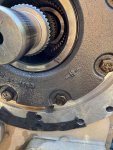
I am very glad I did this! Looked great inside, popped off the outer clutch pack snap ring and lifted out the clutch pack and carrier, discs and spacers look great. Center tower bushing, springs and piston look great, roller bearing looks OK until I try and lift it out.. The front/outer race and needle carrier lifted right off with no resistance leaving the inner race behind on the center tower…

It was just a matter of time before the outer race and needle carrier popped forward off the inner race and down to rest on the carrier. Then the lip on the inner race and crimps that are supposed to hold it all together, would have methodically chipped away at the composite roller carrier until it released the rollers to thrash around in the clutch-pack and on into the rest of the transmission…

Whew!

Inner race is still on the center tower.
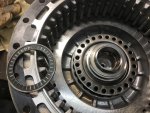
IMG_4153.jpeg


after I lifted out the thrust bearing inner race…
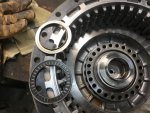
IMG_4154.jpeg
 

Plasa

Well-known member
Steel Soldiers Supporter
268
333
63
Location
Italy
Do you have a transmission that is affected by the Allison letter to change the bearing if transmission is before a certain serial number?
 

Ronmar

Well-known member
4,366
8,238
113
Location
Port angeles wa
All transmissions prior to maybe feb 2011(need to check s/n on the bulletin)

Here is the basic chain of events. In the 90’s they produced with a particular p/n bearing, lets call it A. I think they knew about issues then, because even the military A0 LMTV manuals produced in the 90’s say to replace this bearing WHENEVER you are in the transmission/transfer case for any type of work.

At some point Allison officially acknowledged the failure with a tech bulletin stating that the type A roller thrust bearing should be replaced with a improved roller thrust bearing with a new P/N, lets call this one B… they also listed a s/n break point where production included bearing B.

At some point, I assume because bearing B was also failing or they suspected a possibility of failure, they issued a second tech bulletin directing that you replace bearing B with a composite thrust washer 3 times as thick as the A or B roller thrust bearings… that was feb 2011 and they again listed a S/N breakpoint where this bushing was included in production…

I have no idea if a bearing B has failed, but Allison said replace it with a thrust washer, and they shifted production to the thrust washer…

here is a link to the most recent failure discussion. It has links to previous discussions and the tech bulletins…

 
Last edited:

NDT

Well-known member
Steel Soldiers Supporter
10,814
7,363
113
Location
Camp Wood/LC, TX
If you cut the bed away to allow cover removal, how many hours are we looking at to do this repair? Do we have to drain the fluid?
 

Ronmar

Well-known member
4,366
8,238
113
Location
Port angeles wa
it depends on your vehicle...
I believe you must drain the transfer, but that's the easiest part:) . You don't need to drain every last drop, just till the flow slackens near the end and put the plug back in, maybe 3.5 gal. (clean 5gal bucket, 3/8 drive ratchet or breaker bar, about 5 minutes)...

A 1078 you can trim the bed folded sheet metal crossmember. you can also unbolt the bed and lift the front 3-4" over the upper frame rail. Depending on your available tools and skillset, either will take perhaps an hour or longer. A plasma cutter would take perhaps 10 minutes to setup and cut out the interfering material... you need to be able to move the P6 clutch assembly~6" to the rear to slide the clutch center carrier off of the protruding center splined shaft...

There is a lower bolt-in crossmember in the main frame but it is far enough back to not be much of a factor except to reach around to access hardware or manipulate the assembly while lowering it out... not much of an issue...

If you have a 1079, get ready for the pain. I own a 1079 chassis... There is a heavy welded crossmember(same channel material the upper frame rails are made out of) in the upper frame, approximately 3" behind the P6... Besides having a m1079 box on top of it, it is huck bolted to the main chassis frame with 18-20 fasteners. you need to remove those fasteners and lift that upper frame rail ~8" to clear the P6 enough to remove it. The other option is to cut it out and turn it into a bolt-in crossmember... It is 1/4" 2" X 6" channel, so no easy task with the 1079 box in place then prepping and drilling the remaining ends for a bolt plate...
Since I am converting that upper frame rail into my habitat floor, I did not want to cut that crossmember. but since I am making it a hydraulic captured spring habitat to chassis connection, I have already cut all the huck bolts out. I simply had to unbolt the front and lift the habitat floor and cargo boxes 8" to clear the P6.

Once the interferences are out of the way, Besides the 5 minutes to drain some oil, with a powered ratchet and a breaker bar, it is under an hour to remove all the hardware and pull off the p6 assembly(there is a notch on top to insert a screwdriver to pry/loosen the seal on the p6 cover, providing all the hardware spins out OK(15MM bolt heads, in 3 different lengths). It weighs ~55# but it is supported by the center shaft and a case guide ring, so you can get all the hardware out easily. not horrifically heavy and not until you slide it off the center shaft.

On the bench, 2 minute disassembly. Remove the upper/outer snap-ring with a screwdriver, and lift the center carrier and all the rotor and stator discs(perhaps 25#?) straight up and out of the housing and set aside to inspect later. That will leave you staring at the P6 thrust bearing on top of the tower like in the above pics...

Good luck if you should decide to accept this mission... This tape will self destruct in 5... 4... 3...
 
Top