• Steel Soldiers now has a few new forums, read more about it at: New Munitions Forums!

  • Microsoft MSN, Live, Hotmail, Outlook email users may not be receiving emails. We are working to resolve this issue. Please add support@steelsoldiers.com to your trusted contacts.

Personal modifications- make my life easier

6x6guy

Member
476
20
18
Location
McHenry, Il.
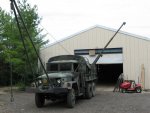
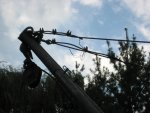
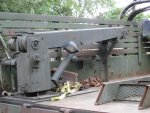
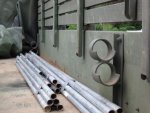
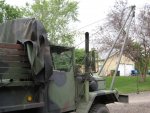
Couple of pics, when I get bored and have nothing as far as work- with lots of time on my hands of latley, and work is slow and very slow.
And I like to work on projects- but unfortunately nobodys around to help most of the time.
Hence, what to build to make my life easier with a limited budget,
so this is what I come up with. :roll:
 

Attachments

OD_Coyote

Active member
887
58
28
Location
North Bend, WA
The A frame and the crane in the bed are slick. [thumbzup]
Can you post more details/specs on both? I now have more free time and less money than I had when I worked for a fortune 100 company and I am currently self-employed, but I would still like to have an A frame setup like yours.
 

6x6guy

Member
476
20
18
Location
McHenry, Il.
As far as the crane, I picked it up a auction about a year ago along with a truck body for $400
sold to the truck body for scrap, rebuilt and lengthen the hand held remote, and had the electric
motor for crane winch rebuilt.
I tryed to install a small gas driven motor with a HD alternater I had, that didn't work to well
and decided to install a 160 amp alternater directly to the belt system, and added a Optima battery
with switched relays to handle the extra electrical 12 volt components to be installed.

The front A frame mount was in the planing stage for a while, and did some research on front
cranes - the only thing I could find was basicly a military pole truck- with the same configuration
but I had to lengthen the structure to get the length needed to lift a M109 body off a frame.
So instead of paying somebody to lift the body- I decided to make it myself and use the money for parts so it would be available any time I needed to use it again.
And I started to compile different designs, with a one person assembly, dissassembly
with storage of the components on the truck
and not look out of place when covered up.
 

KsM715

Well-known member
5,149
142
63
Location
St George Ks
Nice work but....... in pic 6, the cables holding up the a-frame, the cable clamps need to be turned around. The way they are now is putting a kink in the cable holding the weight. That will be the point of failure when it gets over stressed.

Edit: Field Manual 5-125 (rigging) is an excellent source of info for this type of stuff. (page 2-36)
 
Last edited:

tiger422

New member
323
1
0
Location
Lakeland/Florida
Nice work but....... in pic 6, the cables holding up the a-frame, the cable clamps need to be turned around. The way they are now is putting a kink in the cable holding the weight. That will be the point of failure when it gets over stressed.

The rule is never saddle a dead horse or don't put the saddle part of the clamp on dead end of the cable.
 

antennaclimber

Moderator
Moderator
Steel Soldiers Supporter
1,357
902
113
Location
State College, PA
Nice work and it looks good.

KsM715 is correct about the cable clamps.
Just remember this saying when installing cable clamps "You never saddle a dead horse" The saddle goes on the "live" side of the wire and the U bolt goes on the dead end.

Keep up the nice work and Thanks for sharing the project with all of us.
 

6x6guy

Member
476
20
18
Location
McHenry, Il.
The red button is for the 160 amp relay for the rear, otherwise there is power going to the rear of the
the truck through a #2 welding cable attached to the crane.

The heater core is out of a chevelot pickup about 35,000 BTU I was told and mounted right in -
more than enough heat and air flow for the defroster in the coldest weather.

I hate to say this about the wire saddles, I had them the other way and a friend of mine and MV owner who
is a union journeymen electrican - lets call him jeff, Jeff stops by one day and makes a statement, those clamps
are on backwards, and he gos on saying that he just went through a manadatory safety class and I have
it on backwards - OK, so I change the clamps ( now the wrong way) , so the only thing I can say Jeff he must of
missed that part and or to busy talking at the back of the class.
 

tm america

Active member
2,600
23
38
Location
merrillville in
I like it all. Nice job!I like the tow bar mounting . I guess i'm gonna ask one of those question that get a bad answer.......Why do you need the a frame on the front if you have the crane on the back?
 

KsM715

Well-known member
5,149
142
63
Location
St George Ks
I hate to say this about the wire saddles, I had them the other way and a friend of mine and MV owner who
is a union journeymen electrican - lets call him jeff, Jeff stops by one day and makes a statement, those clamps
are on backwards, and he gos on saying that he just went through a manadatory safety class and I have
it on backwards - OK, so I change the clamps ( now the wrong way) , so the only thing I can say Jeff he must of
missed that part and or to busy talking at the back of the class.
roflMy name IS Jeff and I am an electrician also. NON union. Thats all I'll say.

I like the mods and hope to make something similar for the front of my M818 someday so I can do some lifting in the future.
 

6x6guy

Member
476
20
18
Location
McHenry, Il.
The A frame winch crane in front will lift a lot more than the rear crane is only rated at 3,500 lbs all the drawn in, and
800 lbs all the way out.
 

tm america

Active member
2,600
23
38
Location
merrillville in
well i hate to see you carrying extra weight around you can store that rear crane at my house if you need to.....The a frames on the front are only rated at 3000lbs.I not sure how much they will really hold .i would keep an eye on those bumper brackets and front axle if you gonna load it more than 3000lbs.
 
Top