• Steel Soldiers now has a few new forums, read more about it at: New Munitions Forums!

  • Microsoft MSN, Live, Hotmail, Outlook email users may not be receiving emails. We are working to resolve this issue. Please add support@steelsoldiers.com to your trusted contacts.

personel heater.

davemccoull

Member
93
2
8
Location
Nelson Lancs U.K.
I,ve been looking at the way the intake hose on my heater is routed, it doesn,t look right at all, although the heater seems to work o.k. it can,t be getting much air thu, those sharp bends. Anybody any suggestions
Thanks
Dave
 

Attachments

gimpyrobb

dumpsterlandingfromorbit!
27,785
748
113
Location
Cincy Ohio
Well you asked for suggestions, so Why not move the air intake scoop back and use a straight pipe for the intake?
 

clinto

Moderator, wonderful human being & practicing Deuc
Staff member
Administrator
Super Moderator
Steel Soldiers Supporter
Supporting Vendor
12,596
1,125
113
Location
Athens, Ga.

Attachments

BFR

Rocket Surgeon
2,331
43
48
Location
North Georgia
mine is bolted directly to the side panel, where the intake for the heater is flush w/ the opening. seems like a good idea, but you can't lower the side panel w/o raising the hood, and when you do it stresses the hoses.
 

davemccoull

Member
93
2
8
Location
Nelson Lancs U.K.
Personel heater

Thanks guys for all your replies. I,m going for Boatcarpenters sugestion and try the cab mounting, that looks neat, and extra space under bonnet wil be a godsend.Where does the intake hose go to, or is it left off? Thanks for all your help
 

Boatcarpenter

New member
1,877
17
0
Location
Marlborough, NH
RE: Personel heater

BFR, the heater is tucked up under the dash pretty well and does not interfere with footroom.
davemccoull, the intake hose is left off at least for now. Plenty of fresh air gets into the cab so no worries about bad air!! You have to turn the distribution box around because the heated air is coming from the other direction. It's a project but I felt a very worthwhile one. And don't forget to move your air valve that is behind there. Good Luck!!
BC
 

Manstein

Chaplain Emeritus
331
4
0
Location
Cartersville Ga.
Boat Carpenter, did your's come mounted in the cab or did you perform that conversion.

Why don't they mount them all there? Was it an "add-on" option that was installed after manufacture?
 

jasonjc

Well-known member
5,325
283
83
Location
Gravette Ar.
The heater is an option on these trucks. (but a heater was standard on the fire truck :?: :( ) It is mounted as the fist pic shows. either on a mounting bracket or on the old stye square fender. Thats the military way at leaset. The way boat carpenter did it is: out of the way, looks good and makes scence there for IT'S not an appoved military install. :p

so boat carpenter tell us more about the install you did it looks great. how did you do it.
 

m139h2otruck

Member
569
5
16
Location
NH
heater

The heater in our 5 ton water truck which is I think the same as an M35 uses a sheet metal 90 that is flattened sort of on the inlet of the blower to miss the side panel. Have seen pictures of this same thing on other M35s.
 

Boatcarpenter

New member
1,877
17
0
Location
Marlborough, NH
RE: heater

I got the idea from looking in some A3's at a local Guard outfit. Their heater is congigured a little differently but I took the idea and ran with it. I don't have all the metal fabbing gear that some of you guys have, so I had to use off the shelf angle iron, flat stock, threaded rod etc.,from my local hardware store. I'll try to dig up some pics of the basic framework that I used.
 

Boatcarpenter

New member
1,877
17
0
Location
Marlborough, NH
Pics and description

The project took lots of trial and error so I'm not sure if these pics are the final version or not, but you will get the idea.
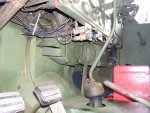
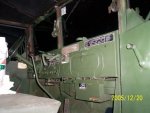
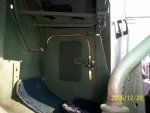
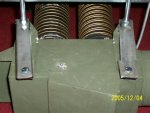
Pic 0044 shows flat stock over the brace from firewall to dash. Glove box will slide back in and clear it whereas if I recall correctly bolt heads might not. There is another one at the back of the heater fastened to that piece of angle also.
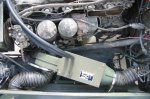
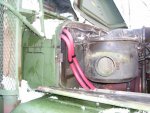
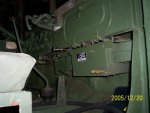
Pic 0040 shows the brace and where I moved the air valve.
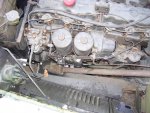
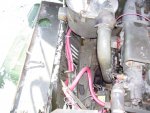
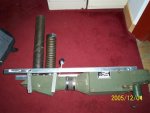
Pic 0031 shows the basic framework that I used. Didn't have to drill any new holes in the heater but I did have to use an impact screwdriver to get the factory screws out. I either had to shorten the inlet side of the d-box or cut down the cone shaped piece on the heater to get the length of the whole unit that I wanted.
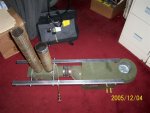
0029 another view of basic framework.
Pic 0034 shows how I used the brackets on the distribution box that would normally mount to the firewall. I connected them with flat stock locked in place on some threaded rod which was in turn locked with nuts and lockwashers to both sides of the basic angle frame in the front and back to make it rigid and parallel.
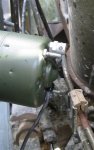
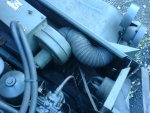
I had a plumber friend soldier the 90 deg elbows for the inlet ond outlet lines so they aimed upthe direction the hoses came in from.
If you have the welding equip handy you can probably make shorter and neater work of the job. Maybe on my next green machine :D
 

Attachments

Manstein

Chaplain Emeritus
331
4
0
Location
Cartersville Ga.
Nice job! Thanks for sharing the pics. It's been good to see how you guys document your projects. I'm going to have to do the same. Even if it's for my own enjoyment in front of the fire when the power is out.
 
Top