• Steel Soldiers now has a few new forums, read more about it at: New Munitions Forums!

  • Microsoft MSN, Live, Hotmail, Outlook email users may not be receiving emails. We are working to resolve this issue. Please add support@steelsoldiers.com to your trusted contacts.

Picked up 6 MEP-802A gensets and will be documenting making them all runners here

Another Ahab

Well-known member
18,007
4,579
113
Location
Alexandria, VA
That's so funny; well, you sure straightened me out, there, pclausen! My apologies.

That first pic, I said to myself:

That car is dead level, but the forks are inclined back toward the tractor; no way that car would sit level like that (instead of leaning back against the face of that fork-lift).

I was plumb wrong! :shrugs::oops:
 

Guyfang

Moderator
Staff member
Moderator
16,924
24,545
113
Location
Burgkunstadt, Germany
I worked for a mean old fart that just loved to "teach" people a lesson. One of the guys in the shop always parked in two park places, so no one would park next to him. The boss came out one day and saw his car parked "wrong" for the ten thousandth time and flipped out. Grabbed the forklift and picked up the car. Drove off to a sand bunker, (in a sand and gravel yard) and left the car on the two side walls. Then he hid the fork lift.
 

Another Ahab

Well-known member
18,007
4,579
113
Location
Alexandria, VA
I worked for a mean old fart that just loved to "teach" people a lesson. One of the guys in the shop always parked in two park places, so no one would park next to him. The boss came out one day and saw his car parked "wrong" for the ten thousandth time and flipped out. Grabbed the forklift and picked up the car. Drove off to a sand bunker, (in a sand and gravel yard) and left the car on the two side walls. Then he hid the fork lift.
Not a fork-lift story, and yours is good for sure, but my first car was a Volkswagen Beetle, and one night we had an ice hockey game at the Washington Coliseum (same place that the Beatles played their first concert in the U.S.). After the game, while I was changing in the locker room my buddies bodily picked up my car (it was like 8 of them), and placed it tight between a dumpster and a wall of the Coliseum, so it was trapped. They all left before I exited the locker room.

They all thought it was real funny. It probably was, but I never could laugh about it as hard as they did. It's like that when the jokes' on you!


dog II.jpg
 
Last edited:

pclausen

Well-known member
Steel Soldiers Supporter
452
281
63
Location
Afton, VA
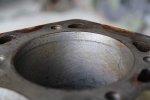
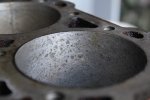
Made some decent progress on unit #3 this past weekend. This is about as good am I'm going to be able to hone the cylinder walls:

MEP802-8-8-01.jpg
http://www.cstone.net/~dk/MEP802-8-8-01.JPG

MEP802-8-8-02.jpg
http://www.cstone.net/~dk/MEP802-8-8-02.JPG

That 2nd cylinder still has some pitting, but they are very shallow now. Guess I'll find out soon enough how bad it smokes. I probably have close to 1 hour worth of running the hone in that cylinder and figured this will have to do.

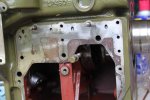
So after a good rinse with the power washer, blow dry with the air hose, and the sprayed down in WD-40, it was time to put the crank back in. The only tricky part is to make sure oil supply hole for the center bearing is lined up correctly.

Here the hole is lined up:

MEP802-8-8-03.jpg
http://www.cstone.net/~dk/MEP802-8-8-03.JPG

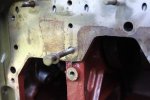
And after the crank was pushed all the way in and the insert was in place.

MEP802-8-8-04.jpg
http://www.cstone.net/~dk/MEP802-8-8-04.JPG

Flywheel side end-cap ready to go back on.

MEP802-8-8-05.jpg
http://www.cstone.net/~dk/MEP802-8-8-05.JPG

With that done, the next step was to heat up the crank gear and slide it on, followed by installing the cam.

MEP802-8-8-06.jpg
http://www.cstone.net/~dk/MEP802-8-8-06.JPG

Next up will be to gap the new rings and install the pistons.
 

87Nassaublue

New member
116
0
0
Location
Sharpsburg, Ga
You might want to mic the cylinders and pistons after you get all the honing done you are planning to do. You could end up with some piston skirt slap if you hone too much out of the cylinders.
 

m-35tom

Well-known member
Supporting Vendor
3,022
223
63
Location
eldersburg maryland
exactly. if you ran a good hone for that long you are WAY oversize and at the least can expect piston noise and worst it will soon break the piston. what is the line in the other wall that looks like a crack? i suppose it is just a 'mark' /
 

sandmanxx

New member
81
3
0
Location
San Antonio/Tx
All I can say is you must have learned learned a lot about these engines lol.. I think I will take look at top side of mine - never heard of evaprust..

Buying some Monday [thumbzup]
 

kwfiggatt

New member
14
0
1
Location
pliny, wv
You really need a rigid hone instead of the spring loaded thing. Rigid hones have a micrometer adjustment that allows you to exert quite a lot of force against the cylinder walls with the hone stones, making them bite. Sunnen and Lisle are two of the big players in this area. I've honed many cylinders over sized for installing O/S pistons with a rigid hone. Honing a cylinder O/S 0.030" may take like 10~15 minutes with a rigid hone. I found mine on ebay for around $50, but you have to keep a lookout for a good deal.

Hope this helps.

Kevin
 

rustystud

Well-known member
9,298
3,074
113
Location
Woodinville, Washington
You really need a rigid hone instead of the spring loaded thing. Rigid hones have a micrometer adjustment that allows you to exert quite a lot of force against the cylinder walls with the hone stones, making them bite. Sunnen and Lisle are two of the big players in this area. I've honed many cylinders over sized for installing O/S pistons with a rigid hone. Honing a cylinder O/S 0.030" may take like 10~15 minutes with a rigid hone. I found mine on ebay for around $50, but you have to keep a lookout for a good deal.

Hope this helps.

Kevin
You should never use a hone to fit over-size pistons. Always take it to a machine shop to do this kind of work. There is no way you can make perfectly straight holes with a hone. Your just asking for trouble doing that.
 

kwfiggatt

New member
14
0
1
Location
pliny, wv
I agree that honing a cylinder oversized isn't as good as having one bored and honed, but if you're careful and stop honing often to measure the cylinder while you're doing it, you can get acceptable results. Heat buildup is also an issue when honing oversized - you have to stop and let everything cool down to get good measurements.

I was thinking about this post on my drive home, and a more aggressive hone probably isn't the right solution for these rusty cylinders unless you have oversized pistons. I wonder how electrolysis would work in this situation? You could fill each cylinder up with electrolyte solution, suspend a piece of re-bar in the cylinder for the cathode, and turn on the juice. If I understand the electrolysis rust removal process correctly, it actually reduces the rust back to iron by removing the oxygen atoms from the iron oxide. Anyone ever try electrolysis on rusty cylinder bores?
 
Last edited:

rustystud

Well-known member
9,298
3,074
113
Location
Woodinville, Washington
I agree that honing a cylinder oversized isn't as good as having one bored and honed, but if you're careful and stop honing often to measure the cylinder while you're doing it, you can get acceptable results. Heat buildup is also an issue when honing oversized - you have to stop and let everything cool down to get good measurements.

I was thinking about this post on my drive home, and a more aggressive hone probably isn't the right solution for these rusty cylinders unless you have oversized pistons. I wonder how electrolysis would work in this situation? You could fill each cylinder up with electrolyte solution, suspend a piece of re-bar in the cylinder for the cathode, and turn on the juice. If I understand the electrolysis rust removal process correctly, it actually reduces the rust back to iron by removing the oxygen atoms from the iron oxide. Anyone ever try electrolysis on rusty cylinder bores?
Again I must say to take your engine to a machine shop to get them bored out. Never use a hone for this. They are not made for this type of job. The only time I would use a hone to bore out a cylinder is if it's the apocalypse and I must get this engine running to save my family and friends. Either that or I have no money and desperately need my vehicle running to try and get to that new job I was just hired for.
 

pclausen

Well-known member
Steel Soldiers Supporter
452
281
63
Location
Afton, VA
I'm reviving this old thread as I have finally started to work on these again. This thread was started way back on 6/21/2014, so almost 8 years ago now! Wow how times flies!

What brought this into focus for me again is that we recently had a 6 day power outage during the first big storm of the season where I live in Central VA. I did install a 20kW Kubota whole home backup generator back in 2017. It was used and started out life as a "winter warmer" for large diesel electric locomotives to keep their electrical systems, main engine oil and coolant, warm, while in standby mode. I have no idea how many hours were on it. Took quite a bit of work to get it fully automated and integrated with an Asco 400A automatic transfer switch. Got it all working, but I was lacks on maintenance since the original install in 2017 as we didn't have have any day long outages during that period, until this month. It died on day 2 and I had to scramble to get one of my 802s running that had been sitting since 2015!

Amazingly, without much effort I got one of the 802 up and running within about an hour, and it then kept my house operational for the next 5 days. We had to be very careful about what to turn on during that period, but it never missed a beat. And that was with the oil, coolant and filters that were put in back in 2015!

So after getting power restored, I decided it was time to do something about all these 802's I have sitting around in various stages of repair. I got the Kubota fixed again, but that's a story for another day and not the focus of this thread.

Here's a table showing the 80# MEP units I have purchased and their initial condition:

UnitAcquire DateBuild DateHoursCostEngine ID TagInitial ConditionMain Work CompletedNew partsCurrent ConditionStill to be done
MEP 802A #16/201407 20063544$40044020385DN2WA72Water in boresBlock hot tanked, Head rebuild, ringsInjectors, rubber mountsPutting engine back togetherAssemble
MEP 802A #26/201406 20071355$60044006095DN2WA72Water in boresBlock hot tanked, Head rebuild, ringsInjectorsIn piecesAssemble
MEP 802A #36/201408 20092844$1,000081028765DB2WA72Water in boresHead rebuild, ringsInjectorsMakes powerLoad test
MEP 802A #410/201407 20093504$1,200081028775DN2WA72Engine cranksCracked rear bell housingMakes powerLoad test
MEP 802A #510/201408 20087502$800081019635DN2WA72Cracked pistonTBDIn piecesAssemble
MEP 803A #11/202107 20005717$5,0000006800210DN4WA72Makes powerReplaced cracked gaugesMakes powerFuse Mod, load test

I used MEP 802A #4 to power my house for the 5 days remaining without power during the storm. During that time I noticed that the following 3 gauges did not work: Fuel, Temp, Oil Pressure. The gauges were bad, as was the oil pressure sending unit and the fuel sender. All have been fixed using spared from the other sets. So that this point, #4 is 100% done.

I was also able to get MEP 802A #3 fired up for the first time since 2015 last night. I didn't want to at first, but after draining the old fuel from the tank and drawing about 1/2 cup of old fuel out of the fuel filter, it finally started:


It completely stopped smoking after running for a few minutes. I still need to load test it, but am waiting for nicer weather for that. I'm also building a more portable load bank.

So all the non-completed 802s have been sitting in my shop pretty much since 2015/2016 in the same spot:
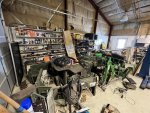
IMG_0235.JPG

Taking up almost an entire bay. I had started putting MEP 802A #1 back together, and it has been sitting on a workbench on the back of the shop since 2016 as well:
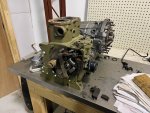
IMG_0236.JPG

The head and various other top end pieces have been sitting on a shelf as well:
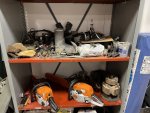
IMG_0237.JPG

So today I decided it was time to go all in again, and get those done once and for all!

I moved the short block along with what I hope are all the top end parts, from my shop up to the attached garage at the house where I have heat:
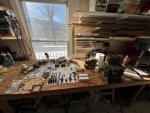
IMG_0239.JPG

Crank turns over and all the lifters go up and down from gravity alone, as does the 2 lifters for the fuel injectors.
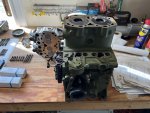
IMG_0240.JPG

Here's a shot of MEP 802A #1, #3 and #4 all up in the heated garage:
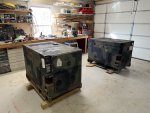
IMG_0241.JPG

I promise I'll get all these 802s done before another 8 years passes by, lol.

Another thing that got me motivated again was that I also picked up a 803A on a M116A3 before I knew if I would be able to fix the Kubota. It is 100% operational, but I have not load tested it yet, but all gauges work and doesn't smoke or make any kind of unusual noises. It is actually quieter than the 802s, but that might be because it still has that foam material in the inlets which none of my 802s have.
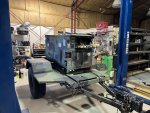
IMG_0234.JPG

Hopefully I'll be able to make good progress on MEP 802A #1 over the next few weeks!
 
Last edited:

ClarkeF

Member
206
5
18
Location
Hestand, KY
Thanks for picking this thread up again! You are motivating me to find my 802A’s mysterious oil leak. I’ve sidelined it for the past year and a half as I picked up a Kubota 10k, but I hate running it as it’s a 3600 RPM screamer… looking forward to following along again!
 

pclausen

Well-known member
Steel Soldiers Supporter
452
281
63
Location
Afton, VA
I went and picked up a jug of the magic Evapo-Rust along with a jug of Kerosene at Tractor Supply this morning. Also stopped by Lowe's to get a small breaker panel and breakers for a load bank I'm building.

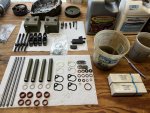
Dropped the 2 injection pumps into the Kerosene and the bolts and misc mounting hardware into the Evapo-Rust elixir. Also sorted and layout the remaining pieces that I put away back in 2016. Looks to be mostly complete:

IMG_0258.JPG

What's nice about this block, is that both injector pumps were shimmed the same (2 blacks, a clear and a green shim each). So in theory I should be able to just slap it back together the same way, but I'll probably go ahead and measure anyway, to verify those are indeed the proper shim packs for each pump.

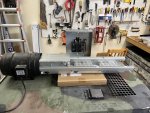
Here's the load bank I'm working on:

load_bank_01.JPG

I know that as a rule of thumb, you don't want the heaters mounted one in front of the other like I have it, but with 750 cfm of airflow, I doubt it will matter one bit, but we'll see. I got 2 more coming to complete the "tunnel". They will be configured so that the ones in parallel will be turned on first and be on the right side. The ones in series will be closest to the blower and will only be used occasionally.
 

Another Ahab

Well-known member
18,007
4,579
113
Location
Alexandria, VA
I see a mountian ridge out a window in one of your picks, pclausen; and have to admit that I do not know Afton here in our Grand Old Commonwealth:

- Are you maybe down around (+/-), the Bristol area?
 

pclausen

Well-known member
Steel Soldiers Supporter
452
281
63
Location
Afton, VA
Good catch!

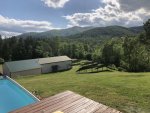
That's a view of the Blue Ridge Mountains. Afton is on the Eastern side of the Blue Ridge, about 25 miles outside Charlottesville. Here's a view from last spring that shows the mountains much better. You can see my shop building in the lower left corner, where I did most of the generator work:

pool_5_10_21_3.JPG

My little slice of heaven. Can't wait for warmer weather!

Part of what kept me from working on the generators, is that I went all in with solar and crypto mining:

solar_panels_areal.JPG

But that's a topic for another thread. :)
 
Top
AdBlock Detected

We get it, advertisements are annoying!

Sure, ad-blocking software does a great job at blocking ads, but it also blocks useful features of our website like our supporting vendors. Their ads help keep Steel Soldiers going. Please consider disabling your ad blockers for the site. Thanks!

I've Disabled AdBlock
No Thanks