• Steel Soldiers now has a few new forums, read more about it at: New Munitions Forums!

  • Microsoft MSN, Live, Hotmail, Outlook email users may not be receiving emails. We are working to resolve this issue. Please add support@steelsoldiers.com to your trusted contacts.

Piston Rings Worn Out, Time for a Rebuild

Wildchild467

Well-known member
Steel Soldiers Supporter
2,052
57
48
Location
Milford / Michigan
Update: I bought new pistons and liners, gaskets, new rod bolts and now just need bearings. I thought about using plastigauge (spelling?) to check my bearing clearances and possibly using the same bearings. Then again I would like new bearings if they were worn in the least bit. I only feel like doing this job once. I'm sure I will be a lot nicer to this engine than the military ever was.

Question: My engine does not have a rebuild tag. Does that mean it has a standard size crank shaft journals? I would assume yes, but did they ever put under-size cranks in factory engines? I'm debating on ordering standard bearings before I even pull it apart.
 

rustystud

Well-known member
9,298
3,074
113
Location
Woodinville, Washington
I would "mike" the bearing journals before ordering bearings. They could just be slightly undersized and then you would need to go with something like .003" under bearings. That is if they still make that size bearing. If they don't then its off to the grinding shop and .010" undersize bearings.
 

Wildchild467

Well-known member
Steel Soldiers Supporter
2,052
57
48
Location
Milford / Michigan
I would "mike" the bearing journals before ordering bearings. They could just be slightly undersized and then you would need to go with something like .003" under bearings. That is if they still make that size bearing. If they don't then its off to the grinding shop and .010" undersize bearings.
I don't believe they make under-size bearings like that. only .010" and .020". From what I read in the TM, i believe the later crankshafts were slightly bigger diameter by only something like .0005 or something small. I would have to look again, but there was a slight size difference between early and late.

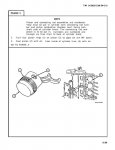
What I need to find out is how to orientate the piston rings on the piston prior to install. I didn't see that in the TM when I was looking through it. Maybe I need to look again or if somebody wants to chime in, that would be good too. Thank you in advance if somebody does.
 

rustystud

Well-known member
9,298
3,074
113
Location
Woodinville, Washington
First off there should be some instructions with the rings, if not then they should at least be marked 1,2 3 etc or compression, and oil wiper. Second the compression rings should have a bevel on them. This bevel will always go to the top of the piston. Third, you always stagger the position of the ring gap between rings. I usually make them 180 degrees apart unless there is more then 3 then I go with 90 degrees apart. This way there is never a straight line down which would allow compression to more easily leak out. On the oil wiper rings if they are a 3 piece design I usually stagger the narrow outer ring gaps. But before you even put the rings on the pistons check them in the new bore. There should be a specific gap needed mentioned in the TM's. You may have to grind the ends of the rings to get the proper gap.
 

Wildchild467

Well-known member
Steel Soldiers Supporter
2,052
57
48
Location
Milford / Michigan
First off there should be some instructions with the rings, if not then they should at least be marked 1,2 3 etc or compression, and oil wiper. Second the compression rings should have a bevel on them. This bevel will always go to the top of the piston. Third, you always stagger the position of the ring gap between rings. I usually make them 180 degrees apart unless there is more then 3 then I go with 90 degrees apart. This way there is never a straight line down which would allow compression to more easily leak out. On the oil wiper rings if they are a 3 piece design I usually stagger the narrow outer ring gaps. But before you even put the rings on the pistons check them in the new bore. There should be a specific gap needed mentioned in the TM's. You may have to grind the ends of the rings to get the proper gap.

When I pull my engine apart, I want to look for signs of things being worn out or who knows, even not put together correctly. You never know what the factory does or who was working hungover that day. It feels like there may be rings already in the pistons in the liners. The piston does not slide that easy, so I'm not sure. I bought rings anyway.

I hope to start on the project this week. I finally am getting some room in my garage to work after getting some projects done.
 

DieselBob

Active member
2,891
15
38
Location
Arnold Maryland
What I need to find out is how to orientate the piston rings on the piston prior to install. I didn't see that in the TM when I was looking through it. Maybe I need to look again or if somebody wants to chime in, that would be good too. Thank you in advance if somebody does.
I found this in TM9-2815-210-34-2-2 but that manual only goes up to the LDT465-1C.
Rings.jpg
 

FLYWHEEL

Member
131
7
18
Location
Daventry Northamptonshire U.K.
When we assemble pistons at work we position the ring gaps at 120 degrees from each other for pistons with three rings,
( 12 o clock, 4 o clock, 8 o clock position ) if you have four rings I would position them 90 degrees apart (12,3,6,9 o clock) to keep the gaps as far apart from each other as possible, hope this helps
 
Last edited:

Wildchild467

Well-known member
Steel Soldiers Supporter
2,052
57
48
Location
Milford / Michigan
Well I got my garage somewhat cleaned out and am ready to start the rebuild/overhaul. Last night I just unhooked the batteries, drained the oil (left the drain plug out to make sure it gets completely drained out) took off the inlet pipe to the turbo, removed air cleaner and that is about it. Not as much as I was hoping to get done, but its still good. letting the oil completely drain for a day I think will help with any messes I might encounter later. Tonight I hope to remove the brush guard, radiator, turbo and intake+exhaust manifolds. cleaning the garage up a little more along the way may be a good idea too. lay out all the parts on the bench in an organized fashion will help me have a clear game plan with this rebuild. I'm exited and nervous at the same time even though I have done other engine rebuilds before. Its just good to have a clear game plan and take your time so you don't miss anything.

20150712_131938.jpg
 

Wildchild467

Well-known member
Steel Soldiers Supporter
2,052
57
48
Location
Milford / Michigan
I made a lot of good progress with the truck last night. I have a lot of the components removed and did a leakdown test on all the cylinders last night. The leakdown is as follows:

Cylinder number 1: 24%
Cylinder number 2: 95%
Cylinder number 3: 88%
Cylinder number 4: 79%
Cylinder number 5: 80%
Cylinder number 6: 90%

These numbers should all be less than 20% anyway, and they are not. I did hear some air leaking out of the exhaust ports on all of them, so I will have to check out the seats and valves when I pull the heads off. Either have them reground or put new valves and seats in... we will see shortly!

20150713_200850.jpg20150713_211251.jpg20150713_211240.jpg20150713_223049.jpg20150713_223034.jpg20150713_234337.jpg
 

Attachments

Wildchild467

Well-known member
Steel Soldiers Supporter
2,052
57
48
Location
Milford / Michigan
Ill have to have my buddy shoot some video. It should be good. Im expecting EGS's to be lower and power to be high. It was a slug before.
 

Wildchild467

Well-known member
Steel Soldiers Supporter
2,052
57
48
Location
Milford / Michigan
Could a moderator please change the title of this thread to "Piston Rings Worn Out, Time for a Rebuild" I would appreciate it. That title tells more what I am actually doing in the thread and may help people find more answers when they search. Thank you for your help.
 

wb1895

Member
876
17
18
Location
Lexington NC
I'm really glad you are doing this. As soon as I get back from overseas, I am going to be doing the exact same thing. I have new pistons, liners, bearings, valve guides, gaskets, filters...ect. I am looking forward to your progress and any feedback on problems you might encounter.
 
Top