nyvram
New member
- 115
- 1
- 0
- Location
- Franklin/TN
So we finally got around to putting in the new radiator last night
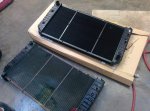
Out with the old in with the new!
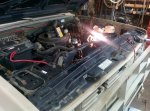
While we were into it we decided to go ahead & replace the thermostat. The nightmare begins...
Both bolts were frozen. It appears this must have been leaking at some point in the past and rather than properly repair it, the owner simply tightened the s*** out of the bolts as evidenced by the gasket pretty much being squeezed out of the space.
So propane torch and 'unfreeze' screw juice in hand we went to work. Success! We removed the top bolt after a great deal of elbow grease and coaxing. Next, the bottom bolt.
and then...NOOOOOOOOOOOOOOOOOOOOOOO
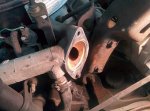
So began a 3 hour tour of removing the remnants of the frozen bolt.
Attempt 1, vice clamp and acetylene torch
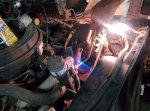
Nothing.
Attempt 2, screw a nut onto the threaded end and WELD THAT SUCKER IN PLACE
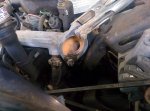
Nope, even heated up so hot the aluminum was glowing orange and the weld holding..we succeeded only in shearing off the threaded part welded to the nut.


Attempt 3, the time consuming process of drilling out the remnants of the bolt while slowly increasing the bit size until its wide enough to run a full bolt with a nut.
Success! (well more or less..i think the truck will live with a nut/bolt combo on here.) We ruined probably 10 drillbits..those bolts are HEAVY METAL.
So at this point, we realized NAPA sold us the wrong gasket to go with the thermostat. DOH! With all the rigging going on, I didn't want to also use a cereal box for the gasket so we punted on the thermostat install until later today.
Next, to install the radiator. It went in mostly well..except the well known 'swollen' oil line heads would not allow us to thread the 2 lines on the passenger side. A few minutes work with a grinder, file & sandpaper and we had those in.
So to ensure the lines weren't leaking we decided to crank up the truck!
--- there was only one small problem ----
We forgot we had pulled the dang alt belt off so we wouldn't accidentally melt it or cut it in half when heating the aluminum up for our last attempt with the welded nut in place!!
About 2 seconds into our 'dry run' the belt had successfully snapped, wrapped itself thoroughly around the fan wheel and dislocated the drive belt off its pulley.


So, it being midnight at this point, we cut our losses..finished up the radiator and will be on the hunt for a new alt belt and gasket today.
DOES ANYONE KNOW THE CORRECT GASKET PART #?? I am bringing the metal head with me to match it up but it would be nice if we knew ahead of time.
Any "gotchas" on getting the correct alt belt? I heard someone say there were some that might be a little more 'loose' and the spec was a little tricky on this one.
Sorry no more pictures..as the frustration and diesel oil on our hands grew, the desire to pick up the phone & take photos waned.

Out with the old in with the new!

While we were into it we decided to go ahead & replace the thermostat. The nightmare begins...
Both bolts were frozen. It appears this must have been leaking at some point in the past and rather than properly repair it, the owner simply tightened the s*** out of the bolts as evidenced by the gasket pretty much being squeezed out of the space.
So propane torch and 'unfreeze' screw juice in hand we went to work. Success! We removed the top bolt after a great deal of elbow grease and coaxing. Next, the bottom bolt.
and then...NOOOOOOOOOOOOOOOOOOOOOOO

So began a 3 hour tour of removing the remnants of the frozen bolt.
Attempt 1, vice clamp and acetylene torch

Nothing.
Attempt 2, screw a nut onto the threaded end and WELD THAT SUCKER IN PLACE

Nope, even heated up so hot the aluminum was glowing orange and the weld holding..we succeeded only in shearing off the threaded part welded to the nut.
Attempt 3, the time consuming process of drilling out the remnants of the bolt while slowly increasing the bit size until its wide enough to run a full bolt with a nut.
Success! (well more or less..i think the truck will live with a nut/bolt combo on here.) We ruined probably 10 drillbits..those bolts are HEAVY METAL.
So at this point, we realized NAPA sold us the wrong gasket to go with the thermostat. DOH! With all the rigging going on, I didn't want to also use a cereal box for the gasket so we punted on the thermostat install until later today.
Next, to install the radiator. It went in mostly well..except the well known 'swollen' oil line heads would not allow us to thread the 2 lines on the passenger side. A few minutes work with a grinder, file & sandpaper and we had those in.
So to ensure the lines weren't leaking we decided to crank up the truck!
--- there was only one small problem ----
We forgot we had pulled the dang alt belt off so we wouldn't accidentally melt it or cut it in half when heating the aluminum up for our last attempt with the welded nut in place!!
About 2 seconds into our 'dry run' the belt had successfully snapped, wrapped itself thoroughly around the fan wheel and dislocated the drive belt off its pulley.
So, it being midnight at this point, we cut our losses..finished up the radiator and will be on the hunt for a new alt belt and gasket today.
DOES ANYONE KNOW THE CORRECT GASKET PART #?? I am bringing the metal head with me to match it up but it would be nice if we knew ahead of time.
Any "gotchas" on getting the correct alt belt? I heard someone say there were some that might be a little more 'loose' and the spec was a little tricky on this one.
Sorry no more pictures..as the frustration and diesel oil on our hands grew, the desire to pick up the phone & take photos waned.
Last edited:


