- 1,673
- 898
- 113
- Location
- Central NY
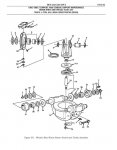
Bench Servicing Tips. (All Numbers are relative to the Parts Diag {open seperate window from TM section of forum if pic too small}):

Note EDITS in YELLOW when re-visiting thread.
Servicing is required if any of the grease fittings are blocked and/or any of the bearings, rollers or cable sheave wheel are siezed. Some of this can be done on the vehicle, however if removal/full servicing is required/chosen (blasting/painting etc.) here are my tips...
1/ Cable Guard #3 removed whilst on vehicle - slacken cable and pull loop aside.
2/ Back off 4 number trolley retaining bolts #25, lift level wind complete from track. NB. Very Heavy.
3/ Locate and remove all grease fittings #7 x 7 number AND #26. Item #26 is a 2 part, 90 deg fitting (not found on all front winch level winds - see alternative thread for modification).
4/ Generally, there is enough mass in the complete levelwind that free disassembly can be done with suitable support and correct/appropriate drifts and sizeable hammers. Be carefull - heavy components are finger hungry.
5/ Either trolley rollers #21 x 4 or cable wheel Sheave #30 would then be removed.
6/ Remove snap rings [circlips] - (may be seized in groove. Use snap ring pliers to open 'ears' then tap radially around groove before trying to) lift out of groove and pull off shaft x 2 in #15 or #11.
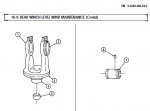
7/ For #30 removal, locate ONE NUMBER Sheave shaft pin (#7 in pic 2 from TM' 34-2 maintenance)

tap or press sheave shaft #11 from Sheave frame #10 in direction of pin (#7 in pic 2)
...........................................................................................................................................
CLEAN AND INSPECT bearing surfaces of shafts for pitting. If really damaged - trolley wheel shafts can be pressed out and replaced - if part available.
CLEAN AND INSPECT Roller bearings for operation. Subject to your expected use of rear winch, decide if freeing up and re-lubeing is adequate for needle rollers or that replacement is reqd. See post #7 for Needle Roller Bearing Disassembly/Servicing.
FELT WASHERS: can be "laminated" by cutting 'washers' for #19 or"strips" wound lengthwise for #8 - from sheet felt - available at fabric stores (Wally World etc).
...........................................................................................................................................
8/ Removal of Sheave frame #10 from trolley frame #15, check that nut #29 is inplace (mine was corroded and broken off of the pivot shaft #16 See pic 1 post #4). Shaft will have to be repaired or replaced once needle bearing #12 has been serviced as shaft will NOT fall out of base of trolley. This statement is now corrected as there is a shoulder for the shaft to sit on and the larger, lower nut, to draw up against. See diag post # 8 - (Mine was held inplace by siezed shaft/hard grease).
EDIT. TYPICAL REASON FOR FAILURE/CORROSION is blocking of 2 drain holes in sides of trolley frame #15, may have been painted over! Located approximately above felt washer #8 in sheave frame #10.
continued later.............

Note EDITS in YELLOW when re-visiting thread.
Servicing is required if any of the grease fittings are blocked and/or any of the bearings, rollers or cable sheave wheel are siezed. Some of this can be done on the vehicle, however if removal/full servicing is required/chosen (blasting/painting etc.) here are my tips...
1/ Cable Guard #3 removed whilst on vehicle - slacken cable and pull loop aside.
2/ Back off 4 number trolley retaining bolts #25, lift level wind complete from track. NB. Very Heavy.
3/ Locate and remove all grease fittings #7 x 7 number AND #26. Item #26 is a 2 part, 90 deg fitting (not found on all front winch level winds - see alternative thread for modification).
4/ Generally, there is enough mass in the complete levelwind that free disassembly can be done with suitable support and correct/appropriate drifts and sizeable hammers. Be carefull - heavy components are finger hungry.
5/ Either trolley rollers #21 x 4 or cable wheel Sheave #30 would then be removed.
6/ Remove snap rings [circlips] - (may be seized in groove. Use snap ring pliers to open 'ears' then tap radially around groove before trying to) lift out of groove and pull off shaft x 2 in #15 or #11.
7/ For #30 removal, locate ONE NUMBER Sheave shaft pin (#7 in pic 2 from TM' 34-2 maintenance)

tap or press sheave shaft #11 from Sheave frame #10 in direction of pin (#7 in pic 2)
...........................................................................................................................................
CLEAN AND INSPECT bearing surfaces of shafts for pitting. If really damaged - trolley wheel shafts can be pressed out and replaced - if part available.
CLEAN AND INSPECT Roller bearings for operation. Subject to your expected use of rear winch, decide if freeing up and re-lubeing is adequate for needle rollers or that replacement is reqd. See post #7 for Needle Roller Bearing Disassembly/Servicing.
FELT WASHERS: can be "laminated" by cutting 'washers' for #19 or"strips" wound lengthwise for #8 - from sheet felt - available at fabric stores (Wally World etc).
...........................................................................................................................................
8/ Removal of Sheave frame #10 from trolley frame #15, check that nut #29 is inplace (mine was corroded and broken off of the pivot shaft #16 See pic 1 post #4). Shaft will have to be repaired or replaced once needle bearing #12 has been serviced as shaft will NOT fall out of base of trolley. This statement is now corrected as there is a shoulder for the shaft to sit on and the larger, lower nut, to draw up against. See diag post # 8 - (Mine was held inplace by siezed shaft/hard grease).
EDIT. TYPICAL REASON FOR FAILURE/CORROSION is blocking of 2 drain holes in sides of trolley frame #15, may have been painted over! Located approximately above felt washer #8 in sheave frame #10.
continued later.............
Last edited:


