• Steel Soldiers now has a few new forums, read more about it at: New Munitions Forums!

  • Microsoft MSN, Live, Hotmail, Outlook email users may not be receiving emails. We are working to resolve this issue. Please add support@steelsoldiers.com to your trusted contacts.

rear window crank problems

appalacious

New member
239
7
0
Location
Perry, GA
Hey guys,
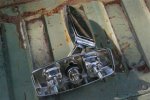
I recently bought one of those chrome cranks off ebay for my rear window. The thing is, I can't figure out how its supposed to go on at all.

In the picture,
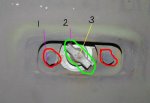
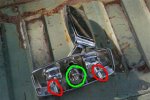
#1- these are actually screws with big rubber heads on them. But they're inserted into the holes on either side of the middle piece.

#2- This thing, I got no idea. Obviously its the main part of whats left of the crank. This is what I laboriously turn to get the window up and down. But I have no idea how to connect it to the ebay crank.

#3- Is something supposed to be here? But just broke off? Thats the only thing I can think of.

Thanks,
J
 

Attachments

appalacious

New member
239
7
0
Location
Perry, GA
I went there before i posted this. I couldn't find that winged piece in the diagram at all.
Plus the diagram was pretty small. Does anyone have first hand knowledge?
J
 

appalacious

New member
239
7
0
Location
Perry, GA
Thanks clinto, that picture is definitely alot better than the one I saw on LMC, of course I could've just missed it altogether.

I never saw that winged metal piece that I have on my truck in the diagram. I wonder what the deal is with that.
J
 

319

Lieutenant
Steel Soldiers Supporter
3,348
49
48
Location
Michigan
appalacious,
Looking closer at your photo, I realize now that it's the outside of the tailgate. Those studs (#1) are broken from the window crank casting. You'll need to replace the entire assembly. Can you post a photo of what you bought off of e-bay?

Clinto, did you get your's fixed? I cannot get my lock cylinder to stay in the crank assembly and was wondering what I may be doing wrong. I'm not missing parts and the lock cylinder is not damaged.
 

maritimer

New member
404
3
0
Location
Yarmouth, NS
ok the red circles in firs tpic are broken studs they are supposed to be attached to the base of the crank handle like i circled in second pic. the wingnut looking thingy in fiorst pic should slide into the clutch thincy in the handle both circled in green.

to gain access to the broken studds to permit install of new handle first lower tail gate and find either a table or saw horse that is close to height as the window slot cover with blanket. roll out window and rest on balnket covered thingy. next remove inspection hatch on the inside of tailgate, this will allow access to the regulator mech, un bolt the steel track the window sits in fro mregulator arms and make sure it is out of the way * should pull otu with glass as one piece, next unbolt regulator and remove *takes soem swearing and what not to get at soem of the bolts* once removed now is a good time to clean and grease regulator gears and tracks. on the back side of the regulator you should see the wingnut looking thingy i circle in first pic. anyway. you should see the 2 broken studs with nuts attached on the inside of tail gate now undo the nuts and the studs shoudl fall on the floor, now your new handle should slide in place and be bolted back to the tailgate. now reverse the process and start installing the regulator back in place * at this point you may need to rotate the crank handle to get the ears to mesh with the clutch thingy so the regulator can set in properly. bolt the regulator in, slide the glass back int othe tailgate and re-attach the glass track to the regulator. once this is done check for fit and function *rool the window up and down before closing the tailgate. ocne everything is working smoothly re-attached inspection hatch cover and close tail gate. then go to fridge and grab a cold refreshment and smile.

edit to add it seems you are missing the item i circled in third pictire in blue goes between the 2 green circled items talk to clinto about the actual name and part number as when i did mine i just made one out of some pipe and creative welding/grinding.
 

Attachments

Last edited:
Top
AdBlock Detected

We get it, advertisements are annoying!

Sure, ad-blocking software does a great job at blocking ads, but it also blocks useful features of our website like our supporting vendors. Their ads help keep Steel Soldiers going. Please consider disabling your ad blockers for the site. Thanks!

I've Disabled AdBlock
No Thanks