• Steel Soldiers now has a few new forums, read more about it at: New Munitions Forums!

  • Microsoft MSN, Live, Hotmail, Outlook email users may not be receiving emails. We are working to resolve this issue. Please add support@steelsoldiers.com to your trusted contacts.


Remove/Install rear main seal NHC250 M809

MyothersanM1

19K M1 Armor Crewman
Steel Soldiers Supporter
1,954
401
68
Location
Culver City, CA
UPDATE 18AUG12: The job is done! See page 2 post 19 & 20 for details...

UPDATE 08AUG12: I have pretty much figured this all out. Please read on as I post the details of my progress.


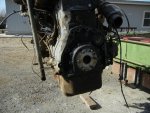
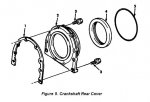
I have removed all components involved to get into the flywheel housing of the NHC250 in my M818. Now, TM -34-1 shows, and I have read it exhaustively, the flywheel housing removed to change out the rear main seal by removing the rear cover/oil seal housing from the block.

However, the TM also shows the seal can be installed after the rear cover/oil seal housing is bolted back into the block. This would lead me to believe that one should be able to remove the seal without going through all of the above trouble.

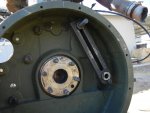
I can look between the crank flange and surrounding metal (rear cover or seal casing?) and see where the seal material meets the flange. I have made an attempt to remove the seal to no avail and I fear I have fouled something up.

Has anyone tackled this endeavor and, if so, how did you remove and reinstall the rear main seal.

Here are pics of where I am at:

Rear Main Seal-Clutch Job 008.jpgRear Main Seal-Clutch Job 009.jpgRear Main Seal-Clutch Job 007.jpg
 
Last edited:

WillWagner

The Person You Were Warned About As A Child
Super Moderator
Steel Soldiers Supporter
8,387
2,394
113
Location
Monrovia, Ca.
I've never seen that type of rear seal carrier. Hopefully somebody else has done a rear seal on an NHC and can help out. It SHOULD come out with a slide hammer and screws. As for going together, the seal should be a teflon lip seal that comes with an installation sleeve. Push the seal onto the crank and use a small hammer to start it and get the lip past the end of the crank then use a 2x to tap it in all the way. Good luck Brian, keep us updated.
 

MyothersanM1

19K M1 Armor Crewman
Steel Soldiers Supporter
1,954
401
68
Location
Culver City, CA
Update: Talked to the guys down at Memphis Eq. and they said the bell housing needs to come off with the style I have to get to the rear cover/oil seal housing. They also said very rarely, if at all, does the bell housing need to dialed back in. My seal should be here this week, so, probably this Sat. we'll dig deeper into this bad boy. My big concern is not taking off the housing it's safely suspending/jacking the engine while the housing is off.

Will, the O-ring goes on the back end of the rear cover where it meets the bell housing. Why? I don't know. Don't see why you would need one there. That should be a dry location between the housing and the block. Are we keeping something in or something out? Nonetheless, I ordered a new o-ring anyway.

I find it funny the military would design this truck with the rear main seal in such a work intensive locationaua. Pulling the tranny, clutch and flywheel is one thing, OK, but having to remove the starter, flywheel housing and rear cover is a-whole-nother animal:roll:. Oh, well, just my thoughts.
 

WillWagner

The Person You Were Warned About As A Child
Super Moderator
Steel Soldiers Supporter
8,387
2,394
113
Location
Monrovia, Ca.
Glad you found an answer. Keep the pics coming, looks like we need this type of documentation here since it as so hard to find.
 

gringeltaube

Staff Member
Super Moderator
Moderator
Steel Soldiers Supporter
6,882
2,260
113
Location
Montevideo/Uruguay
Wish I had "been there...."
The folks at Memphis should know better but.... the longer I look at your pics, the more convinced I get that there is no extra seal housing behind that "hump", for this engine version.
It just wouldn't make sense, all that work - to almost having to pull the engine to fix a leaking main seal...!
My theory is that here, the flywheel housing carries the seal. And that preformed packing (O-ring), somewhere between block and housing, is needed to keep oil in - and water out of the engine.

In the image below I can only see three different parts and if I'm not completely mistaken that area indicated with a blue arrow IS the seal casing. If so you should be able to pull it out with the common tricks (and precautions) applicable to any seal.

I concur with Will regarding the installation method for the replacement (teflon) seal - which BTW, would also apply to the other "open" style flywheel housing, to put the rear cover back in place, with the new seal already pressed in. (diagram, below... out of TM 9-2320-260-34P1, page 44, w/ typo fixed!)

Many IF's... but sure enough we will find out after you get the new seal plus instructions...


G.
 

Attachments

MyothersanM1

19K M1 Armor Crewman
Steel Soldiers Supporter
1,954
401
68
Location
Culver City, CA
We were not allowed to do that type of repair. Just replaced the power unit.
This repair is listed in the -34-1. So, I guess that would make it a third echelon/third shop or higher job. Not a simple motorpool/field fix. As far as tanks go, the unit maintenance could pull a power pack and change out small parts such as a starter. However, a turbine replacement was done by the third shop. Don't ask me how I know.

Maybe it was for waterproofing while fording ? Wouldn't want water in the engine or clutch .


That's a good point. I guess if you forgot the the fording plug at the bottom of the housing or in an emergent situation.
There are still areas around the bell housing where moisture could seep in.
 

MyothersanM1

19K M1 Armor Crewman
Steel Soldiers Supporter
1,954
401
68
Location
Culver City, CA
Wish I had "been there...."
The folks at Memphis should know better but.... the longer I look at your pics, the more convinced I get that there is no extra seal housing behind that "hump", for this engine version.
It just wouldn't make sense, all that work - to almost having to pull the engine to fix a leaking main seal...!
My theory is that here, the flywheel housing carries the seal. And that preformed packing (O-ring), somewhere between block and housing, is needed to keep oil in - and water out of the engine.

In the image below I can only see three different parts and if I'm not completely mistaken that area indicated with a blue arrow IS the seal casing. If so you should be able to pull it out with the common tricks (and precautions) applicable to any seal.


I concur with Will regarding the installation method for the replacement (teflon) seal - which BTW, would also apply to the other "open" style flywheel housing, to put the rear cover back in place, with the new seal already pressed in. (diagram, below... out of TM 9-2320-260-34P1, page 44, w/ typo fixed!)


Many IF's... but sure enough we will find out after you get the new seal plus instructions...


G.


I have attempted to remove the seal via the blue arrow ring and I get not a budge. The elusive o-ring is behind that ring on the outer edge butting up to the flywheel housing. This leads me to believe the blue arrow ring is in fact integral to the rear cover/oil housing and I have messed up the outer edge of the cover. I shined a flashlight between the crank flange and this ring and I can see the oil seal. I can say it is pretty deep in there.


What is frustrating to me is the TM -34-1 says upon disassemble of the rear cover from the block (absent the bell housing) the seal is removed after the cover is off. BUT, here's what throws me. When you put it back together the instruction says the seal goes in (from behind) after the cover is installed on the block. If the latter is true, one should also be able to remove it from behind through the bell housing. Not the case.

I guess I'll be the sacrificial lamb and dive headlong into this. I'll report back all my findings. Now, where's that digital camera...
 
Last edited:

MyothersanM1

19K M1 Armor Crewman
Steel Soldiers Supporter
1,954
401
68
Location
Culver City, CA
Update: More parts

An update on this job. I have accumulated some more parts over the last few days and I thought I would post some pics and info on them.

Rear main seal w/ installation sleeve: I ordered it under p/n 3006737 (the number listed in TM -34-1) from
https://truckhelp.com/shop/product/cummins-3006737/ It also comes up p/n 211253 in the Cummins NHC250 parts catalog along with the above p/n. I ordered from Truck Help and got a USA made part not an imported knock off.

Rear Main Seal-Clutch Job 017.jpgRear Main Seal-Clutch Job 018.jpgRear Main Seal-Clutch Job 022.jpgRear Main Seal-Clutch Job 025.jpgRear Main Seal-Clutch Job 026.jpg

I also was able to find and order, on eBay from the same seller, the o-ring for the rear cover/oil seal housing and rubber seals for the bell housing bolts.

O-ring p/n 137075 (p/n is different on the packaging):
Came as a lot of three from the seller. So, now I have extras.

Rear Main Seal-Clutch Job 024.jpgRear Main Seal-Clutch Job 023.jpg

Bell housing seals p/n 172648: I bought two lots of five for ten. The job requires nine.

Rear Main Seal-Clutch Job 019.jpgRear Main Seal-Clutch Job 020.jpg

I figure if I can get the part and I'm in there it's going to get replaced.

I am seeing an issue with the seal installation sleeve. Once everything is together there is no way to remove it without some type of assitance as it sits too deep inside the rear cover. I plan on attaching some fishing line to it and pulling it out that way. Anybody have any other thoughts?
 

MyothersanM1

19K M1 Armor Crewman
Steel Soldiers Supporter
1,954
401
68
Location
Culver City, CA
Oil Seal Housing details

Well, since I drilled into the outer edge of the oil seal housing (AKA rear cover), I decided to purchase a new one. I ordered it from Memphis Eq. under p/n 216165. The part is actually two parts, the oil seal housing and the outer ring/o-ring carrier. Mine came with the large o-ring installed. Now I have extras.
Rear Main Seal-Clutch Job 027.jpgRear Main Seal-Clutch Job 028.jpg

The outer ring bolts to housing using two ¼” bolts with lock washers. TM-34-1 (pp. 3-186 to 3-187) neglects to tell us this is a two-part piece. Yes, the oil seal can be installed from behind, but only after the outer ring is removed. TM also states to install the o-ring in the rear cover. No, the o-ring installs in a channel below the outer ring lip on the outside of the whole assembly. The o-ring creates a seal between the two. The very outer lip of the o-ring carrier is what is seen between the crank flange and the bell housing. Do not drill into this thinking you are going to pull out the oil seal. The oil seal sits a whole inch or so inside the outer ring.
Rear Main Seal-Clutch Job 007A.jpg

On the rear/bottom of the housing is semi-circle cutout for oil drain back to the oil pan.

Rear Main Seal-Clutch Job 030.jpg

To eliminate any confusion, the rear and front of the housing are in relation to the rear of the engine block. So housing rear faces vehicle front and vice-versa.
 

MyothersanM1

19K M1 Armor Crewman
Steel Soldiers Supporter
1,954
401
68
Location
Culver City, CA
Install seal into housing

There is a prominent lip in the housing portion to seat the seal against. I first test-fitted the seal into the housing with the seal lip facing into what would be the engine block. Using a soft plastic headed hammer, I drove the seal fully into seat using light taps as I went around the circumference of the seal. Once driven in, the seal should sit flush with the outer edge of the housing. There is really no need, but do not use any lubricants on the seal as it is to be installed dry on to the crank flange.
Rear Main Seal-Clutch Job 029.jpgRear Main Seal-Clutch Job 031.jpgRear Main Seal-Clutch Job 032.jpgRear Main Seal-Clutch Job 033.jpg

I temporarily bolted the outer ring to the housing for storage until the work session. During the install the outer ring must be remove so you can pull out the plastic installation sleeve once the seal and its housing are in place.
Rear Main Seal-Clutch Job 034.jpgRear Main Seal-Clutch Job 035.jpgRear Main Seal-Clutch Job 036.jpgRear Main Seal-Clutch Job  037.jpg


Next time, I will pull the bell housing and install the oil seal housing and put it all back together again.
 

Ord22

Member
571
3
18
Location
Stockbridge, Ga
This repair is listed in the -34-1. So, I guess that would make it a third echelon/third shop or higher job. Not a simple motorpool/field fix. As far as tanks go, the unit maintenance could pull a power pack and change out small parts such as a starter. However, a turbine replacement was done by the third shop. Don't ask me how I know.


That's a good point. I guess if you forgot the the fording plug at the bottom of the housing or in an emergent situation. There are still areas around the bell housing where moisture could seep in.
That is true. The rear main seal is 3rd shop to repair.
 

MyothersanM1

19K M1 Armor Crewman
Steel Soldiers Supporter
1,954
401
68
Location
Culver City, CA
:ditto:Wish me luck. Diggin' deep tomorrow. Gonna get this "son-of-a-beehive mother fletcher" running, if I have to tear my last strands of hair out.[thumbzup]
 

MyothersanM1

19K M1 Armor Crewman
Steel Soldiers Supporter
1,954
401
68
Location
Culver City, CA
Oil seal install

I have been slacking off in my reporting, so here goes…

Last Saturday my neighbor and I finished up the rear main seal/clutch job. All went fairly well. We started by unbolting the starter from the flywheel housing. Using a cargo strap, we suspended it from the forward engine-lifting ring to avoid having to disconnect all associated wring.

We undid the rear engine mounting bolts from the frame mounts to prep the engine for jacking and flywheel housing removal. I don’t know if they needed it, but I soaked the bolts with PB Blaster a few days prior just in case the bolts wanted to be stubborn. They came off without any issue. I did not have any access to a large gantry or crane. So, using a 4-ton floor jack and a 4 x 6 block of wood, the engine was jacked up just far enough to place another 4 x 6 block and a 12-ton jack stand. We jacked from the flywheel housing only using the oil pan for static support. I do not recommend jacking from the oil pan. Anyway, it all worked fine. But, I tell you, that engine is heavy!


Rear Main Seal-Clutch Job 038.jpgRear Main Seal-Clutch Job 040.jpgRear Main Seal-Clutch Job 039.jpg


The flywheel housing was nice and tight to the block after removing the oil pan and block bolts. This is a good thing meaning the housing will not have to be redialed upon reinstall. Using a 2 x 4, hammer and a large screwdriver for prying, the housing was coaxed off the back off the block and the alignment pins. The housing is aluminum and is easily removed by one person. My neighbor scraped all old gaskets off and cleaned the housing.


Rear Main Seal-Clutch Job 044.jpgRear Main Seal-Clutch Job 045.jpg


Now, with the oil seal hosing exposed, I was able to remove it. I immediately noticed the seal housing is of a one-piece design different from the nicer two-piece I ordered, a little more on this later. I undid the eight block bolts and four oil pan bolts. The seal housing required a bit of prying due the sealant put on it by whoever worked on it before me. Once loose it slid off. One problem here, which I now must correct, is the rear portion of the oil pan gasket came off too.

I cleaned off all old gasketing and sealant. I inspected the crank flange, which is still clean, smooth and free of gouging. I cleaned everything with brake cleaner and got it all good and dry. Remember, the seal must go on dry. I used some Permatex Blue Gasket Maker in absence of a paper gasket between the block and the housing. I placed the installation sleeve on the crank flange, pushed the pre-assembled new seal and housing onto the block then removed the installation sleeve. All bolts were installed with new Grade 8 lock washers and torqued to spec. I smoothed out the blue gasket maker and cleaned off all excess. After some curing of the gasket maker, all bolts were torqued again. If you use the two-piece housing, I would not recommend torquing the two small bottom bolts on the housing outer ring. They ¼” bolts and I would not want to see them shear off.

Rear Main Seal-Clutch Job 043a.jpgRear Main Seal-Clutch Job 046.jpgRear Main Seal-Clutch Job 047.jpg


Not really all that difficult to actually change the seal, it’s the road getting to it that is all consuming. I’m not going to get long winded here, but everything else goes back together in reverse order (and per the TM)…flywheel housing, starter, flywheel, clutch disc, pressure plate (don’t forget to remove shipping bolts if your new PP comes with them) and transmission.


MyothersanM1

19K M1 Armor Crewman
Steel Soldiers Supporter
1,954
401
68
Location
Culver City, CA
Old one-piece oil seal housing

A note about the single piece oil seal housing, the TM is still incorrect in saying to install the housing then the seal. The seal must be driven into the one-piece housing from behind. The two-piece design will allow one to remove and install the seal with the housing still attached to the block by the two bottom block bolts and four oil pan bolts. My old seal was not installed with great care, as there were many divots all away around the inner side of the metal ring.

Rear Main Seal-Clutch Job 048.jpgRear Main Seal-Clutch Job 049.jpgRear Main Seal-Clutch Job 050.jpg


I hope this write-up will be of assistance to those in the future who will be changing out their rear main seal. Please feel free to contact me if you have any thoughts, concerns or questions. Now it’s time to change the oil pan gasket….
 
Top
AdBlock Detected

We get it, advertisements are annoying!

Sure, ad-blocking software does a great job at blocking ads, but it also blocks useful features of our website like our supporting vendors. Their ads help keep Steel Soldiers going. Please consider disabling your ad blockers for the site. Thanks!

I've Disabled AdBlock
No Thanks