
sierrajcharlie
New member
- 144
- 0
- 0
- Location
- Farmersburg, Iowa
I couldn't find anything on the topic so I decided to give it a try. This is from a 84 M1009 and dealing with a rear black out light. It was one with three wires to it. I thought of showing how I did it about half way thru the process, so that's when I started taking pictures.
Materials needed: A couple of feet of 16 gauge wire, a 1/4x1 1/2 in carriage bolt with nut, washer, lock washer, a few 16 gauge crimp connectors and some heat shrink.
Tools: A pencil soldering gun, 1500 watt+/- soldering gun, solder, flux, screwdrivers, 7/16 socket and drive, drill and 1/16 in. drill bit, wire stripper
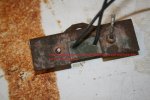
Start by removing the light, just get if over with and twist off the bolt. That's what the carriage bolt is for. Just leave the other nuts alone, break them both off and you'll loose your lights ground.
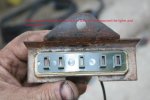
Pry off the cover with a screwdriver, remove the inner cover to expose the solder connections and lights. Use your pencil gun to remover the solder on the existing wires. This will also create a starting hole for your bit.
Now drill a hole removing the existing wire and solder, all the way thru the light. As straight as possible. Strip the wire, put some flux on the wire, then push it thru the hole, outside to the inside of the light. On the inside leave the wire a bit long so you have somewhere to put the soldering gun onto to heat up the wire. I had to use the bigger gun because the pencil gun didn't have enough power to heat the wire. I tinned the tip first so when the wire itself was hot enough the flux sucked in the solder and let a nice top on the wire.
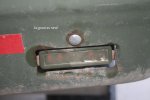
Once you've got the wires taken care of put the light back together and put it back on the truck. Since I didn't know which wire went where I stripped the wires a bit on the truck and light then turned on the lights. Make sure you've got the ground hooked to the light. I had just enough wire on the light to just crimp the truck wire onto it. Now just touch the wires together until you have the right combination. Now just use the crimp connectors, first put the heat shrink on, heat it up and you're done!
Actual time to do one light was about a hour. It took a lot longer than that figuring out what to do and find a small enough drill bit. Hope this helps somebody out there.
Materials needed: A couple of feet of 16 gauge wire, a 1/4x1 1/2 in carriage bolt with nut, washer, lock washer, a few 16 gauge crimp connectors and some heat shrink.
Tools: A pencil soldering gun, 1500 watt+/- soldering gun, solder, flux, screwdrivers, 7/16 socket and drive, drill and 1/16 in. drill bit, wire stripper
Start by removing the light, just get if over with and twist off the bolt. That's what the carriage bolt is for. Just leave the other nuts alone, break them both off and you'll loose your lights ground.
Pry off the cover with a screwdriver, remove the inner cover to expose the solder connections and lights. Use your pencil gun to remover the solder on the existing wires. This will also create a starting hole for your bit.
Now drill a hole removing the existing wire and solder, all the way thru the light. As straight as possible. Strip the wire, put some flux on the wire, then push it thru the hole, outside to the inside of the light. On the inside leave the wire a bit long so you have somewhere to put the soldering gun onto to heat up the wire. I had to use the bigger gun because the pencil gun didn't have enough power to heat the wire. I tinned the tip first so when the wire itself was hot enough the flux sucked in the solder and let a nice top on the wire.
Once you've got the wires taken care of put the light back together and put it back on the truck. Since I didn't know which wire went where I stripped the wires a bit on the truck and light then turned on the lights. Make sure you've got the ground hooked to the light. I had just enough wire on the light to just crimp the truck wire onto it. Now just touch the wires together until you have the right combination. Now just use the crimp connectors, first put the heat shrink on, heat it up and you're done!
Actual time to do one light was about a hour. It took a lot longer than that figuring out what to do and find a small enough drill bit. Hope this helps somebody out there.
Attachments
-
 58.1 KB Views: 62
 -
 55.3 KB Views: 56
 -
 48.3 KB Views: 62
 -
 38.7 KB Views: 60