• Steel Soldiers now has a few new forums, read more about it at: New Munitions Forums!

  • Microsoft MSN, Live, Hotmail, Outlook email users may not be receiving emails. We are working to resolve this issue. Please add support@steelsoldiers.com to your trusted contacts.

Replacing M998 Fan Questions

avlon01

Member
128
5
18
Location
Genoa City, WI
I managed to break most of my fan blades when I entered deep water too fast. Now I need to fix it!

I was able to remove the old fan by first disconnecting the fan hose from fan drive then removing the nuts and lock washers. The old fan slid out easily since when the blades broke they also took out a good part of the fan shroud. Unfortunatly the new fan will not fit inbeween the fan shroud and the fan drive. I need to disconnect the fan drive and have the TM in front of me.

But I'm stuck.

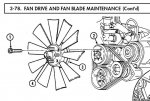
The TM says to use a hex head driver, 8mm to remove four socket head screws so I can remove the fan drive assembly. I CANNOT figure out what tool it's calling for. It looks like I need a deep hex head driver, but I don't see anything it will go into.

Any help is appreciated since the Humvee has now been stranded for almost 24 hours.

I'm trying not to have it towed or pull the entire cooling stack.


Sent from my iPhone using Tapatalk
 
Last edited:

infidel got me

Well-known member
1,679
32
48
Location
Newberry, Florida
Tried to do just what you are trying to do. I ended up pulling the stack. Make sure you didn't damage your shroud. I replaced my fan blade with a new one from kaskar before my truck left my driveway!
 

NDT

Well-known member
Steel Soldiers Supporter
10,458
6,532
113
Location
Camp Wood/LC, TX
If you drive it out barely over engine idle, the fan won't need to come on. Watch the temp gauge.
 

avlon01

Member
128
5
18
Location
Genoa City, WI
I have a new fan from a local supplier. My shroud is shot, but for right now I'm not too worried. I just need to get it moving so I can get it home and it won't get towed.

I'm trying to figure out how to get part #1 unscrewed. I can stick my pinkie finger in the hole the screw is supposed to be in, but it just feels like a solid piece of metal. I'm not sure where that bolt actually is.

hmmwv fan.jpg

If I can get that part off, I can get my fan installed without having to pull the whole stack. I'm a bit over a half-hour away from home if I take the highway, closer to 45 min via backroads, so I can't drive it home.
 
Last edited:

NDT

Well-known member
Steel Soldiers Supporter
10,458
6,532
113
Location
Camp Wood/LC, TX
Oh, don't you have to apply pressure to the clutch and turn it until the allen screw comes into view?
 

dilvoy

Active member
733
25
28
Location
San Francisco, Ca.
You need to rotate the part that the fan was attached to so you can have the four allen head bolts appear in the four holes so you can unscrew them. You could try loosening or removing the little screws at the rear of the clutch assy that tighten the phenolic piece. That should allow you to easily rotate the forward portion of the fan clutch assy, but those allen head bolts should be lock tighted in place so it will be a challenge with the cooling stack in place, unless you have an impact drill driver to use.
 

Bulldogger

Well-known member
Steel Soldiers Supporter
1,330
586
113
Location
Quantico VA
Dilvoy is correct. That you can't feel the allen screw head means the bolt head is out of sync with the opening, which is not unusual at all. You need to turn the fan independent of the housing behind it. You can try yanking, since the blades are broken anyway! The TM recommends you put air pressure on the fan clutch pressure hose fitting you disconnected the pressure line from. As it happens, at least on the last HMMWV I worked on, the thread size is the same size as a standard air compressor chuck fitting. If you have a set of air tools, pull off one of the inlet fittings, or grab a spare, then thread it into the fan hose threads and snap on the air line. It took us about 75psi to get the fan to turn IIRC.

Here's a tip no one mentioned yet: once you line up the hex bolt head and put the 8mm wrench on it, the fan will want to keep turning as you try to break it loose (wow were they tight on the one I was working on!). Try putting a deep well socket through the hole in the fan that matches the diameter of that hole, and then put the 8mm socket through the center of the socket. This will let the 8mm turn inside the socket while the outside of the socket keeps the fan from turning and getting off center from the hole/bolt lineup. I thought of this after doing the aforementioned fan removal, and would love to hear if it works!

Best of luck,
Bulldogger
 
Last edited:

avlon01

Member
128
5
18
Location
Genoa City, WI
Just an update -

I was able to beat the new fan in and attach it without having to remove the whole assembly. It helped (?!) that when the old fan let loose it took out most of my shroud.

Attached new fan, attached hose, and drove home. No issues.

Now it's off to the shop for a replacement fan shroud assembly.
 
Top
AdBlock Detected

We get it, advertisements are annoying!

Sure, ad-blocking software does a great job at blocking ads, but it also blocks useful features of our website like our supporting vendors. Their ads help keep Steel Soldiers going. Please consider disabling your ad blockers for the site. Thanks!

I've Disabled AdBlock
No Thanks